Meta descriptions and branding have the most influence on search clickthrough, survey finds
The majority of participants also agreed that rich results improve Google search.
Please visit Search Engine Land for the full article.
The steps to financial freedom are here. Visit our site if you want to be financially free and live a wealthy lifestyle
The majority of participants also agreed that rich results improve Google search.
Please visit Search Engine Land for the full article.
Cheetos Popcorn, pretzel Pop-Tarts, Coke Energy, Mountain Dew Zero Sugar and Bud Light Seltzer all have two things in common: They’re all new additions to a brand’s product lineup, and they’re all the focal point of ads airing during the Super Bowl. This Sunday, several brands will be putting their latest offerings on display in…
The social media marketing week in review: A round up of news and announcements you may have missed.
Please visit Marketing Land for the full article.
The social media marketing week in review: A round up of news and announcements you may have missed.
Please visit Marketing Land for the full article.
Do you know how Google decides what website should be ranked number 1, 2, 3 and so on for any given keyword?
Well, they have an algorithm for that.
But as you know, algorithms aren’t perfect. That’s why Google continually tries to improve it.
One way that they try to improve their algorithm is through Search Quality Raters.
Google knows that they can always make their search results
better. And one way is to have humans review their listings for any given
keyword.
So, all around the world, Google has
people who manually review websites. And they review each website based on these
guidelines.
It’s kind of long and extensive, but it is important that the Quality Raters don’t directly impact rankings.
Instead, they give feedback to the engineers who code up the algorithm so they can make it more relevant to searchers.
First, I want you to log into your Google Analytics account and go to the audience overview report.

Then click on “Add Segment.”
Your screen should look something like this:
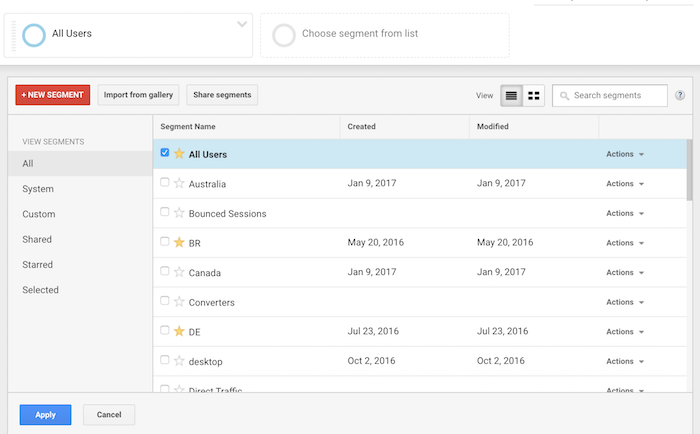
Then click on “+ New Segment.”
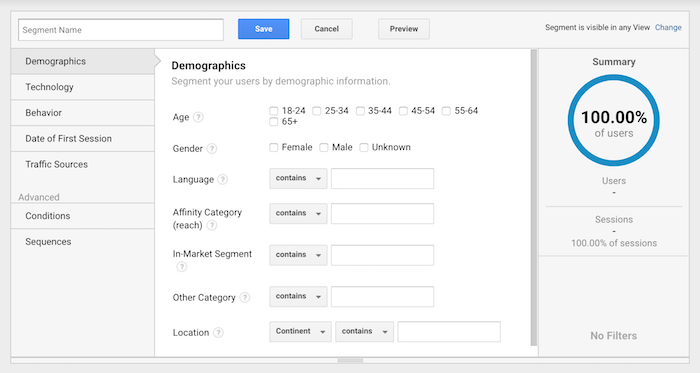
Your screen should look like the image above.
I want you to click “Conditions,” which is under the “Advanced” navigation label. Once you do that, fill out everything to match the screenshot below and click “save”.
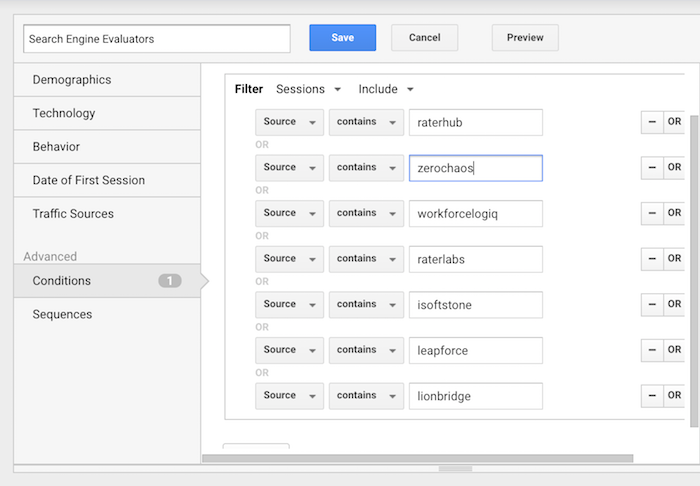
Just make sure that when you are filling out the table you are clicking the “or” button and not the “and” button. And make sure you select “Source” for the first column.
Now that you’ve created the new segment, it’s time to see if
any Quality Raters have viewed your site.
When you are in Google Analytics, you’ll want to make sure
you select the segment you just created.
If you copied my screenshot, you would have labeled it “Search Engine Evaluators.” And when you select it, you’ll probably see a graph that looks something like the image below.
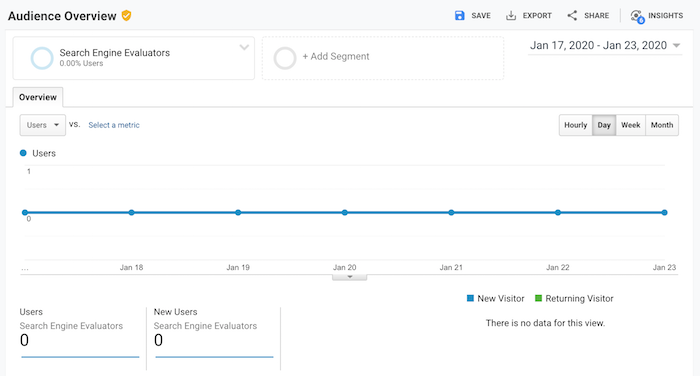
You’ll notice that no Quality Raters have been to my site
during the selected date period, which is common as they don’t visit your site
daily and, in many cases, they don’t come often at all.
The other thing you’ll notice is that next to the “Audience Overview” heading, there is a yellow shield symbol. If your symbol is green, then that’s good.
Yellow means your data is being sampled.
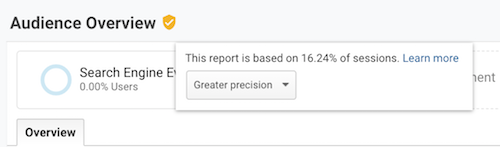
If you see the yellow symbol, reduce your date range and you’ll eventually see a green shield next to “Audience Overview” like the image below.
In general, it is rare that Quality Raters view your site each month. But as you expand your time window, you’ll be able to spot them.
And once you spot them, you can shorten the date range so the data isn’t sampled and then drill down to what they were looking at on your website.
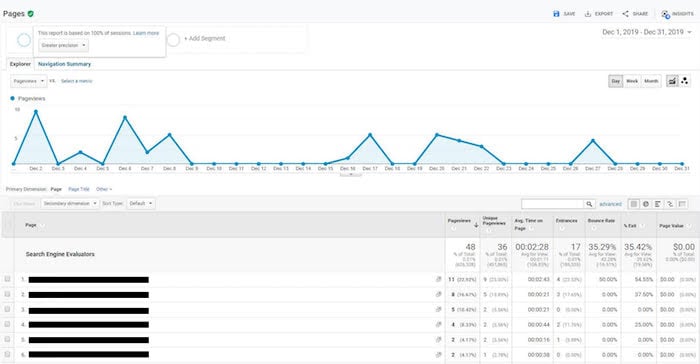
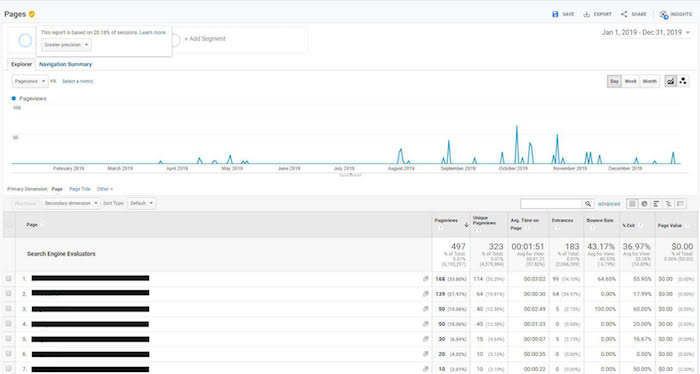
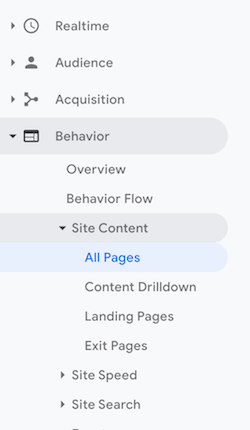
The key to analyzing what Quality Raters are doing on your site is to look at the “Site Content” report in Google Analytics and that will help you produce results that look like the screenshot above.
To get to that report, click on “Behavior,” then “Site Content,” and then “All Pages.”
The goal of a Quality Rater is to help improve Google’s
algorithm. And whether they have visited your site or not, your goal should
be to make your site the best site in the industry.
You can do so by doing the following 3 things:
If you have Quality Raters browsing your site from time to time,
don’t freak out. It doesn’t mean your rankings are going to go down or up.
And if you can’t find any Quality Raters visiting your site,
don’t freak out either. Because that doesn’t mean that you won’t ever rank well
in Google.
As your site gets more popular, you’ll notice a higher chance of Quality Raters visiting your site over time. This just means that you need to focus more on delighting your website visitors. Create the best experience for them and you’ll win in the long run.
So, have you spotted any Quality Raters in your Google Analytics?
PS: Special shoutout to Matthew Woodward who originally brought the Google Quality Raters segmentation to light.
The post How to Check if Google Manually Reviewed Your Site appeared first on Neil Patel.
Do you know how Google decides what website should be ranked number 1, 2, 3 and so on for any given keyword?
Well, they have an algorithm for that.
But as you know, algorithms aren’t perfect. That’s why Google continually tries to improve it.
One way that they try to improve their algorithm is through Search Quality Raters.
Google knows that they can always make their search results
better. And one way is to have humans review their listings for any given
keyword.
So, all around the world, Google has
people who manually review websites. And they review each website based on these
guidelines.
It’s kind of long and extensive, but it is important that the Quality Raters don’t directly impact rankings.
Instead, they give feedback to the engineers who code up the algorithm so they can make it more relevant to searchers.
First, I want you to log into your Google Analytics account and go to the audience overview report.
Then click on “Add Segment.”
Your screen should look something like this:
Then click on “+ New Segment.”
Your screen should look like the image above.
I want you to click “Conditions,” which is under the “Advanced” navigation label. Once you do that, fill out everything to match the screenshot below and click “save”.
Just make sure that when you are filling out the table you are clicking the “or” button and not the “and” button. And make sure you select “Source” for the first column.
Now that you’ve created the new segment, it’s time to see if
any Quality Raters have viewed your site.
When you are in Google Analytics, you’ll want to make sure
you select the segment you just created.
If you copied my screenshot, you would have labeled it “Search Engine Evaluators.” And when you select it, you’ll probably see a graph that looks something like the image below.
You’ll notice that no Quality Raters have been to my site
during the selected date period, which is common as they don’t visit your site
daily and, in many cases, they don’t come often at all.
The other thing you’ll notice is that next to the “Audience Overview” heading, there is a yellow shield symbol. If your symbol is green, then that’s good.
Yellow means your data is being sampled.
If you see the yellow symbol, reduce your date range and you’ll eventually see a green shield next to “Audience Overview” like the image below.
In general, it is rare that Quality Raters view your site each month. But as you expand your time window, you’ll be able to spot them.
And once you spot them, you can shorten the date range so the data isn’t sampled and then drill down to what they were looking at on your website.
The key to analyzing what Quality Raters are doing on your site is to look at the “Site Content” report in Google Analytics and that will help you produce results that look like the screenshot above.
To get to that report, click on “Behavior,” then “Site Content,” and then “All Pages.”
The goal of a Quality Rater is to help improve Google’s
algorithm. And whether they have visited your site or not, your goal should
be to make your site the best site in the industry.
You can do so by doing the following 3 things:
If you have Quality Raters browsing your site from time to time,
don’t freak out. It doesn’t mean your rankings are going to go down or up.
And if you can’t find any Quality Raters visiting your site,
don’t freak out either. Because that doesn’t mean that you won’t ever rank well
in Google.
As your site gets more popular, you’ll notice a higher chance of Quality Raters visiting your site over time. This just means that you need to focus more on delighting your website visitors. Create the best experience for them and you’ll win in the long run.
So, have you spotted any Quality Raters in your Google Analytics?
PS: Special shoutout to Matthew Woodward who originally brought the Google Quality Raters segmentation to light.
The post How to Check if Google Manually Reviewed Your Site appeared first on Neil Patel.
The social media marketing week in review: A round up of news and announcements you may have missed.
Please visit Marketing Land for the full article.
Did you know:
Pinterest is such a key part of the buying journey for its users that over 90 percent of weekly active Pinners use Pinterest to make purchasing decisions.
Talk about buying power!
Not only are Pinterest users making purchase decisions on the platform, 83 percent say they are making purchases specifically based on the content they’ve seen from brands on Pinterest.
Pinterest is no longer simply a place to save ideas and build dream boards. Instead, Pinterest has turned into the world’s largest visual discovery platform.
And there are a lot of opportunities for brands.
We had a chance to chat with the team over at Pinterest about some of their best practices for brands looking to increase sales. We’re excited to share those lessons with you!
Here’s what we learned…
According to one survey, “47 percent of social media users saw Pinterest as the platform for discovering and shopping for products—more than three times higher than those who cited Facebook or Instagram.”
Seventy-seven percent of weekly Pinners have also discovered a new brand or product on Pinterest, and according to Pinterest, “people actually want to see content from brands while they’re on the platform–78 percent say it’s useful.”
Pinterest might not immediately come to mind as a platform to invest in for many brands, but it should.
Pinterest lives in a unique space on the internet where users are discovering content related to themselves and their aspirations rather than focusing on others, and this has turned it into a powerful platform for users to make purchasing decisions and discover new brands and products.
Clearly, Pinterest is not one to be ignored when it comes to your marketing strategy. Here’s how you can use the platform to drive sales.
There are some really simple ways that you can start leveraging Pinterest to reach new audiences and optimize your pins and profile for sales. Some of these tips might be easy to implement immediately while others might play into later strategies, let’s dive in!
A whopping 97 percent of top searches on Pinterest are unbranded, according to the Pinterest team. For brands, this presents an opportunity to stand out and gain brand recognition through the platform.
Pinterest recommends adding a small logo in one of the four corners of your pin, this can be done really easily in a tool like Canva. You can play around with the design, of course, and add your logo wherever it feels best. In this example from Quip, they went with top centered to fit with the rest of the text on their image.

As with most sites, mobile is extremely important on Pinterest. Eighty-five percent of Pinners are using the mobile app, so it’s important that your content appeals to them while they’re on their phones and appears properly in their feeds. If you’re linking back to your own content, it’s also important that the page that you’re sending users to is mobile friendly as well.
A tip from Pinterest here is to tailor your font size to phone rendering to make sure your fonts are legible on small screens and to design for a vertical aspect ratio. The ideal dimensions are 600 pixels x 900 pixels.

Have you ever clicked on a beautiful image on Pinterest only to be taken to a website that looks nothing like the pin? I have, and it left me really confused.
According to Pinterest, the best practice is to make sure your pins and your website have a similar look and feel, and that doing this pays off. In an analysis from Pinterest, they found that “Pins that went to landing pages with similar imagery had a 13 percent higher online sales lift.”
This example from Ettitude is really great. The pin they are sharing fits seamlessly in a lot of home decor and design tags on Pinterest.

And although their website uses different photos, it still has a similar feel to the pin.

A big element to social media marketing and campaigns is timing. When are people online and when are people talking about the things you want to talk about?
Luckily in the case of Pinterest, they release annual ‘Seasonal Insights,’ which helps take away some of the guesswork. A report that contains more than a dozen specific moments that take place throughout the year.

For example, their 2019 report shared that users start sharing holiday content in June all the way through December and that content related to the Summer starts getting pinned at the beginning of February.
They also have monthly trends reports. Here’s their latest for December 2019 trends on Pinterest, it shares specific trends like the search term ‘peach green tea’ is up 320 percent YoY!
These are great free resources that you can leverage to start timing seasonal campaigns around when people are starting to make specific seasonal purchasing decisions. I would never have thought that people start looking at holiday content in June but that’s super-specific information that can go a long way to help with timely campaigns.
One of the main ways for Pinterest to help generate sales is for the products you are selling to be easily available through Pinterest. Luckily, the platform makes this really easy for brands to set up and feature prominently on their profiles.
Every Business profile on Pinterest has the ability for users to create a “shop” tab.

The shop tab is just what it sounds like, a place where users can go to see all of the products your brand is selling. On the flip side, brands can leverage that tab to share pins that link directly to their sales pages for the specific product.

Pinterest makes this whole process quite easy, they even have a method for importing new products through Pinterest Catalogs. All you have to do is have your data source approved and then as you add new products to your website, they get automagically added to Pinterest as well.
We hope this guide helps you get started with or double down on your efforts with Pinterest. Let us know about your experience with Pinterest in the comments!
If you want even more Pinterest resources, the Pinterest team has created a free Pinterest Academy with tons of lessons in there.
The social media marketing week in review: A round up of news and announcements you may have missed.
Please visit Marketing Land for the full article.
In 2017, 71% of small businesses had a website, and 92% of businesses without a website said they’d have one by the end of 2018. Today, having a website is as necessary for a company as having a phone number.
Maybe you’re starting a new business venture or developing your personal brand. Or, maybe you’re looking to update your company’s outdated website. Whatever the case, creating a new website can feel overwhelming, particularly without technical expertise or a budget for web developers.To alleviate any frustration you might feel, we’ve put together a comprehensive, step-by-step guide to creating a website. Best of all, you won’t need a coder, web designer, or big budget to create one — all you’ll need to do is follow the seven steps below.
The first thing you’ll need to do when creating a website is find the right CMS (content management system) for your business. There are plenty of free or budget-friendly site builders out there, but they aren’t all created equal, so you’ll want to weigh the pros and cons before choosing one.
For instance, consider whether you need a platform that allows you to code, or whether you’d like to avoid coding altogether. You might also narrow your list if you want your website to support multiple languages. Perhaps you simply want to check out templates offered by different CMS systems, or price ranges to see which you can afford.
Popular CMS systems include Wordpress, Squarespace, Wix, and, of course, HubSpot. In fact, the new HubSpot CMS will be released in 2020.
Check out 15 of the Best Free Website Builders to simplify your decision-making process. Once you’ve chosen the best CMS for your needs, continue to step two.
One of the easiest ways to appear illegitimate as a company is to shirk on paying for a domain name. If you were looking for a freelance writer, would you more likely hire from Carolineforsey.weebly.com or Carolineforsey.com? A .weebly or .wordpress extension is an indicator you didn’t pay for the full service, which might seem unprofessional or lower in quality — worst case, a consumer might wonder why you can’t afford the full service, and draw conclusions that you’re not fully established.
Fortunately, purchasing a domain name is typically inexpensive, and there are a few different domain sites you can use. Both Godaddy.com and Bluehost.com are cheap, secure, and effective options for buying a domain name, with added benefits such as SSL security and office 365.
Here’s where it gets tricky. You’ll need to choose a domain name as similar as possible to the name of your company, but with over 1.8 billion websites out there today, your company’s name might already be taken.
If your ideal domain name is already taken, consider using a different extension. I’d advise you to use one of the three most common extensions if you can: .com, .net, or .org. However, if it makes sense for your business, you might want to check out an alternate extension like .us or .shop.
Play around with it. Once you’ve chosen and paid for a domain name, you’ll usually also get personal email accounts attached, so make sure you’re happy to use your domain name as your main online identity.
Now, for the fun part.
On whatever CMS platform you chose, take the time to browse through templates and themes, and choose one you think best represents your brand.
When in doubt, you can’t go wrong if you choose something clean with straight lines, and a limited amount of text. If you need some inspiration, check out 27 of the Best Website Designs to Inspire You in 2020.
Ultimately, no one knows your business better than you. Take the time to consider which template would most likely appeal to your ideal demographic.
Within your CMS, you can probably use filters or search to narrow down on templates related to your industry.
It’s important your template is responsive, so your site will look the same on all devices. When considering templates, you also need to decide whether you want a static header or slideshow header, and how many pages you’ll need to fit in your menu bar. Stay away from hard-to-read fonts or flashy backgrounds that could distract a consumer from understanding your core message.
Once you’ve chosen a template and theme, take the time to customize it. Your site’s design and functionality is your chance to persuade an audience to take a closer look. It’s imperative your design makes sense to your ideal consumer and works to enhance your product’s success rather than hinder it.
It’s important to plan exactly which pages you’ll need to include in your site. While it varies business to business, I’d guess you’ll need at least a “Home” page, an “About Us” page, a “Services/Product” page, and a “Contact Us” page.
Of course, you can choose to rearrange page topics any way you want, or combine them. If you’re unsure, check out other company websites within your industry to get ideas for how to organize your navigation bar, or which pages to include and exclude.
I might be biased, but you should probably also include a blog — you know, sometimes they come in handy.
While every platform is different, it’s typically easy to add and remove pages on whichever platform you use.
This is arguably the most important step. Now that you have your pages set up, what will you put on them?
I’d suggest writing rough drafts for pages like your “About Us” page and landing page. Talk with coworkers and stakeholders — what message do you want to put out there? What tone do you want to set? Should you make jokes and be funny, or aim to be more inspirational?
If your online audience stumbled across your site, what questions would they have first?
Imagine your website is your only chance to have a full conversation with a potential customer. The home page is the preliminary introduction, “Hey, we do XYZ.” Your “About Us” page digs deeper, “We are XYZ.” And your products or services pages are your big push to the finish line: “You want to work with us? Great, here’s how you’ll benefit.”
During this stage, it’s imperative you do your keyword research.
For instance, if you’re selling eyeglasses, and you notice “retro eyeglasses” has more monthly search volume than “vintage eyeglasses”, you might use this research to steer the direction of the content on your site.
If you’re stuck, check out competitor’s websites to gauge what other companies in your industry are doing.
Once you’ve filled in your pages with the heavy-hitter content, you can still increase your search visibility by filling in gaps in your CMS settings.
Essentially, these are your SEO elements. On your pages, you should include:
Make sure you include a site title and tagline in the “Settings” of your website building platform. Go through, and check out the URLs — are those optimized for search?
All these elements should be optimized because it tells Google all about your website and how you provide value to visitors and customers. It helps your site be optimized for both human eyes and search engine bots.
Lastly, take a look at your site and figure out what you’re missing. The best CMS platform will ideally offer all the integrations you need.
Website plugins are individual services that improve a specific functionality of your site.
Perhaps your business is ecommerce, in which case, it might be wise to install a Shopify plugin extension.
Or, maybe you want to ensure your website is secure, to protect client data. In that case, find a plugin that offers firewall protection and attacks malware or other threats.
Plugins regarding security, SEO, image compression, and social media are necessities because it’s much easier to do all this work in one place rather than having to log on to several platforms.
Whatever the case, browse your plugin library and pick and choose a few you think will take the effectiveness of your site to the next level.
Once you’re ready, click “Publish”, and your site is ready for use.
Lastly, let’s take a look at how to make a website with HubSpot. If you’re not using HubSpot already, you can try the CMS free trial. If you’re already using HubSpot’s CRM, it probably makes the most sense to build a website within HubSpot to integrate all your sales and marketing needs in one place.
HubSpot offers a variety of plugins and extensions, themed templates, and sophisticated tools for SEO analysis.
If you want to build a website with HubSpot, it’s easy and intuitive. Here’s how:
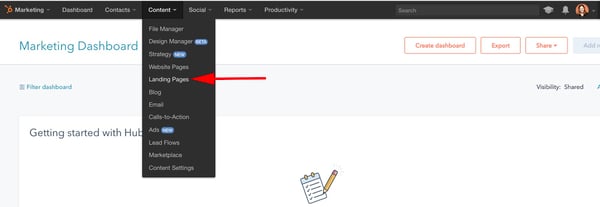
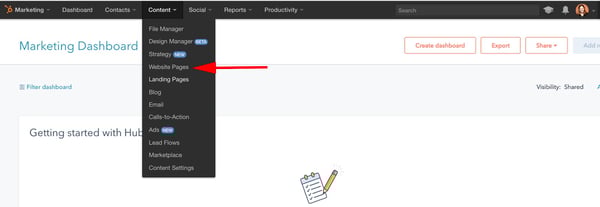
Within your HubSpot portal, click “Content” on the dashboard at the top of your screen. Then, click “Landing Pages”.
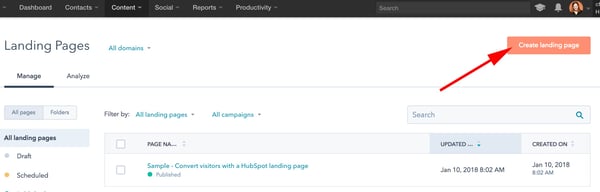
After that, click the orange “Create landing page” button and name your page.
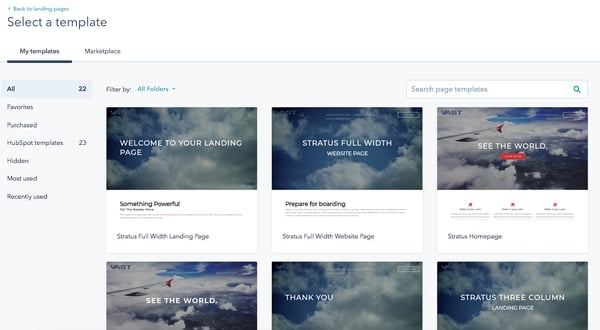
Now, you’ll be taken to this “Select a template” page. Scroll through your options, search page templates, or check out the Marketplace. When you’ve found a template you like, select it.
This is your landing page. You can scroll over text boxes, images, or other modules to edit them. In the below picture, I scrolled over the “See The World” Banner Text, and when I click it, it allows me to edit that text.

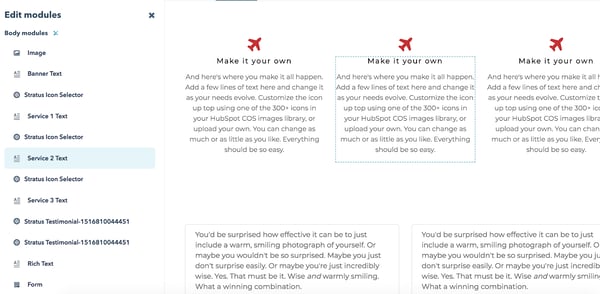
You can also click the “Edit modules” tool on the right side of your screen and edit from there. For instance, I selected “Service 2 Text”, which directed me to the “Make it your own” paragraph on my landing page. You can add text, images, sections, forms, and more from the “Edit modules” section.
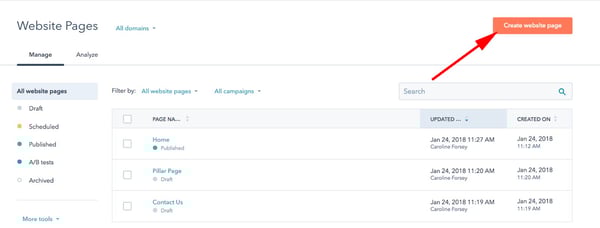
When you’re happy with your landing page and want to move on, go back to your dashboard and click “Content” at the top of your screen, and then “Website Pages”.
Here, you’ll click the orange “Create website page” button and name your page, just like your landing page. Then, you’ll be taken through a similar process of choosing a template and adding content. If you want a more in-depth tutorial, check out a quick tour of website pages.
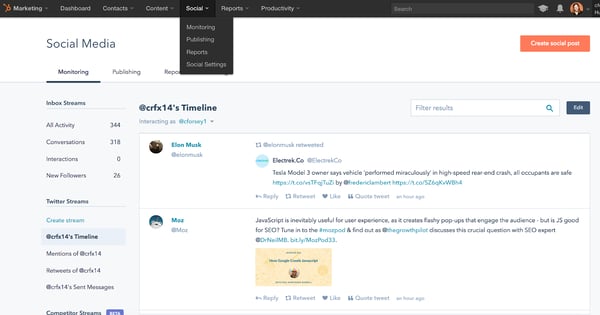
If you want to incorporate your social media accounts, click “Social” on your dashboard. You can monitor all your social media accounts and also publish tweets, Facebook statuses and comments, Instagram pictures, and other content straight from your HubSpot dashboard.
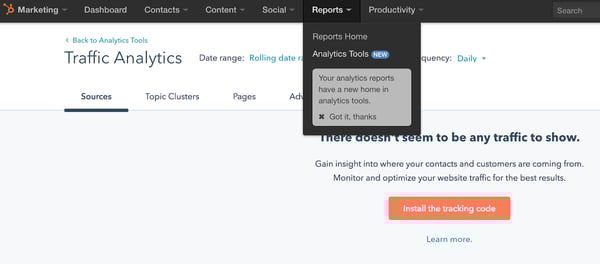
If you want to check out your site analytics, go to “Reports” and then “Analytics Tools”. You’ll need to install the tracking code, which is easy to do within the HubSpot platform by clicking the orange “Install the tracking code” button. If you’re still unsure, check out how to install the HubSpot tracking code.
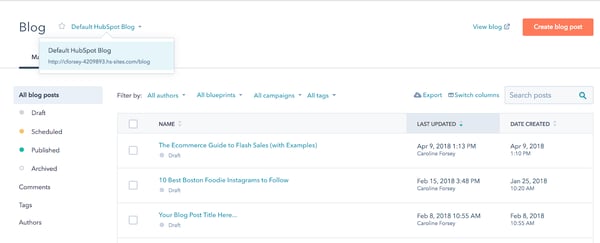
If you want to write blog posts, go to “Content” > “Blog” on your dashboard to create, publish, and monitor your website’s blog posts.
This is a fairly broad and general overview to get you started building a website with HubSpot, but there are plenty of more in-depth features and tools you might want to explore with a HubSpot specialist, or by checking out some articles on academy.hubspot.com.
Editor’s note: This post was originally published in May 2018 and has been updated for comprehensiveness.
![]()