If distraction prevents you from reaching the goals you truly want to achieve, this episode is for you. I spoke with Nir Eyal, international best-selling author of a new book called Indistractable: How to Control Your Attention and Choose Your Life. We talked about the simple yet powerful changes you can make to control your mind and use your time more effectively. You’ll also find lots of bonus content on the blog.
If distraction prevents you from reaching the goals you truly want to achieve, this episode is for you. I spoke with Nir Eyal, international best-selling author of a new book called Indistractable: How to Control Your Attention and Choose Your Life. We talked about the simple yet powerful changes you can make to control your mind and use your time more effectively. You’ll also find lots of bonus content on the blog.
If distraction prevents you from reaching the goals you truly want to achieve, this episode is for you. I spoke with Nir Eyal, international best-selling author of a new book called Indistractable: How to Control Your Attention and Choose Your Life. We talked about the simple yet powerful changes you can make to control your mind and use your time more effectively. You’ll also find lots of bonus content on the blog.
When I was 12 years old, I used to look through my older cousin’s CD collection, a little confused.
I didn’t understand the need to have CDs when I could go on my iTunes and listen to all my favorite songs. Then, when I was in middle school, I got my first hand-me-down iPod shuffle.
This is a great example of the product life cycle (PLC) in action. CDs were in the decline stage while the iPod was in the growth stage – more on the stages below.
Overall, the concept of the product life cycle is to help businesses make decisions on how to mature and grow in the marketplace.
As marketers, it’s important to understand how your marketing tactics and strategies will change depending on the stage your company is in.
For example, a brand new product will market differently than a well-established, mature product. On the one hand, the marketing will focus on raising awareness and on the other it’ll focus on maintaining awareness.
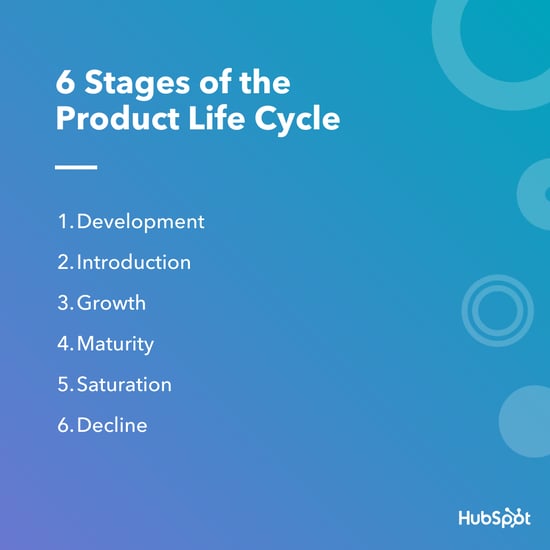
Below, let’s review the product life cycle — from learning about what it is, what the stages are, and looking at real-life examples.
1. Development
The development stage of the product life cycle is the research phase before a product is introduced to the marketplace. This is when companies bring in investors, develop prototypes, test product effectiveness, and strategize their launch. Due to the nature of this stage, companies spend a lot of money without bringing in any revenue because the product isn’t being sold yet.
This stage can last for a long time, depending on the complexity of the product, how new it is, and the competition. For a completely new product, the development stage is hard because the first pioneer of a product is usually not as successful as later iterations.
2. Introduction
The introduction stage is when a product is first launched in the marketplace. This is when marketing teams begin building product awareness and reaching out to potential customers. Typically, when a product is introduced, sales are low and demand builds slowly.
Usually, this phase is focused on advertising and marketing campaigns. Companies build their brand, work on testing distribution channels, and try to educate potential customers about the product. If those tactics are successful, the product goes into the next stage — growth.
3. Growth
During the growth stage, consumers have accepted the product in the market and customers are beginning to truly buy-in. That means demand and profits are growing, hopefully at a steadily rapid pace.
The growth stage is when the market for the product is expanding and competition begins developing. Potential competitors see success and want in. During this phase, marketing campaigns often shift from getting customers to buy-in to the product to establishing a brand presence so consumers choose them over developing competitors.
Additionally, as companies grow, they’ll begin to open new distributions channels and add more features and support services.
4. Maturity
The maturity stage is when the sales begin to level off from the rapid growth period. At this point, companies begin to reduce their prices so they can stay competitive amongst growing competition.
This is the phase where a company begins to become more efficient and learns from the mistakes made in the introduction and growth stages. Marketing campaigns are typically focused on differentiation rather than awareness. This means that product features might be enhanced, prices might be lowered, and distribution becomes more intensive.
During the maturity stage, products begin to enter the most profitable stage. The cost of production declines while the sales are increasing.
5. Saturation
During the product saturation stage, competitors have begun to take a portion of the market and products will experience neither growth nor decline in sales.
Typically, this is the point when most consumers are using a product, but there are many competing companies. At this point, you want your product to become the brand preference so you don’t start to enter the decline stage.
Again, marketers need to focus on differentiation in features, brand awareness, price, and customer service. The competition reaches its apex at this stage.
6. Decline
Unfortunately, if your product doesn’t become the preferred brand in a marketplace, you’ll typically experience a decline. Sales will decrease during the heightened competition and are hard to overcome.
Additionally, consumers might lose interest in your product as time goes on, just like the CD example I mentioned earlier.
If a company is at this stage, they’ll either discontinue their product, sell their company, or innovate and iterate on their product in some way.
To extend the product life cycle, successful companies can implement new advertising strategies, reduce their price, add new features to their increase value proposition, explore new markets, or adjust brand packaging.
The best companies will usually have products at several points in the product life cycle at any given time.
Example of a Product Life Cycle
Similar to the CD example above, let’s follow the product life cycle of the typewriter:
Development: Before the first commercial typewriter was introduced to the market, the overall idea had been developed for centuries, beginning in 1575.
Introduction: In the late 1800s, the first commercial typewriters were introduced.
Growth: The typewriter became a quickly indispensable tool for all forms of writing, becoming widely used in offices, businesses, and private homes.
Maturity: Typewriters were in the maturity phase for nearly 80 years, because this was the preferred product for typing communications up until the 1980s.
Saturation: During the saturation stage, typewriters began to face fierce competition with computers in the 1990s.
Decline: Overall, the typewriter couldn’t withstand the competition of new emerging technologies and eventually the product was discontinued.
However, not all products need to face the decline stage. Companies can extend the product life cycle with new iterations and stay afloat as long as they have several products at various points of the product life cycle.
Whether you’re developing a brand new product or working with a mature, well-established brand, you can use the product life cycle stages as a guide for your marketing campaigns.
By replacing the technical grind, AI will free marketers to focus on the part of the job that requires the most humanity – engaging and serving customers.
The market for no- and low-alcohol products in the U.S. is expected to grow about 32% between 2018 and 2022, and Anheuser-Busch is taking note. The beverage company, known globally as AB InBev, has introduced four new no- and low-alcohol beers (NABLAB) to its portfolio. The new products, which are made by craft brewers owned…
Every year, 80% of new year’s resolutions fail by the time February rolls around. Launching your email marketing strategy shouldn’t be one of them.
That’s why we created a simple, 7-day challenge to help you dominate email marketing in 2020.
By the end of it, you’ll have launched the most important parts of a successful email marketing strategy. And the best part? You only need 30 minutes or less each day to complete this challenge.
Day 1: Choose your email template and brand it. (30 minutes)
This step is often overlooked. Many people use different email templates every time they send an email. Or, they never fully customize a template to match their brand.
But branding an email template and using it consistently are important. Your brand sets you apart from your competitors. It allows you to be unique and develop a personality for your business. It builds credibility and trust between you and your subscribers. Your subscribers can see your content and immediately tie it back to you.
Step 1: Choose your email template. Find an email template that works with your brand and your message. A plain template is often better than one already filled with colors and background images, because it’s easier to make it your own. Then, add your logo to the top or bottom of the email. (Inside AWeber, there are 8 NEW email templates you can easily customize to fit your branding. Choose the template format you’d like. Then drag and drop to add your images and build the layout you want.)
Step 2: Add your brand colors to your template. Don’t overdo it! Too many colors can be distracting. Try adding your brand colors in just a few places, like your call-to-action buttons, header image, or headlines.
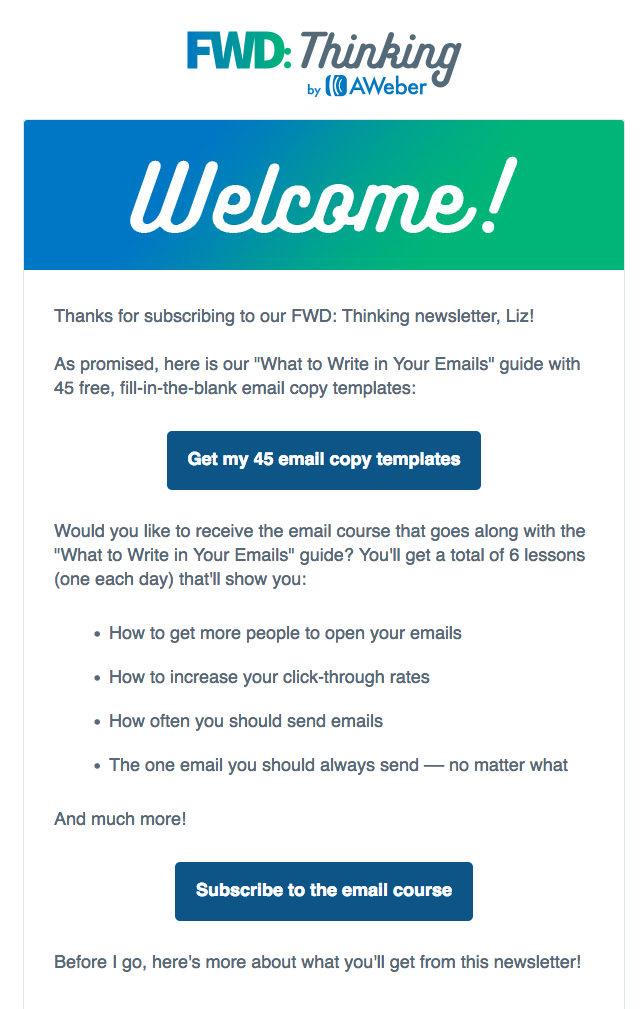
For example, in the welcome email of AWeber’s FWD: Thinking newsletter, we incorporate our brand colors by using a header image with AWeber’s green and blue gradient and a call-to-action button with our brand’s shade of blue.
To do: Choose an email template and add your logo and brand colors to it.
Day 2: Customize your confirmation message. (15 minutes)
A confirmed opt-in message is an email you send people immediately after they fill out your sign up form. It asks them to verify they want to subscribe to your emails by clicking a link or button in the message.
Confirmation messages are optional but strongly recommended. They serve as proof that your subscribers definitely want to be on your list. So internet service providers (like Gmail and Yahoo!) may deliver more of your messages to the inbox when you use confirmation messages. Plus, it prevents subscribers from signing up using fake email addresses.
To make your subscribers more likely to confirm their subscription, you can follow these common best practices for confirmed opt-in emails:
Keep your content short.
Explain the value your subscribers will receive by subscribing to your list.
To do: Set up and customize the subject line and content of your confirmed opt-in email. (If you’re an AWeber customer, you can follow these directions to complete this step.)
Day 3: Create a sign up form. (30 minutes)
Sign up forms allow your subscribers to easily join your email list. You can promote your form by adding it to your website and sharing a hosted sign up form with your audience. Hosted sign up forms allow you to share your form anywhere, even if you don’t have a website.
To do: Write your sign up form copy and build your form using ideas from the homework post you just read.
Day 4: Write your welcome email (30 minutes)
A welcome email is the first message subscribers receive after joining your list and confirming their subscription. And it gets a lot of attention — on average, open rates are 4 times higher and click-through rates are 5 times higher than other emails, according to marketing research company Experian. You can take advantage of this above average engagement by crafting an excellent welcome email.
Your welcome email should:
Welcome subscribers to your email list.
Deliver the lead magnet you promised on your sign up form.
Explain what kind of content you’ll send subscribers, how often you’ll send it, and what they’ll learn.
Introduce yourself or your business.
Ask subscribers to add you to their address book. (This is called whitelisting and it can help more of your emails bypass the spam folder.)
Once you draft your welcome email, take some time to personalize it! Personalization makes your subscribers feel you’re writing a message specifically to them. Something as simple as including your subscriber’s first name in the subject line or body of your welcome email can boost opens and clicks. Homework: Read The One Email You Should Always Send and How Personalization Can Help You Connect with Subscribers.
Day 6: Publish your form on your social media channels. (20 minutes)
Your list is set up and your confirmation and welcome messages are ready to go. Now it’s time to put your hard work to the test and start to grow your list!
An easy first step is turning you social media followers into email subscribers. People who follow your brand on social media have already shown they want to hear from you. And there’s no better way for them to stay up to date on your latest content and sales than joining your email list.
Post a link to your hosted sign up form on Facebook, Twitter, and LinkedIn and ask your social followers to subscribe for exclusive updates.
Day 7: Share your sign up form with your connections. (20 minutes)
Reach out to the people you already know, like colleagues, friends, or family members. Ask them if they want to sign up for your email list.
Let them know what content you are offering and explain the benefits they would receive if they sign up.
If they say no, maybe the content you’re offering just isn’t for them. But maybe they know someone it would be perfect for. You never know until you ask!
To do: Contact 5 people you know. Send them the hosted URL to your sign up form and ask if they’d like to join your email list or share it with someone they know.
Ready, set, go!
Congrats! If you completed this 7-day challenge, you’re well on your way to launching a successful email marketing strategy.
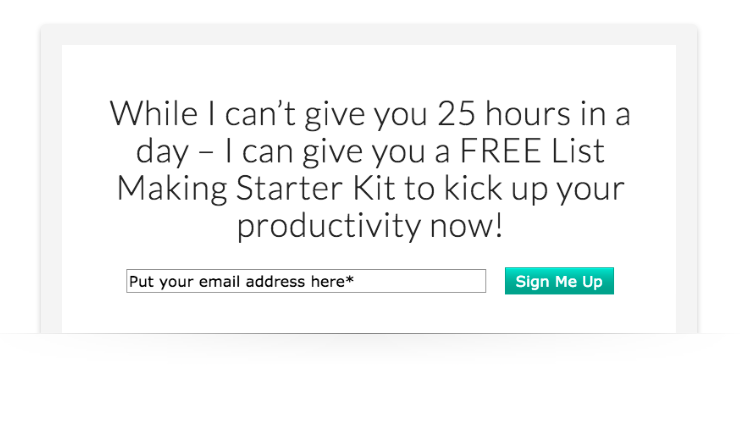
Ready for your next challenge? Then try this: Create a lead magnet — a freebie you give subscribers when they sign up for your list. Lead magnets can increase the conversion rate of your sign up form.
For example, author and productivity expert Paula Rizzo offers a free List Making Starter Kit in return for signing up for her email newsletter, which she sends via AWeber.
Pinterest is such a key part of the buying journey for its users that over 90 percent of weekly active Pinners use Pinterest to make purchasing decisions.
Talk about buying power!
Not only are Pinterest users making purchase decisions on the platform, 83 percent say they are making purchases specifically based on the content they’ve seen from brands on Pinterest.
Pinterest is no longer simply a place to save ideas and build dream boards. Instead, Pinterest has turned into the world’s largest visual discovery platform.
And there are a lot of opportunities for brands.
We had a chance to chat with the team over at Pinterest about some of their best practices for brands looking to increase sales. We’re excited to share those lessons with you!
Here’s what we learned…
How people are using Pinterest
According to one survey, “47 percent of social media users saw Pinterest as the platform for discovering and shopping for products—more than three times higher than those who cited Facebook or Instagram.”
Pinterest might not immediately come to mind as a platform to invest in for many brands, but it should.
Pinterest lives in a unique space on the internet where users are discovering content related to themselves and their aspirations rather than focusing on others, and this has turned it into a powerful platform for users to make purchasing decisions and discover new brands and products.
Clearly, Pinterest is not one to be ignored when it comes to your marketing strategy. Here’s how you can use the platform to drive sales.
How to leverage Pinterest for sales: 5 tips from the Pinterest team
There are some really simple ways that you can start leveraging Pinterest to reach new audiences and optimize your pins and profile for sales. Some of these tips might be easy to implement immediately while others might play into later strategies, let’s dive in!
1. Brand your pins
A whopping 97 percent of top searches on Pinterest are unbranded, according to the Pinterest team. For brands, this presents an opportunity to stand out and gain brand recognition through the platform.
Pinterest recommends adding a small logo in one of the four corners of your pin, this can be done really easily in a tool like Canva. You can play around with the design, of course, and add your logo wherever it feels best. In this example from Quip, they went with top centered to fit with the rest of the text on their image.
2. Create mobile-first content
As with most sites, mobile is extremely important on Pinterest. Eighty-five percent of Pinners are using the mobile app, so it’s important that your content appeals to them while they’re on their phones and appears properly in their feeds. If you’re linking back to your own content, it’s also important that the page that you’re sending users to is mobile friendly as well.
A tip from Pinterest here is to tailor your font size to phone rendering to make sure your fonts are legible on small screens and to design for a vertical aspect ratio. The ideal dimensions are 600 pixels x 900 pixels.
3. Create a similar look and feel
Have you ever clicked on a beautiful image on Pinterest only to be taken to a website that looks nothing like the pin? I have, and it left me really confused.
According to Pinterest, the best practice is to make sure your pins and your website have a similar look and feel, and that doing this pays off. In an analysis from Pinterest, they found that “Pins that went to landing pages with similar imagery had a 13 percent higher online sales lift.”
This example from Ettitude is really great. The pin they are sharing fits seamlessly in a lot of home decor and design tags on Pinterest.
And although their website uses different photos, it still has a similar feel to the pin.
4. Time your campaigns
A big element to social media marketing and campaigns is timing. When are people online and when are people talking about the things you want to talk about?
Luckily in the case of Pinterest, they release annual ‘Seasonal Insights,’ which helps take away some of the guesswork. A report that contains more than a dozen specific moments that take place throughout the year.
For example, their 2019 report shared that users start sharing holiday content in June all the way through December and that content related to the Summer starts getting pinned at the beginning of February. They also have monthly trends reports. Here’s their latest for December 2019 trends on Pinterest, it shares specific trends like the search term ‘peach green tea’ is up 320 percent YoY!
These are great free resources that you can leverage to start timing seasonal campaigns around when people are starting to make specific seasonal purchasing decisions. I would never have thought that people start looking at holiday content in June but that’s super-specific information that can go a long way to help with timely campaigns.
5. Set up your shop
One of the main ways for Pinterest to help generate sales is for the products you are selling to be easily available through Pinterest. Luckily, the platform makes this really easy for brands to set up and feature prominently on their profiles.
The shop tab is just what it sounds like, a place where users can go to see all of the products your brand is selling. On the flip side, brands can leverage that tab to share pins that link directly to their sales pages for the specific product.
Pinterest makes this whole process quite easy, they even have a method for importing new products through Pinterest Catalogs. All you have to do is have your data source approved and then as you add new products to your website, they get automagically added to Pinterest as well.
We hope this guide helps you get started with or double down on your efforts with Pinterest. Let us know about your experience with Pinterest in the comments!
If you want even more Pinterest resources, the Pinterest team has created a free Pinterest Academy with tons of lessons in there.
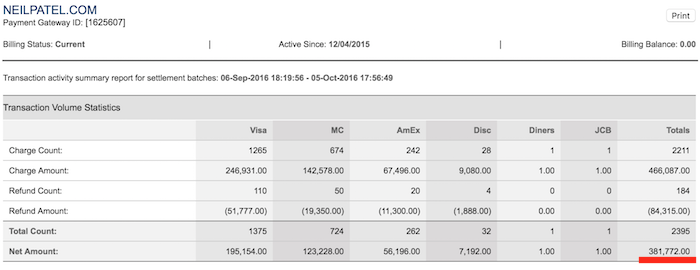
I was talking with my friend who works at Keap (formally known as Infusionsoft) and he was breaking down how people still make millions of dollars selling info products and ebooks.
Now, I don’t sell info products as heavily as I used to, but when I focused on it 100% of the time, my numbers were great.
Just look at the screenshot above. It’s my revenue on a bad
month of selling info products.
So today, I thought I would do something different.
Instead of just blogging about marketing tactics, I thought I would share my old business model with you and give you the exact emails, power points, and everything you need so that way you can replicate my results.
Are you ready?
Step #1: Figure out what you want to sell
Don’t worry about traffic. Instead, I want you to figure out what you want to sell.
Whatever it may be, it needs to solve a problem for people.
For example, I’ve sold marketing courses that teach people
how to get more traffic. This is a problem businesses have as they need traffic
in order to generate sales.
You can literally sell almost anything online, just make sure you are passionate about it and know that subject well.
If you want, you can just use my slides and modify them to
whatever product or service you are selling. You can download
my slides here.
I know looking at slides can be a bit confusing but watching
this video may also help as it breaks down the process.
Once you have created your PowerPoint, you’ll need to use a software like Webinar Jam to present to people who are potential customers (don’t worry, I’ll teach you how to get traffic in a bit).
What Webinar Jam does is make it easy for you to create a
Webinar that people can join and you can then sell them through it. That’s what
almost all of us do to sell info products… it works really well.
Step #4: Create emails and set up your CRM
Emails are key to generating income through info products.
And in order to succeed with email marketing when it comes to selling digital products, the right CRM will make all the difference in the world.
Without the right emails, you won’t do well. It’s really that simple.
There are 8 types of emails that you need to create:
Invite sequence – these are a series of emails that invite people to watch your webinar. (here are my invite emails)
Indoctrination – you need to build a connection with people. People are more likely to convert if they know more about you and trust you. (here are my indoctrination emails)
No shows – just because someone signs up to watch your webinar, it doesn’t mean they will attend. For everyone who doesn’t attend, you’ll want to email them and get them to watch the replay. (here are my no show emails)
Encore – not everyone will watch your whole webinar. If they don’t stick to the end they won’t see your offer. You’ll want a few emails that push the replay. (here are my encore emails)
Objection handler – there are a handful of reasons someone may not buy. You’ll want to answer each of those objections through email. (here are my objection handler emails)
Countdown sequence – you’ll want to close off your course. Letting people know that they only have a few days left to buy is a really effective way to generate sales. These emails will roughly make up 1/3 to half of your sales. (here are my countdown emails)
Last chance email – on the last day you’ll want to send a few emails letting people know it is about to close. (here are my last chance emails)
Free trial offer – the majority of people won’t buy from you. Offering the last chance free trial offer is a great way to roughly get 15% more sales. (here are my free trial emails)
I know that sounds like a lot of emails to create and it is, but don’t worry, just click the links above that contain the emails I used and just modify them for your product. 🙂
The key with the emails is to just not mail them out, but it’s to use automation. You can easily set that up with Keap.
The reason most of us marketers use Keap (aside from being a great and efficient tool) is because it connects with other tools that help us maximize our email revenue while also providing the most flexibility.
The flexibility you’ll gain by using Keap will help you make more money. Here’s what I mean:
PicSnippets – for you invite sequence emails you’ll want to use a customized image that has someone’s name in it. Just like how the image above has “Ben’s” name in it. And it dynamically changes to the person’s name.
Plus This – during the objection handler sequence I typically text everyone who watched the webinar with their “first name?”. Plus This automatically does this and what you’ll find is when you text someone their first name they will usually text back with “who is this?”. That’s when Plus This automatically responds with “Hey this is Neil Patel, I just wanted to thank you for watching my webinar. I wanted to follow up and see if you had any questions or if I can help answer anything for you.”. You’ll find that a lot of people will text back with questions, all you have to do is answer them and you’ll generate more sales.
Plus This – I know I mentioned Plus This above, but you will also need it for emails related to your countdown sequence, last chance emails, and free trial offer. You want to use a countdown timer within those emails. The time should adjust based on when you send each email off and the time zone the individual is in. Plus This does all of it for you automatically.
Collect payments – I also use Keap to collect payments. So, once I email someone, they can click a button and buy through pre-made payment pages that Keap provides you.
Step #5: Drive traffic
One of the key ingredients to making money through info products
is to have traffic.
And I know what you are thinking to… “Neil you did well because
you have a ton of traffic”.
Well, people like Sam Ovens and Grant Cardone don’t rank well on Google, yet they make 8 figures a year. They profitably sell info products through ads.
If you want to grow your traffic, go through the following
steps:
Run your URL through Ubersuggest. Click on the “site audit” report as it will show you what to fix in order to maximize your revenue.
You now have a handful of ways to generate sales. Facebook ads are probably the quickest way to generate sales and usually, for every dollar, you spend you should generate at least 2 dollars in revenue.
If you want a longer-term approach, consider SEO and content
marketing.
And a good mid-term approach is leveraging Instagram and
building a personal brand.
Or if you really want to see your numbers grow, consider
doing all of them. 😉
Conclusion
I know everything I broke down may seem overwhelming, but it
shouldn’t be. Just take one step at a time.
Plus there are a lot of tools that make your life easy and do most of the hard work. I pretty much mentioned them all above and you can get them to play nice by using Zapier, which can connect them easily if you aren’t able to figure it out.
And if you are wondering why I stopped focus most of my efforts on info products it isn’t because it was bad business.
It’s the opposite. It’s a good business… but to scale it to
millions a month in revenue is tough and you’ll find that your profit will
drastically drop.
In other words, your upside is limited and it’s not hard to
make a few million a year in profit, but anything above that gets really tough.
So, what are you going to do with the information above?
Are you going to try and sell info products?