Pinterest is such a key part of the buying journey for its users that over 90 percent of weekly active Pinners use Pinterest to make purchasing decisions.
Talk about buying power!
Not only are Pinterest users making purchase decisions on the platform, 83 percent say they are making purchases specifically based on the content they’ve seen from brands on Pinterest.
Pinterest is no longer simply a place to save ideas and build dream boards. Instead, Pinterest has turned into the world’s largest visual discovery platform.
And there are a lot of opportunities for brands.
We had a chance to chat with the team over at Pinterest about some of their best practices for brands looking to increase sales. We’re excited to share those lessons with you!
Here’s what we learned…
How people are using Pinterest
According to one survey, “47 percent of social media users saw Pinterest as the platform for discovering and shopping for products—more than three times higher than those who cited Facebook or Instagram.”
Pinterest might not immediately come to mind as a platform to invest in for many brands, but it should.
Pinterest lives in a unique space on the internet where users are discovering content related to themselves and their aspirations rather than focusing on others, and this has turned it into a powerful platform for users to make purchasing decisions and discover new brands and products.
Clearly, Pinterest is not one to be ignored when it comes to your marketing strategy. Here’s how you can use the platform to drive sales.
How to leverage Pinterest for sales: 5 tips from the Pinterest team
There are some really simple ways that you can start leveraging Pinterest to reach new audiences and optimize your pins and profile for sales. Some of these tips might be easy to implement immediately while others might play into later strategies, let’s dive in!
1. Brand your pins
A whopping 97 percent of top searches on Pinterest are unbranded, according to the Pinterest team. For brands, this presents an opportunity to stand out and gain brand recognition through the platform.
Pinterest recommends adding a small logo in one of the four corners of your pin, this can be done really easily in a tool like Canva. You can play around with the design, of course, and add your logo wherever it feels best. In this example from Quip, they went with top centered to fit with the rest of the text on their image.
2. Create mobile-first content
As with most sites, mobile is extremely important on Pinterest. Eighty-five percent of Pinners are using the mobile app, so it’s important that your content appeals to them while they’re on their phones and appears properly in their feeds. If you’re linking back to your own content, it’s also important that the page that you’re sending users to is mobile friendly as well.
A tip from Pinterest here is to tailor your font size to phone rendering to make sure your fonts are legible on small screens and to design for a vertical aspect ratio. The ideal dimensions are 600 pixels x 900 pixels.
3. Create a similar look and feel
Have you ever clicked on a beautiful image on Pinterest only to be taken to a website that looks nothing like the pin? I have, and it left me really confused.
According to Pinterest, the best practice is to make sure your pins and your website have a similar look and feel, and that doing this pays off. In an analysis from Pinterest, they found that “Pins that went to landing pages with similar imagery had a 13 percent higher online sales lift.”
This example from Ettitude is really great. The pin they are sharing fits seamlessly in a lot of home decor and design tags on Pinterest.
And although their website uses different photos, it still has a similar feel to the pin.
4. Time your campaigns
A big element to social media marketing and campaigns is timing. When are people online and when are people talking about the things you want to talk about?
Luckily in the case of Pinterest, they release annual ‘Seasonal Insights,’ which helps take away some of the guesswork. A report that contains more than a dozen specific moments that take place throughout the year.
For example, their 2019 report shared that users start sharing holiday content in June all the way through December and that content related to the Summer starts getting pinned at the beginning of February. They also have monthly trends reports. Here’s their latest for December 2019 trends on Pinterest, it shares specific trends like the search term ‘peach green tea’ is up 320 percent YoY!
These are great free resources that you can leverage to start timing seasonal campaigns around when people are starting to make specific seasonal purchasing decisions. I would never have thought that people start looking at holiday content in June but that’s super-specific information that can go a long way to help with timely campaigns.
5. Set up your shop
One of the main ways for Pinterest to help generate sales is for the products you are selling to be easily available through Pinterest. Luckily, the platform makes this really easy for brands to set up and feature prominently on their profiles.
The shop tab is just what it sounds like, a place where users can go to see all of the products your brand is selling. On the flip side, brands can leverage that tab to share pins that link directly to their sales pages for the specific product.
Pinterest makes this whole process quite easy, they even have a method for importing new products through Pinterest Catalogs. All you have to do is have your data source approved and then as you add new products to your website, they get automagically added to Pinterest as well.
We hope this guide helps you get started with or double down on your efforts with Pinterest. Let us know about your experience with Pinterest in the comments!
If you want even more Pinterest resources, the Pinterest team has created a free Pinterest Academy with tons of lessons in there.
Welcome to this week’s edition of the Social Media Marketing Talk Show, a news show for marketers who want to stay on the leading edge of social media. On this week’s Social Media Marketing Talk Show, we explore Twitter’s new Promoted Trend Spotlight ad unit, limits on tweet replies, and other upcoming changes to core […]
Every year, 80% of new year’s resolutions fail by the time February rolls around. Launching your email marketing strategy shouldn’t be one of them.
That’s why we created a simple, 7-day challenge to help you dominate email marketing in 2020.
By the end of it, you’ll have launched the most important parts of a successful email marketing strategy. And the best part? You only need 30 minutes or less each day to complete this challenge.
Day 1: Choose your email template and brand it. (30 minutes)
This step is often overlooked. Many people use different email templates every time they send an email. Or, they never fully customize a template to match their brand.
But branding an email template and using it consistently are important. Your brand sets you apart from your competitors. It allows you to be unique and develop a personality for your business. It builds credibility and trust between you and your subscribers. Your subscribers can see your content and immediately tie it back to you.
Step 1: Choose your email template. Find an email template that works with your brand and your message. A plain template is often better than one already filled with colors and background images, because it’s easier to make it your own. Then, add your logo to the top or bottom of the email. (Inside AWeber, there are 8 NEW email templates you can easily customize to fit your branding. Choose the template format you’d like. Then drag and drop to add your images and build the layout you want.)
Step 2: Add your brand colors to your template. Don’t overdo it! Too many colors can be distracting. Try adding your brand colors in just a few places, like your call-to-action buttons, header image, or headlines.
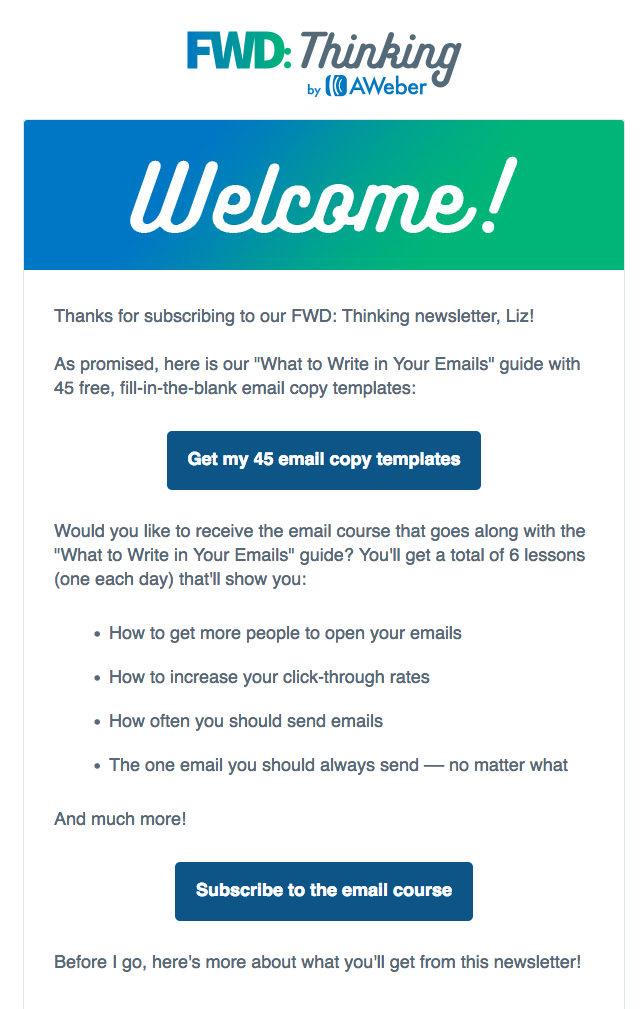
For example, in the welcome email of AWeber’s FWD: Thinking newsletter, we incorporate our brand colors by using a header image with AWeber’s green and blue gradient and a call-to-action button with our brand’s shade of blue.
To do: Choose an email template and add your logo and brand colors to it.
Day 2: Customize your confirmation message. (15 minutes)
A confirmed opt-in message is an email you send people immediately after they fill out your sign up form. It asks them to verify they want to subscribe to your emails by clicking a link or button in the message.
Confirmation messages are optional but strongly recommended. They serve as proof that your subscribers definitely want to be on your list. So internet service providers (like Gmail and Yahoo!) may deliver more of your messages to the inbox when you use confirmation messages. Plus, it prevents subscribers from signing up using fake email addresses.
To make your subscribers more likely to confirm their subscription, you can follow these common best practices for confirmed opt-in emails:
Keep your content short.
Explain the value your subscribers will receive by subscribing to your list.
To do: Set up and customize the subject line and content of your confirmed opt-in email. (If you’re an AWeber customer, you can follow these directions to complete this step.)
Day 3: Create a sign up form. (30 minutes)
Sign up forms allow your subscribers to easily join your email list. You can promote your form by adding it to your website and sharing a hosted sign up form with your audience. Hosted sign up forms allow you to share your form anywhere, even if you don’t have a website.
To do: Write your sign up form copy and build your form using ideas from the homework post you just read.
Day 4: Write your welcome email (30 minutes)
A welcome email is the first message subscribers receive after joining your list and confirming their subscription. And it gets a lot of attention — on average, open rates are 4 times higher and click-through rates are 5 times higher than other emails, according to marketing research company Experian. You can take advantage of this above average engagement by crafting an excellent welcome email.
Your welcome email should:
Welcome subscribers to your email list.
Deliver the lead magnet you promised on your sign up form.
Explain what kind of content you’ll send subscribers, how often you’ll send it, and what they’ll learn.
Introduce yourself or your business.
Ask subscribers to add you to their address book. (This is called whitelisting and it can help more of your emails bypass the spam folder.)
Once you draft your welcome email, take some time to personalize it! Personalization makes your subscribers feel you’re writing a message specifically to them. Something as simple as including your subscriber’s first name in the subject line or body of your welcome email can boost opens and clicks. Homework: Read The One Email You Should Always Send and How Personalization Can Help You Connect with Subscribers.
Day 6: Publish your form on your social media channels. (20 minutes)
Your list is set up and your confirmation and welcome messages are ready to go. Now it’s time to put your hard work to the test and start to grow your list!
An easy first step is turning you social media followers into email subscribers. People who follow your brand on social media have already shown they want to hear from you. And there’s no better way for them to stay up to date on your latest content and sales than joining your email list.
Post a link to your hosted sign up form on Facebook, Twitter, and LinkedIn and ask your social followers to subscribe for exclusive updates.
Day 7: Share your sign up form with your connections. (20 minutes)
Reach out to the people you already know, like colleagues, friends, or family members. Ask them if they want to sign up for your email list.
Let them know what content you are offering and explain the benefits they would receive if they sign up.
If they say no, maybe the content you’re offering just isn’t for them. But maybe they know someone it would be perfect for. You never know until you ask!
To do: Contact 5 people you know. Send them the hosted URL to your sign up form and ask if they’d like to join your email list or share it with someone they know.
Ready, set, go!
Congrats! If you completed this 7-day challenge, you’re well on your way to launching a successful email marketing strategy.
Ready for your next challenge? Then try this: Create a lead magnet — a freebie you give subscribers when they sign up for your list. Lead magnets can increase the conversion rate of your sign up form.
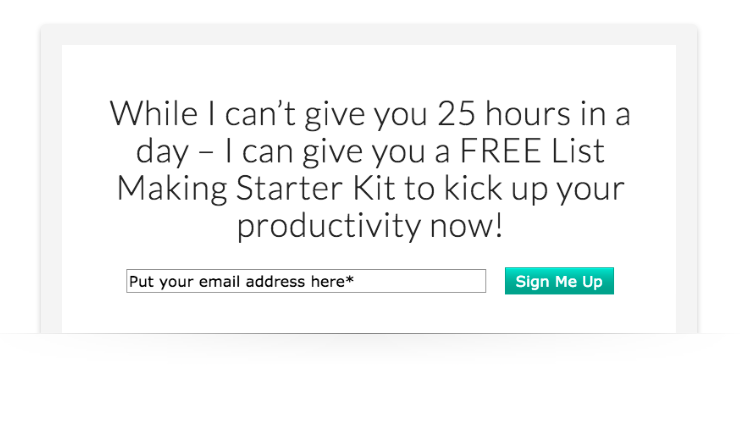
For example, author and productivity expert Paula Rizzo offers a free List Making Starter Kit in return for signing up for her email newsletter, which she sends via AWeber.
It’s Friday afternoon, and your team is jonesing for Happy Hour.
For the last few weeks, you’ve been going to the same ol’ bar by your office, so you decide it’s time to try something new. What do you do? Step outside and walk around until you find a new spot? No, you hop on Google and let it conduct the search for you.
Your ideal post-work pub is nearby, open right after work, and offers a few gluten-free options so your entire team can partake. You plug these criteria into Google, and you’ve got three viable options at your fingertips — in a handy map format to boot.
Pause. Have you ever wondered how Google can whip up such accurate, precise answers in so little time … and present them in such an easy-to-read way? Moreover, what are those restaurants doing to get featured so dominantly on Google’s search engine results pages (SERPs)?
Heck, I’d love my business to pop up when consumers search for criteria relevant to me … wouldn’t you?
No one knows exactly how Google’s algorithm works — but, there are a few ways to organize and optimize your website content so Google knows what content to feature on the SERPs for the various searches people conduct to find you.
This is where structured data comes in. Structured data can make your organization more visible to potential customers and increase your click-through rate by up to 30%.
Not sure what structured data is? That’s OK. By the end of this guide, you’ll be a structured data wizard — and your website will reap the benefits.
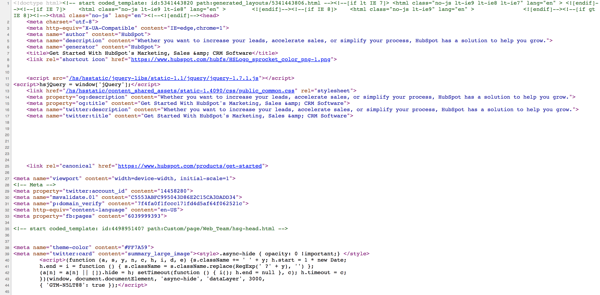
We know that what searchers see online is much different than what search engines see.
View the source code for any website by going to View > Developer > View Source.
This behind-the-scenes code tells browsers how information should be organized on the website (as part of its website development) and tells web crawlers what’s on the page.
Structured data is also at play here. Embedded tags of code (a.k.a. “markup”) throughout the HTML of a webpage tell Google and other search engines what information to display in the SERPs and what this information represents. It also helps social media platforms synthesize your social media posts into snippets that preview the content using Open Graph Protocol (which we touch on later).
This markup is important. It educates search engines on what specific content is on the page. This creates more relevant, informed searches and makes the site a candidate for enhanced results like featured snippets, rich snippets, image and video carousels, knowledge boxes, and more (which we’ll touch on later).
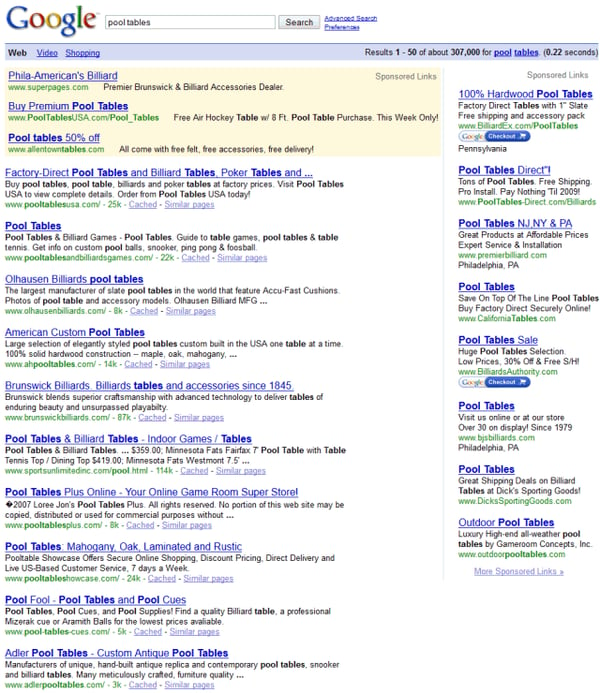
Google’s SERPs weren’t always as easy on the eye as they are today. Don’t remember? Check out this Google result for “pool tables” from 2008.
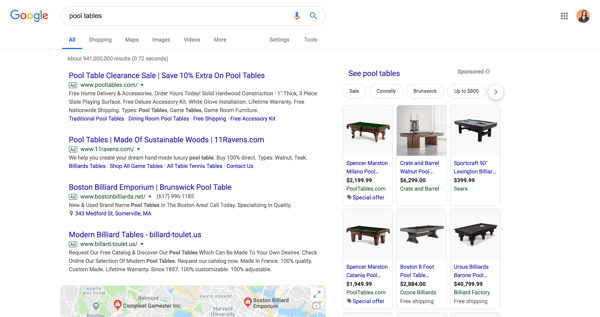
Wow. That’s a world of difference. Not only are these results easier to read, but the extra features make for a much more informative, intelligent searching — and shopping — experience. Between the sponsored content and live map (plus the product carousel, question snippets, and related searches not shown in the screenshot), Google provides pretty much everything I need to know about pool tables.
Heck, sometimes I search for something and find the answer right on the SERP — I don’t even have to click on a result. Does that ever happen to you? If it has, you can thank structured data.
How does structured data work?
At this point, you might be asking: How can there exist a language (markup) that is consistently recognized by search engines and people alike?
In order for this markup to be accurately and universally understood, there are standardized formats and vocabularies that should be used.
Let’s go back to basics for a minute. When conveying information, whether you’re communicating with a human or a computer, you need two main things: vocabulary (a set of words with known meanings) and syntax (a set of rules on how to use those words to convey meaning).
Most terminology surrounding structured data markup can be organized into these two concepts — vocabularies and syntaxes — and webmasters can combine whichever two they need to structure their data (with the exception of Microformats).
Okay … that’s enough of the fancy developer speak. What should you be using for your structured data?
Schema.org is the accepted universal vocabulary standard for structured data. It was founded and is currently sponsored by Google, Bing, Yahoo, and Yandex. It’s flexible, open-sourced, and constantly updated and improved.
As for syntax, there’s no correct answer. Google recommends JSON-LD (and defaults to that syntax when using its Structured Data Markup Helper — as you see below). JSON-LD uses Javascript code and embedded widgets to dynamically display your content, which is typically a simpler development process.
Google also recognizes Microdata and RDFa. Both of these syntaxes use HTML to identify properties within structured data. Microdata is typically only used in the page body, whereas RDFa is commonly used in both the page head and body.
On the other hand, JSON-LD is only placed in the page head, meaning, for certain types of markup, JSON-LD makes it so you don’t have to navigate subheaders, supporting copy, and related styling that’s included in the page’s HTML. This is why JSON-LD is considered simpler than the other two.
Ultimately, it all depends on the data you’re trying to implement, what the benefit is to your website, and what would be easier to share with your team.
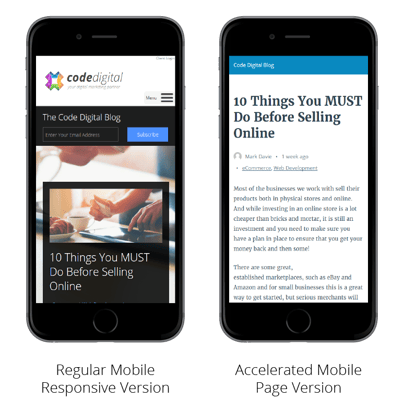
Structured Data and Mobile
Structured data affects mobile a little differently — through Accelerated Mobile Pages (AMP). Accelerated Mobile Pages is a Google-backed, open source project to help all mobile pages load quickly regardless of device.
Structured data markup works a little differently for social platforms. This requires Open Graph Protocol and similar languages that ensure your website and blog content appear in an easy-to-read way when you promote this content on a social network. Two common social media features that use Open Graph Protocol are Pinterest Rich Pins and Twitter cards. We talk more about how to do this below.
<meta property=”og:description” content=”Discover how to create and manage a brand that helps your business become known, loved, and preferred”
Note: Unfortunately, structured data doesn’t impact your organic search ranking (besides helping you grab a spot in a knowledge panel or Featured Snippet at the top of the list). It also doesn’t change how your content looks or behaves on your website — it only affects how and where it might appear on SERPs.
Examples of Structured Data
To the average internet user, structured data can’t be seen. It’s hidden among the code that makes up our favorite websites and online platforms. So, how does structured data affect what we (and our customers) see? What does it look like to the “naked” eye?
When webmasters adhere to structured data standards, search engines like Google and Bing reward their websites and organizations by featuring their content in a variety of SERP features (another reason to use structured data).
There are also a couple of ways that structured data can benefit your non-SERP marketing efforts on social media and email marketing.
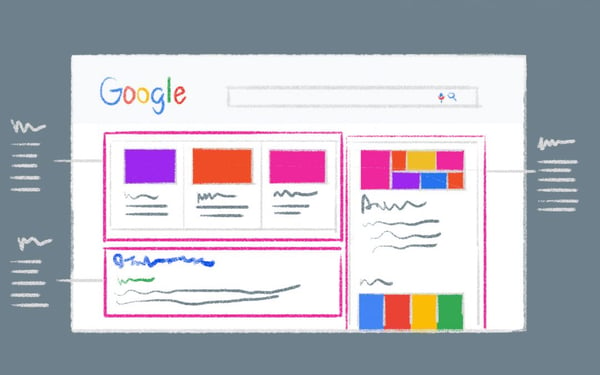
Content Features
Content features appear as separate search results among normal search results.
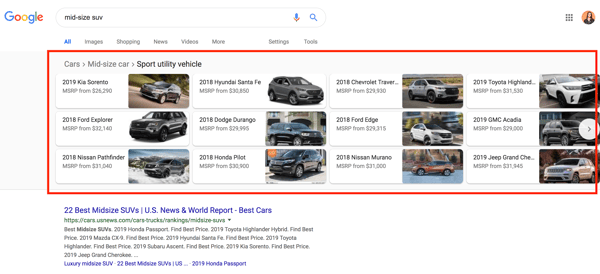
1. Carousels
Carousels show up as images with captions related to a search, such as movie actors, cars, or news articles. Searchers can click through these images to access a separate SERP for that search. Here’s how to use structured data to show up on Carousels.
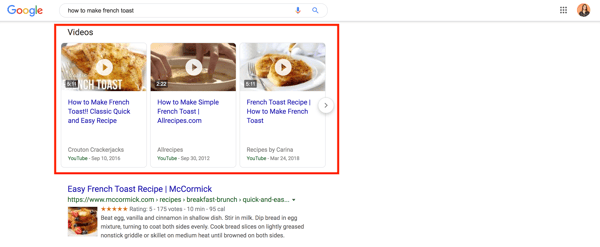
2. Videos
Videos function similarly to carousels but feature videos instead of images or other listings. Searchers can scroll through these results to directly access and watch each video.
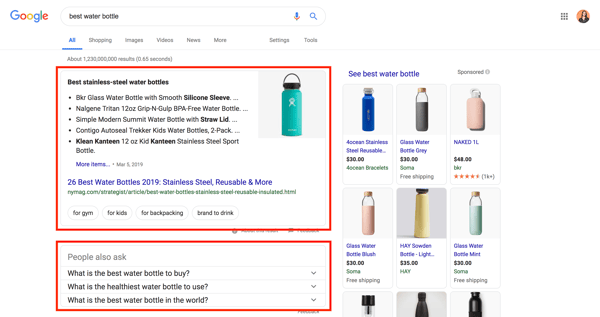
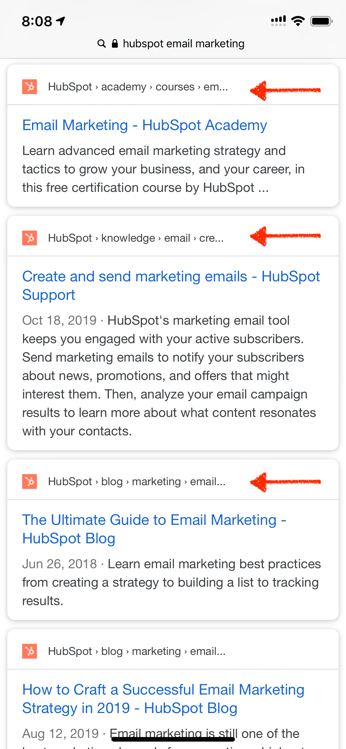
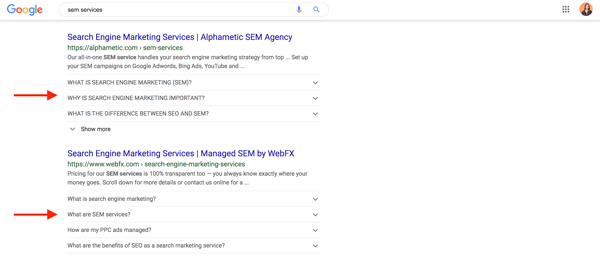
Featured Snippets display information relevant to a query — and link to a third-party website (which sets them apart from Answer Boxes and Knowledge Panels, which draw from public domain databases). They don’t count as one of the ten organic results on a SERP, so if you “win” the Snippet, your website shows up twice.
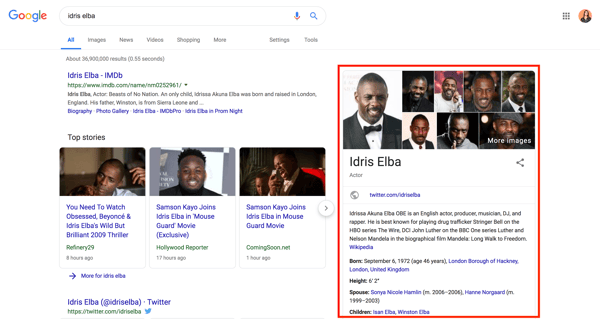
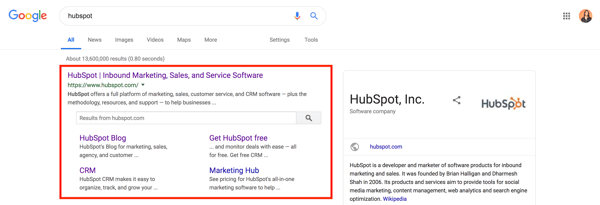
Knowledge Panels pull together the most relevant information from a search and display it as a separate panel on the right side of a SERP. They typically include images, dates, and category-specific information, such as stock prices for companies or birthdays for celebrities. You can use a structured data markup like Schema to tag your content with all of these categories, but there’s no guarantee that Google will reward you with your own knowledge panel.
In fact, structured data doesn’t promise anything, it only makes it easier for search engines and social networks to interpret your content.
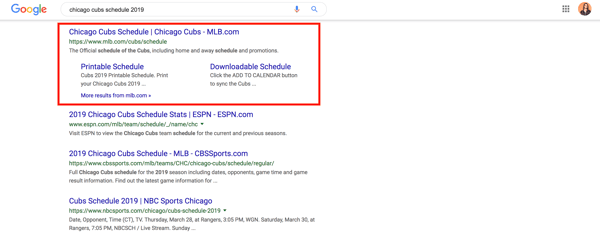
Sitelinks are additional links displayed beneath a search result that navigate to different parts of a website. Google pulls them into a SERP when it thinks additional results would benefit a searcher. Websites with intelligent anchor text and alt text that’s informative, compact, and avoids repetition have a good chance of displaying a result with Sitelinks.
Sitelinks Searchbox is like Sitelinks with a search bar directly featured in the result. That search box uses Google — not the featured website — which creates a brand new SERP. Sitelinks Searchboxes only show up in branded searches.
The how-to feature is similar to FAQ in that it displays a page’s content (if it fits certain criteria) on the SERP so searchers can see that information. It walks searchers through a set of steps and can feature video, text, and images.
Unlike FAQ, the individual steps in how-to result aren’t linkable; however, searchers can access the entire list of steps by clicking your results. These results can show up in two formats: standard accordion layout or rich result carousel, depending on the content. Here’s how to use structured data to display how-to content in your search results.
Structured data can also be used to enhance to non-SERP features.
1. Social Cards
Social-specific markup doesn’t have a big impact on SEO, but it’s still important for marketers to understand. Not only does this markup enhance your social posts and ad efforts, but it can also be read by search engines — which could contribute to any SEO changes in the future.
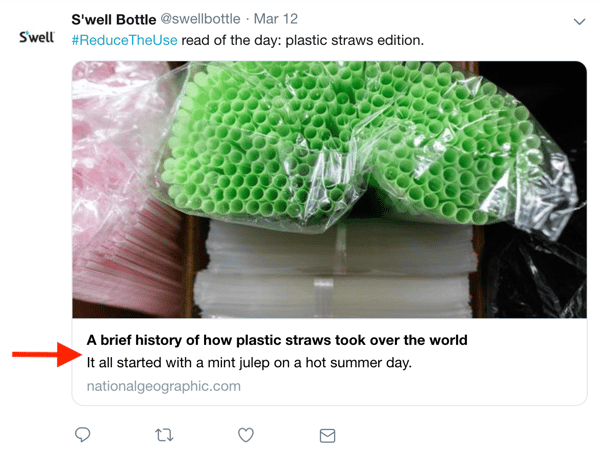
Social cards display images and rich text when links are shared on social media. Any organization who uses social media to share content should be using proper social markup, such as Open Graph Protocol.
Here’s how you ensure your social content displays social cards:
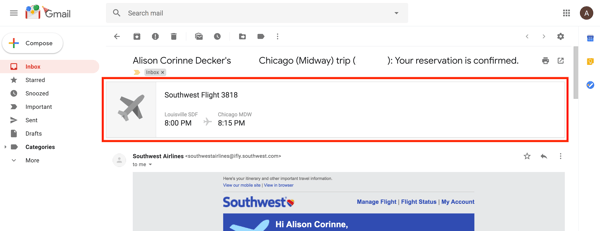
Have you recently booked a flight or ordered something online? If you have Gmail, you might’ve seen your reservation or order details summarized at the top of the confirmation email. This is due to email markup.
The concept of structured data might seem confusing, but its implementation isn’t nearly as complicated. In fact, there are a number of structured data tools that can help you along the way, namely Google’s Structured Data Markup Helper and Testing tools. Sure, you can implement structured data by hand, but Google’s tool ensures accuracy — and makes your life easier.
It’s important to note that adding structured data markup on your website doesn’t guarantee a Featured Snippet or Sitelinks Sitebox. Google can take weeks to crawl your new HTML markup, and sometimes, the information doesn’t show up at all.
However, taking the steps to implement structured data is critical. Google might be smart, but it can’t (yet) understand everything on its own. It might seem like a lot of extra work, but using the correct structured data markup will ensure Google can make sense of your content and can help you potentially increase your click-through rates and visibility.
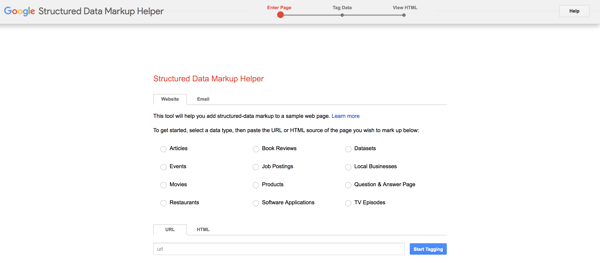
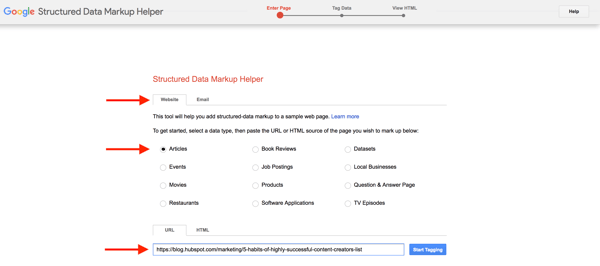
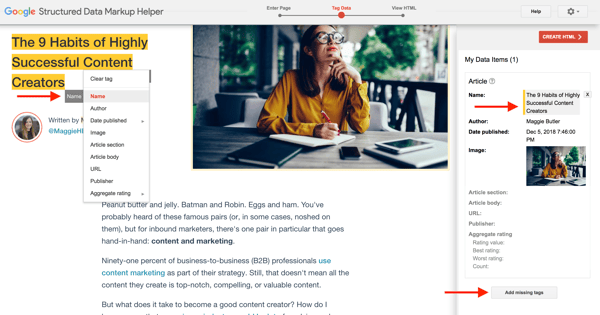
Here’s how to implement structured data by using Google’s Structured Data Markup Helper tool.
Make sure the Website tab is open. Choose the type of data to which you’d like to add the HTML markup. Plug the web page URL (or the HTML code) at the bottom, and click Start Tagging.
3. Highlight page elements and assign data tags.
When the tool loads, you should see your web page on the left side and data items on the right. Highlight different components of your web page to assign data tags such as name, author, and date published. (The tool will suggest different data tags for different types of data, i.e. Events or Book Reviews.)
As you select and assign data tags, you’ll see the information pop up under My Data Tags on the right panel. You can also add any missing tags that might not be visible on the web page; just click Add missing tags.
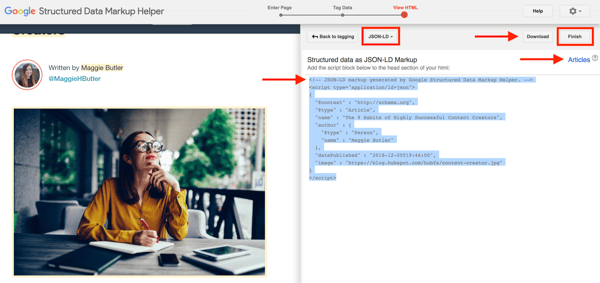
4. Create the HTML.
When you’re finished tagging and assigning data items, click Create HTML in the upper right-hand corner.
5. Add the schema markup to your page.
On the next screen, you should see your structured data markup on the right side. The tool automatically produces the script as JSON-LD markup, but you can change it to Microdata by clicking the JSON-LD drop-down menu in the top menu.
Click Download to download the script as an HTML file. To read more about adding structured data to your article (or any other data type), click Articles in the right corner above the markup.
To “publish” your markup, copy and paste the new HTML markup into your CMS or source code of your web page. Lastly, click Finish in the top right corner to check out Google’s recommended Next Steps … one of which will bring you to this next one.
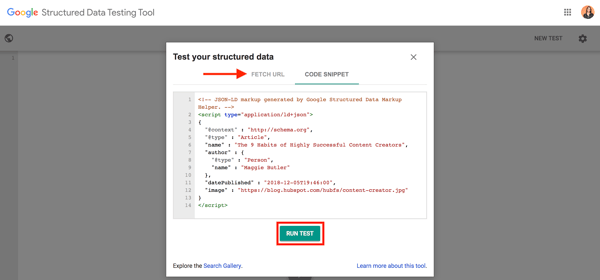
6. Test your markup with Google’s Structured Data Testing Tool.
Open up Google’s Structured Data Testing Tool. You can enter any URL of a web page you’d like to test, or you can enter HTML code. (In the example below, I’m analyzing the code previously produced by Google’s Structured Data Markup Helper Tool.) Click Run Test to begin.
7. Diagnose and fix any detected issues.
The tool will show you your HTML markup on the left side and the markup analysis on the right. Note any red errors or warnings. Click on any data row to highlight the corresponding markup on the left.
If necessary, you can edit any errors in the HTML directly in the tool panel before “publishing” the tested HTML markup.
8. Be patient.
This last step is simple but arguably the hardest — to sit back and wait. Google can take weeks to re-crawl new HTML, and even then, your content isn’t guaranteed to show up in rich snippets or other SERP features.
As long as you follow the correct structured data standards and markup, give Google all the information it needs to know, and be patient, your website and business can benefit greatly from structured data and enhanced SEO.
Get Started with Structured Data Today
Google and other search engines continuously improve how they aggregate and present information. They offer enhanced, intelligent search experiences with the customer in mind. It’s up to you as a business to keep up, and you can do so through structured data.
Structured data benefits businesses — through increased visibility — and consumers — through better usability. Use this guide, tools, and resources to optimize and organize your website and make your customers’ lives easier.
Editor’s note: This post was originally published in April 2019 and has been updated for comprehensiveness.
If you have ever left a comment on NeilPatel.com, you’ll notice that there is no URL field.
Why?
Well, a few years ago, blog commenting exploded. I was literally getting thousands of spam comments a day from people just leaving a comment for the purpose of link building instead of providing value to the community.
Sure, there are spam plugins like Akismet, but it doesn’t catch everything.
Now, most blog comments contain the nofollow attribute in which they tell Google not to follow the link or drive any “SEO value” to that URL.
But still, people still leave blog comments for the purpose of link building.
So, over the past 7 months, I’ve been running an interesting experiment to answer the age-old question…
Do backlinks from blog comments actually help rankings?
Experiment rules
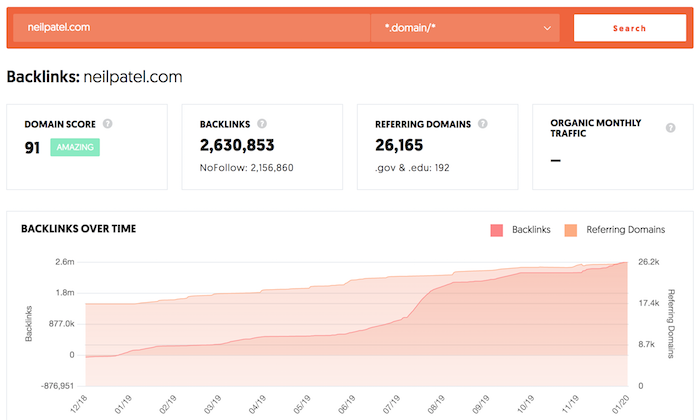
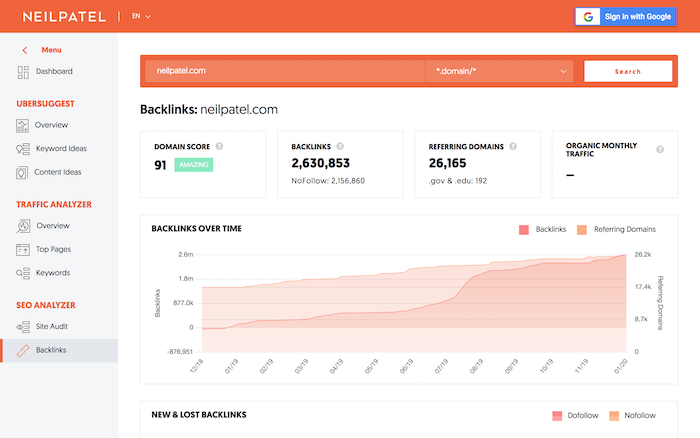
First off, for this experiment, we used “domain score,” which is similar to domain authority.
If you want to know your domain score, the backlinks report in Ubersuggest will tell you what it is.
With this experiment, I sent out an email to a part of my list looking for participants and had 794 websites apply.
From there, I set the following criteria:
English-only sites – It’s easier to rank on many of Google’s international search engines even without building links. I removed non-English speaking sites as I didn’t want to skew the results.
Low-authority sites – I removed any website with a domain score greater than 20 and any site with more than 20 backlinks. The reason being is when a site has a lot of authority, they tend to rank easily for new keywords, even if they don’t build any new links.
No subdomains – I didn’t want a WordPress.com site, a Blogspot site, or even a Tumblr site. Again, this would skew the results so I removed them.
After eliminating the sites that didn’t meet the above criteria, I was left with 314 sites.
Of those 314 sites, many dropped off because they didn’t complete the required work on their part (which was to write a blog post), so I was left with 183 sites at the end that participated.
How the experiment worked
Similar to my previous link building experiment and my on-page SEO experiment, I had these websites write a 1,800 to 2,000-word blog post on whatever subject that was relevant to their site.
The websites had 2 weeks to publish their content and then after 30 days, I looked up their URL in Ubersuggest to see how many keywords each URL ranked for in the top 100 spots, top 50, spots, and top 10 spots.
As I have mentioned in the past, Ubersuggest has a big database of keywords. We are currently tracking 1,459,103,429 keywords.
Now, most of these keywords are barely searched but a decent amount of them get hundreds, if not thousands, of searches per month. A much smaller percentage of keywords generate hundreds of thousands or even millions of searches per month.
In other words, the majority of the keywords people are searching for are long-tail phrases.
We then spent a month building links and then waited another 3 months to see what happened to each site’s rankings.
But here’s the thing: We didn’t build the same type of links to all sites. Instead, we broke the 183 sites into 4 groups (roughly 46 sites per group).
Here were the groups:
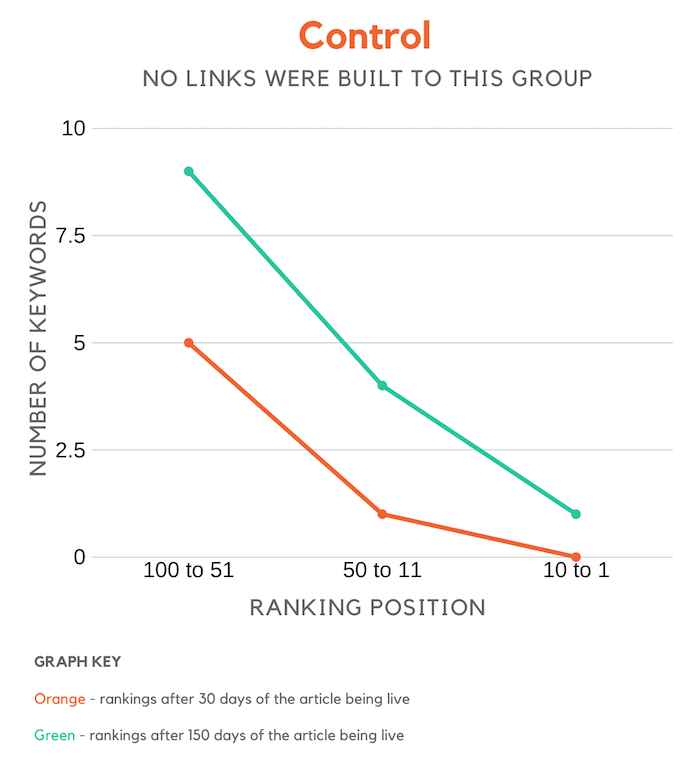
Control – we didn’t build any links to these sites, we just wanted to see what happened to their rankings over time with no focus on link building.
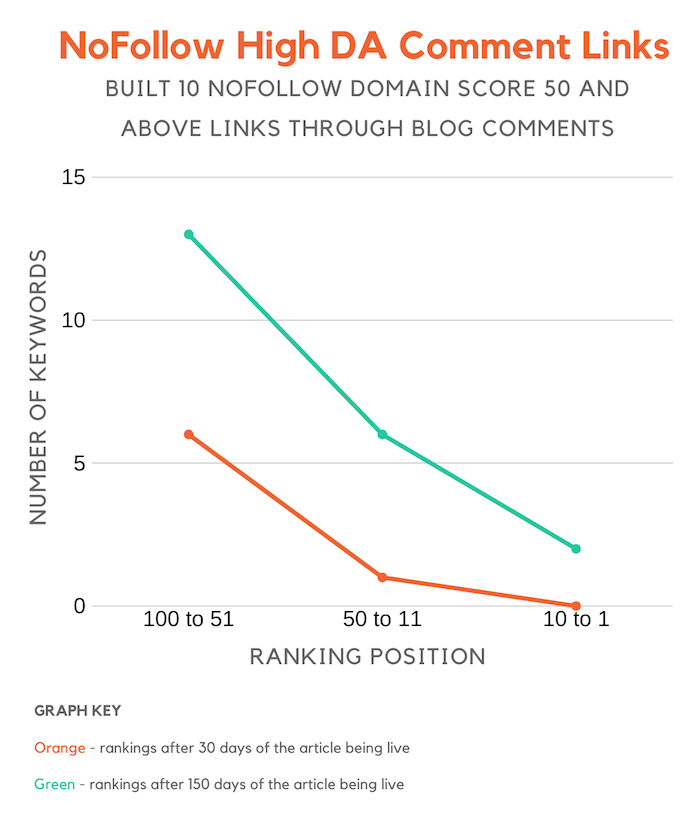
Nofollow high domain score blog comment links – with this group, we built 10 links through blog comments. The links pointed to the newly written post and they were from blogs that had a domain score of 50 or higher and they all contained a nofollow attribute.
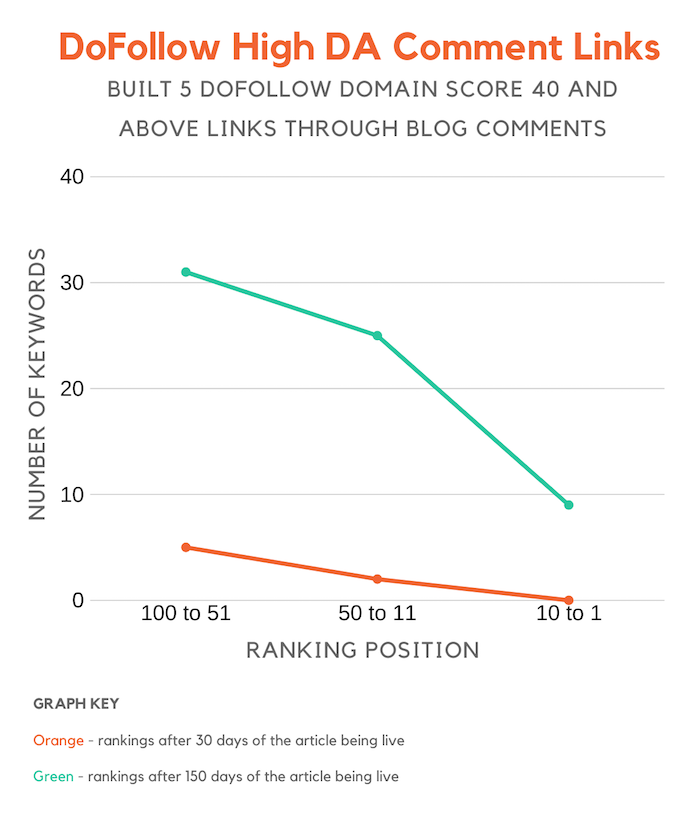
Dofollow high domain score blog comment links – with this group, we built 5 links through blog comments. The links pointed to the new post and were dofollow from blogs with a domain score of 40 or higher. (I reduced the domain score criteria for this category and the link quantity as we struggled to find a large number of high authority blogs that pass link juice in the comment section.)
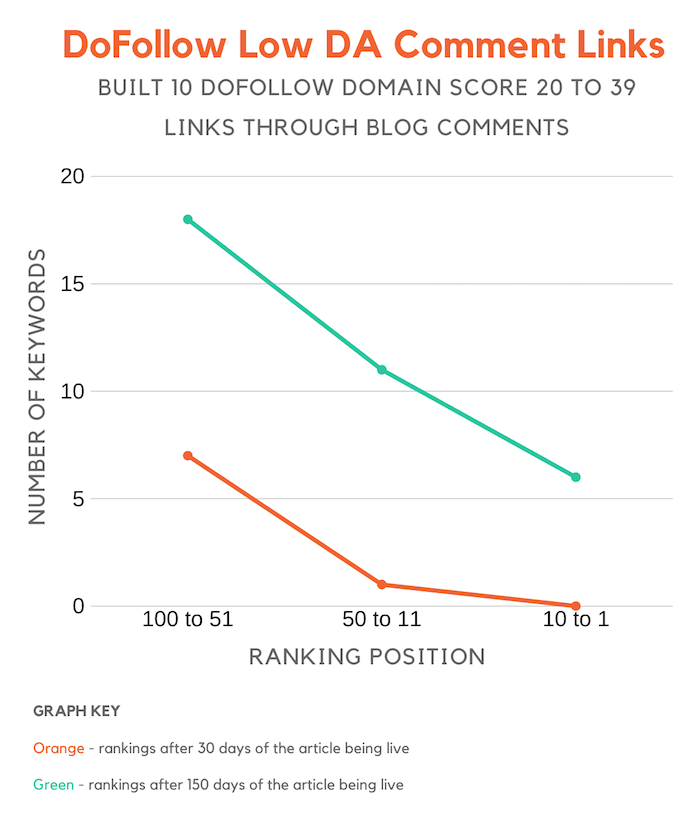
Dofollow low domain score blog comment links – with this group, we built 10 links through blog comments. Each link pointed back to the article and it was from a blog that contains a domain score of at least 20 but no higher than 39. (I was able to build more links here as there are many more low domain score blogs than high domain score ones.)
Keep in mind with the link building for groups 2, 3 and 4,
there was no specific anchor text agenda. Because the links were built through
blog comments, it was too hard to control the anchor text as we didn’t want to
be spammy.
And each comment left on the blog contained at least 75
words as we wanted to ensure that each comment provided value and the core
purpose wasn’t just link building.
Alright, so let’s dive into the results.
Control group
Do you really need links to rank on Google? Well, the chart below says a lot…
As you can see over time, you will naturally grow your search rankings even if you don’t build any links.
Of course, if your content is amazing and you do on-page SEO, you’ll rank higher, but still not growing your link count doesn’t mean you will rank for anything out there… instead, you will still rank for long-tail terms that aren’t too competitive.
Nofollow high domain score blog comment links
Now the results from this group were interesting…
As you can see, the sites in this group had better results than the control group even though the links were nofollowed.
Keep in mind, though, that it could be many variables that caused this, such as the content quality may have been better.
Overall, the sites did perform better than the control group but not by a substantial amount.
Dofollow high domain score blog comment links
Google is sophisticated, they are able to know if a link is from user-generated content (such as blog comments), so I assumed even though the links where dofollow they still wouldn’t have much (if any) impact.
But, shockingly, sites in this group had the largest gains.
As you can see from the chart above, links from high authority sites, even if it is through user-generated content, help with rankings. They just have to be dofollow.
Dofollow low domain score blog comment links
With this last group, we were able to build more dofollow links because we focused on sites with lower authority.
And as you can see from the chart above, it did help with rankings more than building nofollow links but it didn’t help nearly as much as getting links from blogs with higher domain scores.
We built 10 links instead of 5, but the quantity didn’t help
as much as having high domain score links. This group increased their rankings
by 337% versus 828% that group 3 experienced even though they had half the
links.
Again, we still saw gains, just not as large as the previous group.
Conclusion
Who would have thought that building links through blog
comments still helps?
Now, if you are going to use this tactic, you’ll want to focus on blogs that have dofollow comments.
If you aren’t sure how to find them, you can perform a Google search for the following:
“title=”CommentLuv Enabled”” KEYPHRASE – this will showcase blogs that have CommentLuv enabled which means they pass link juice.
“dofollow blogs” – you find a lot of blog articles listing out blogs that have dofollow links. Some of them look like this but you will have to double-check each site as many are nofollow even though bloggers claim they are dofollow.
Followlist – this is a directory of blogs that have dofollow links.
When building links, focus on higher domain scores as it has a bigger impact on rankings.
In addition to that, you’ll only want to leave a comment if you can provide value. Don’t stress the anchor text, focus on the quality of your comment as you don’t want to be a spammer.
Posting spammy links will just cause your comment to be
removed.
Lastly, don’t just leave a valuable comment for the sake of generating a link. Make sure it is on relevant blogs as well. And if that means the blog doesn’t have as high of a domain score that’s fine because the data above shows that even low domain score links still help (just not as much).
So, have you thought about leaving more comments on other blogs? It’s a great way to get your brand out there, generate referral traffic, and boost your rankings.
It’s Friday afternoon, and your team is jonesing for Happy Hour.
For the last few weeks, you’ve been going to the same ol’ bar by your office, so you decide it’s time to try something new. What do you do? Step outside and walk around until you find a new spot? No, you hop on Google and let it conduct the search for you.
Your ideal post-work pub is nearby, open right after work, and offers a few gluten-free options so your entire team can partake. You plug these criteria into Google, and you’ve got three viable options at your fingertips — in a handy map format to boot.
Pause. Have you ever wondered how Google can whip up such accurate, precise answers in so little time … and present them in such an easy-to-read way? Moreover, what are those restaurants doing to get featured so dominantly on Google’s search engine results pages (SERPs)?
Heck, I’d love my business to pop up when consumers search for criteria relevant to me … wouldn’t you?
No one knows exactly how Google’s algorithm works — but, there are a few ways to organize and optimize your website content so Google knows what content to feature on the SERPs for the various searches people conduct to find you.
This is where structured data comes in. Structured data can make your organization more visible to potential customers and increase your click-through rate by up to 30%.
Not sure what structured data is? That’s OK. By the end of this guide, you’ll be a structured data wizard — and your website will reap the benefits.
We know that what searchers see online is much different than what search engines see.
View the source code for any website by going to View > Developer > View Source.
This behind-the-scenes code tells browsers how information should be organized on the website (as part of its website development) and tells web crawlers what’s on the page.
Structured data is also at play here. Embedded tags of code (a.k.a. “markup”) throughout the HTML of a webpage tell Google and other search engines what information to display in the SERPs and what this information represents. It also helps social media platforms synthesize your social media posts into snippets that preview the content using Open Graph Protocol (which we touch on later).
This markup is important. It educates search engines on what specific content is on the page. This creates more relevant, informed searches and makes the site a candidate for enhanced results like featured snippets, rich snippets, image and video carousels, knowledge boxes, and more (which we’ll touch on later).
Google’s SERPs weren’t always as easy on the eye as they are today. Don’t remember? Check out this Google result for “pool tables” from 2008.
Wow. That’s a world of difference. Not only are these results easier to read, but the extra features make for a much more informative, intelligent searching — and shopping — experience. Between the sponsored content and live map (plus the product carousel, question snippets, and related searches not shown in the screenshot), Google provides pretty much everything I need to know about pool tables.
Heck, sometimes I search for something and find the answer right on the SERP — I don’t even have to click on a result. Does that ever happen to you? If it has, you can thank structured data.
How does structured data work?
At this point, you might be asking: How can there exist a language (markup) that is consistently recognized by search engines and people alike?
In order for this markup to be accurately and universally understood, there are standardized formats and vocabularies that should be used.
Let’s go back to basics for a minute. When conveying information, whether you’re communicating with a human or a computer, you need two main things: vocabulary (a set of words with known meanings) and syntax (a set of rules on how to use those words to convey meaning).
Most terminology surrounding structured data markup can be organized into these two concepts — vocabularies and syntaxes — and webmasters can combine whichever two they need to structure their data (with the exception of Microformats).
Okay … that’s enough of the fancy developer speak. What should you be using for your structured data?
Schema.org is the accepted universal vocabulary standard for structured data. It was founded and is currently sponsored by Google, Bing, Yahoo, and Yandex. It’s flexible, open-sourced, and constantly updated and improved.
As for syntax, there’s no correct answer. Google recommends JSON-LD (and defaults to that syntax when using its Structured Data Markup Helper — as you see below). JSON-LD uses Javascript code and embedded widgets to dynamically display your content, which is typically a simpler development process.
Google also recognizes Microdata and RDFa. Both of these syntaxes use HTML to identify properties within structured data. Microdata is typically only used in the page body, whereas RDFa is commonly used in both the page head and body.
On the other hand, JSON-LD is only placed in the page head, meaning, for certain types of markup, JSON-LD makes it so you don’t have to navigate subheaders, supporting copy, and related styling that’s included in the page’s HTML. This is why JSON-LD is considered simpler than the other two.
Ultimately, it all depends on the data you’re trying to implement, what the benefit is to your website, and what would be easier to share with your team.
Structured Data and Mobile
Structured data affects mobile a little differently — through Accelerated Mobile Pages (AMP). Accelerated Mobile Pages is a Google-backed, open source project to help all mobile pages load quickly regardless of device.
Structured data markup works a little differently for social platforms. This requires Open Graph Protocol and similar languages that ensure your website and blog content appear in an easy-to-read way when you promote this content on a social network. Two common social media features that use Open Graph Protocol are Pinterest Rich Pins and Twitter cards. We talk more about how to do this below.
<meta property=”og:description” content=”Discover how to create and manage a brand that helps your business become known, loved, and preferred”
Note: Unfortunately, structured data doesn’t impact your organic search ranking (besides helping you grab a spot in a knowledge panel or Featured Snippet at the top of the list). It also doesn’t change how your content looks or behaves on your website — it only affects how and where it might appear on SERPs.
Examples of Structured Data
To the average internet user, structured data can’t be seen. It’s hidden among the code that makes up our favorite websites and online platforms. So, how does structured data affect what we (and our customers) see? What does it look like to the “naked” eye?
When webmasters adhere to structured data standards, search engines like Google and Bing reward their websites and organizations by featuring their content in a variety of SERP features (another reason to use structured data).
There are also a couple of ways that structured data can benefit your non-SERP marketing efforts on social media and email marketing.
Content Features
Content features appear as separate search results among normal search results.
1. Carousels
Carousels show up as images with captions related to a search, such as movie actors, cars, or news articles. Searchers can click through these images to access a separate SERP for that search. Here’s how to use structured data to show up on Carousels.
2. Videos
Videos function similarly to carousels but feature videos instead of images or other listings. Searchers can scroll through these results to directly access and watch each video.
Featured Snippets display information relevant to a query — and link to a third-party website (which sets them apart from Answer Boxes and Knowledge Panels, which draw from public domain databases). They don’t count as one of the ten organic results on a SERP, so if you “win” the Snippet, your website shows up twice.
Knowledge Panels pull together the most relevant information from a search and display it as a separate panel on the right side of a SERP. They typically include images, dates, and category-specific information, such as stock prices for companies or birthdays for celebrities. You can use a structured data markup like Schema to tag your content with all of these categories, but there’s no guarantee that Google will reward you with your own knowledge panel.
In fact, structured data doesn’t promise anything, it only makes it easier for search engines and social networks to interpret your content.
Sitelinks are additional links displayed beneath a search result that navigate to different parts of a website. Google pulls them into a SERP when it thinks additional results would benefit a searcher. Websites with intelligent anchor text and alt text that’s informative, compact, and avoids repetition have a good chance of displaying a result with Sitelinks.
Sitelinks Searchbox is like Sitelinks with a search bar directly featured in the result. That search box uses Google — not the featured website — which creates a brand new SERP. Sitelinks Searchboxes only show up in branded searches.
The how-to feature is similar to FAQ in that it displays a page’s content (if it fits certain criteria) on the SERP so searchers can see that information. It walks searchers through a set of steps and can feature video, text, and images.
Unlike FAQ, the individual steps in how-to result aren’t linkable; however, searchers can access the entire list of steps by clicking your results. These results can show up in two formats: standard accordion layout or rich result carousel, depending on the content. Here’s how to use structured data to display how-to content in your search results.
Structured data can also be used to enhance to non-SERP features.
1. Social Cards
Social-specific markup doesn’t have a big impact on SEO, but it’s still important for marketers to understand. Not only does this markup enhance your social posts and ad efforts, but it can also be read by search engines — which could contribute to any SEO changes in the future.
Social cards display images and rich text when links are shared on social media. Any organization who uses social media to share content should be using proper social markup, such as Open Graph Protocol.
Here’s how you ensure your social content displays social cards:
Have you recently booked a flight or ordered something online? If you have Gmail, you might’ve seen your reservation or order details summarized at the top of the confirmation email. This is due to email markup.
The concept of structured data might seem confusing, but its implementation isn’t nearly as complicated. In fact, there are a number of structured data tools that can help you along the way, namely Google’s Structured Data Markup Helper and Testing tools. Sure, you can implement structured data by hand, but Google’s tool ensures accuracy — and makes your life easier.
It’s important to note that adding structured data markup on your website doesn’t guarantee a Featured Snippet or Sitelinks Sitebox. Google can take weeks to crawl your new HTML markup, and sometimes, the information doesn’t show up at all.
However, taking the steps to implement structured data is critical. Google might be smart, but it can’t (yet) understand everything on its own. It might seem like a lot of extra work, but using the correct structured data markup will ensure Google can make sense of your content and can help you potentially increase your click-through rates and visibility.
Here’s how to implement structured data by using Google’s Structured Data Markup Helper tool.
Make sure the Website tab is open. Choose the type of data to which you’d like to add the HTML markup. Plug the web page URL (or the HTML code) at the bottom, and click Start Tagging.
3. Highlight page elements and assign data tags.
When the tool loads, you should see your web page on the left side and data items on the right. Highlight different components of your web page to assign data tags such as name, author, and date published. (The tool will suggest different data tags for different types of data, i.e. Events or Book Reviews.)
As you select and assign data tags, you’ll see the information pop up under My Data Tags on the right panel. You can also add any missing tags that might not be visible on the web page; just click Add missing tags.
4. Create the HTML.
When you’re finished tagging and assigning data items, click Create HTML in the upper right-hand corner.
5. Add the schema markup to your page.
On the next screen, you should see your structured data markup on the right side. The tool automatically produces the script as JSON-LD markup, but you can change it to Microdata by clicking the JSON-LD drop-down menu in the top menu.
Click Download to download the script as an HTML file. To read more about adding structured data to your article (or any other data type), click Articles in the right corner above the markup.
To “publish” your markup, copy and paste the new HTML markup into your CMS or source code of your web page. Lastly, click Finish in the top right corner to check out Google’s recommended Next Steps … one of which will bring you to this next one.
6. Test your markup with Google’s Structured Data Testing Tool.
Open up Google’s Structured Data Testing Tool. You can enter any URL of a web page you’d like to test, or you can enter HTML code. (In the example below, I’m analyzing the code previously produced by Google’s Structured Data Markup Helper Tool.) Click Run Test to begin.
7. Diagnose and fix any detected issues.
The tool will show you your HTML markup on the left side and the markup analysis on the right. Note any red errors or warnings. Click on any data row to highlight the corresponding markup on the left.
If necessary, you can edit any errors in the HTML directly in the tool panel before “publishing” the tested HTML markup.
8. Be patient.
This last step is simple but arguably the hardest — to sit back and wait. Google can take weeks to re-crawl new HTML, and even then, your content isn’t guaranteed to show up in rich snippets or other SERP features.
As long as you follow the correct structured data standards and markup, give Google all the information it needs to know, and be patient, your website and business can benefit greatly from structured data and enhanced SEO.
Get Started with Structured Data Today
Google and other search engines continuously improve how they aggregate and present information. They offer enhanced, intelligent search experiences with the customer in mind. It’s up to you as a business to keep up, and you can do so through structured data.
Structured data benefits businesses — through increased visibility — and consumers — through better usability. Use this guide, tools, and resources to optimize and organize your website and make your customers’ lives easier.
Editor’s note: This post was originally published in April 2019 and has been updated for comprehensiveness.
Pinterest is such a key part of the buying journey for its users that over 90 percent of weekly active Pinners use Pinterest to make purchasing decisions.
Talk about buying power!
Not only are Pinterest users making purchase decisions on the platform, 83 percent say they are making purchases specifically based on the content they’ve seen from brands on Pinterest.
Pinterest is no longer simply a place to save ideas and build dream boards. Instead, Pinterest has turned into the world’s largest visual discovery platform.
And there are a lot of opportunities for brands.
We had a chance to chat with the team over at Pinterest about some of their best practices for brands looking to increase sales. We’re excited to share those lessons with you!
Here’s what we learned…
How people are using Pinterest
According to one survey, “47 percent of social media users saw Pinterest as the platform for discovering and shopping for products—more than three times higher than those who cited Facebook or Instagram.”
Pinterest might not immediately come to mind as a platform to invest in for many brands, but it should.
Pinterest lives in a unique space on the internet where users are discovering content related to themselves and their aspirations rather than focusing on others, and this has turned it into a powerful platform for users to make purchasing decisions and discover new brands and products.
Clearly, Pinterest is not one to be ignored when it comes to your marketing strategy. Here’s how you can use the platform to drive sales.
How to leverage Pinterest for sales: 5 tips from the Pinterest team
There are some really simple ways that you can start leveraging Pinterest to reach new audiences and optimize your pins and profile for sales. Some of these tips might be easy to implement immediately while others might play into later strategies, let’s dive in!
1. Brand your pins
A whopping 97 percent of top searches on Pinterest are unbranded, according to the Pinterest team. For brands, this presents an opportunity to stand out and gain brand recognition through the platform.
Pinterest recommends adding a small logo in one of the four corners of your pin, this can be done really easily in a tool like Canva. You can play around with the design, of course, and add your logo wherever it feels best. In this example from Quip, they went with top centered to fit with the rest of the text on their image.
2. Create mobile-first content
As with most sites, mobile is extremely important on Pinterest. Eighty-five percent of Pinners are using the mobile app, so it’s important that your content appeals to them while they’re on their phones and appears properly in their feeds. If you’re linking back to your own content, it’s also important that the page that you’re sending users to is mobile friendly as well.
A tip from Pinterest here is to tailor your font size to phone rendering to make sure your fonts are legible on small screens and to design for a vertical aspect ratio. The ideal dimensions are 600 pixels x 900 pixels.
3. Create a similar look and feel
Have you ever clicked on a beautiful image on Pinterest only to be taken to a website that looks nothing like the pin? I have, and it left me really confused.
According to Pinterest, the best practice is to make sure your pins and your website have a similar look and feel, and that doing this pays off. In an analysis from Pinterest, they found that “Pins that went to landing pages with similar imagery had a 13 percent higher online sales lift.”
This example from Ettitude is really great. The pin they are sharing fits seamlessly in a lot of home decor and design tags on Pinterest.
And although their website uses different photos, it still has a similar feel to the pin.
4. Time your campaigns
A big element to social media marketing and campaigns is timing. When are people online and when are people talking about the things you want to talk about?
Luckily in the case of Pinterest, they release annual ‘Seasonal Insights,’ which helps take away some of the guesswork. A report that contains more than a dozen specific moments that take place throughout the year.
For example, their 2019 report shared that users start sharing holiday content in June all the way through December and that content related to the Summer starts getting pinned at the beginning of February. They also have monthly trends reports. Here’s their latest for December 2019 trends on Pinterest, it shares specific trends like the search term ‘peach green tea’ is up 320 percent YoY!
These are great free resources that you can leverage to start timing seasonal campaigns around when people are starting to make specific seasonal purchasing decisions. I would never have thought that people start looking at holiday content in June but that’s super-specific information that can go a long way to help with timely campaigns.
5. Set up your shop
One of the main ways for Pinterest to help generate sales is for the products you are selling to be easily available through Pinterest. Luckily, the platform makes this really easy for brands to set up and feature prominently on their profiles.
The shop tab is just what it sounds like, a place where users can go to see all of the products your brand is selling. On the flip side, brands can leverage that tab to share pins that link directly to their sales pages for the specific product.
Pinterest makes this whole process quite easy, they even have a method for importing new products through Pinterest Catalogs. All you have to do is have your data source approved and then as you add new products to your website, they get automagically added to Pinterest as well.
We hope this guide helps you get started with or double down on your efforts with Pinterest. Let us know about your experience with Pinterest in the comments!
If you want even more Pinterest resources, the Pinterest team has created a free Pinterest Academy with tons of lessons in there.
Every year, 80% of new year’s resolutions fail by the time February rolls around. Launching your email marketing strategy shouldn’t be one of them.
That’s why we created a simple, 7-day challenge to help you dominate email marketing in 2020.
By the end of it, you’ll have launched the most important parts of a successful email marketing strategy. And the best part? You only need 30 minutes or less each day to complete this challenge.
Day 1: Choose your email template and brand it. (30 minutes)
This step is often overlooked. Many people use different email templates every time they send an email. Or, they never fully customize a template to match their brand.
But branding an email template and using it consistently are important. Your brand sets you apart from your competitors. It allows you to be unique and develop a personality for your business. It builds credibility and trust between you and your subscribers. Your subscribers can see your content and immediately tie it back to you.
Step 1: Choose your email template. Find an email template that works with your brand and your message. A plain template is often better than one already filled with colors and background images, because it’s easier to make it your own. Then, add your logo to the top or bottom of the email. (Inside AWeber, there are 8 NEW email templates you can easily customize to fit your branding. Choose the template format you’d like. Then drag and drop to add your images and build the layout you want.)
Step 2: Add your brand colors to your template. Don’t overdo it! Too many colors can be distracting. Try adding your brand colors in just a few places, like your call-to-action buttons, header image, or headlines.
For example, in the welcome email of AWeber’s FWD: Thinking newsletter, we incorporate our brand colors by using a header image with AWeber’s green and blue gradient and a call-to-action button with our brand’s shade of blue.
To do: Choose an email template and add your logo and brand colors to it.
Day 2: Customize your confirmation message. (15 minutes)
A confirmed opt-in message is an email you send people immediately after they fill out your sign up form. It asks them to verify they want to subscribe to your emails by clicking a link or button in the message.
Confirmation messages are optional but strongly recommended. They serve as proof that your subscribers definitely want to be on your list. So internet service providers (like Gmail and Yahoo!) may deliver more of your messages to the inbox when you use confirmation messages. Plus, it prevents subscribers from signing up using fake email addresses.
To make your subscribers more likely to confirm their subscription, you can follow these common best practices for confirmed opt-in emails:
Keep your content short.
Explain the value your subscribers will receive by subscribing to your list.
To do: Set up and customize the subject line and content of your confirmed opt-in email. (If you’re an AWeber customer, you can follow these directions to complete this step.)
Day 3: Create a sign up form. (30 minutes)
Sign up forms allow your subscribers to easily join your email list. You can promote your form by adding it to your website and sharing a hosted sign up form with your audience. Hosted sign up forms allow you to share your form anywhere, even if you don’t have a website.
To do: Write your sign up form copy and build your form using ideas from the homework post you just read.
Day 4: Write your welcome email (30 minutes)
A welcome email is the first message subscribers receive after joining your list and confirming their subscription. And it gets a lot of attention — on average, open rates are 4 times higher and click-through rates are 5 times higher than other emails, according to marketing research company Experian. You can take advantage of this above average engagement by crafting an excellent welcome email.
Your welcome email should:
Welcome subscribers to your email list.
Deliver the lead magnet you promised on your sign up form.
Explain what kind of content you’ll send subscribers, how often you’ll send it, and what they’ll learn.
Introduce yourself or your business.
Ask subscribers to add you to their address book. (This is called whitelisting and it can help more of your emails bypass the spam folder.)
Once you draft your welcome email, take some time to personalize it! Personalization makes your subscribers feel you’re writing a message specifically to them. Something as simple as including your subscriber’s first name in the subject line or body of your welcome email can boost opens and clicks. Homework: Read The One Email You Should Always Send and How Personalization Can Help You Connect with Subscribers.
Day 6: Publish your form on your social media channels. (20 minutes)
Your list is set up and your confirmation and welcome messages are ready to go. Now it’s time to put your hard work to the test and start to grow your list!
An easy first step is turning you social media followers into email subscribers. People who follow your brand on social media have already shown they want to hear from you. And there’s no better way for them to stay up to date on your latest content and sales than joining your email list.
Post a link to your hosted sign up form on Facebook, Twitter, and LinkedIn and ask your social followers to subscribe for exclusive updates.
Day 7: Share your sign up form with your connections. (20 minutes)
Reach out to the people you already know, like colleagues, friends, or family members. Ask them if they want to sign up for your email list.
Let them know what content you are offering and explain the benefits they would receive if they sign up.
If they say no, maybe the content you’re offering just isn’t for them. But maybe they know someone it would be perfect for. You never know until you ask!
To do: Contact 5 people you know. Send them the hosted URL to your sign up form and ask if they’d like to join your email list or share it with someone they know.
Ready, set, go!
Congrats! If you completed this 7-day challenge, you’re well on your way to launching a successful email marketing strategy.
Ready for your next challenge? Then try this: Create a lead magnet — a freebie you give subscribers when they sign up for your list. Lead magnets can increase the conversion rate of your sign up form.
For example, author and productivity expert Paula Rizzo offers a free List Making Starter Kit in return for signing up for her email newsletter, which she sends via AWeber.