NBC is the latest broadcaster to embrace major events as the best way to set itself apart from its growing number of streaming rivals, unveiling an aggressive slate of programming stretching into 2024. “Where do we fit into these so-called streaming wars? We are the ‘mainstreamer,'” NBC Entertainment chairman Paul Telegdy said today at the…
If you have ever left a comment on NeilPatel.com, you’ll notice that there is no URL field.
Why?
Well, a few years ago, blog commenting exploded. I was literally getting thousands of spam comments a day from people just leaving a comment for the purpose of link building instead of providing value to the community.
Sure, there are spam plugins like Akismet, but it doesn’t catch everything.
Now, most blog comments contain the nofollow attribute in which they tell Google not to follow the link or drive any “SEO value” to that URL.
But still, people still leave blog comments for the purpose of link building.
So, over the past 7 months, I’ve been running an interesting experiment to answer the age-old question…
Do backlinks from blog comments actually help rankings?
Experiment rules
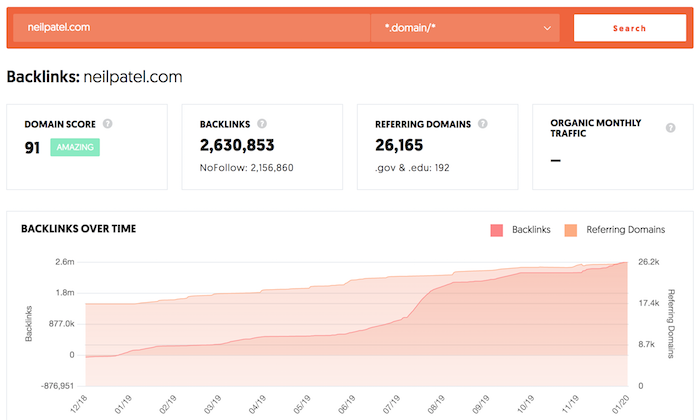
First off, for this experiment, we used “domain score,” which is similar to domain authority.
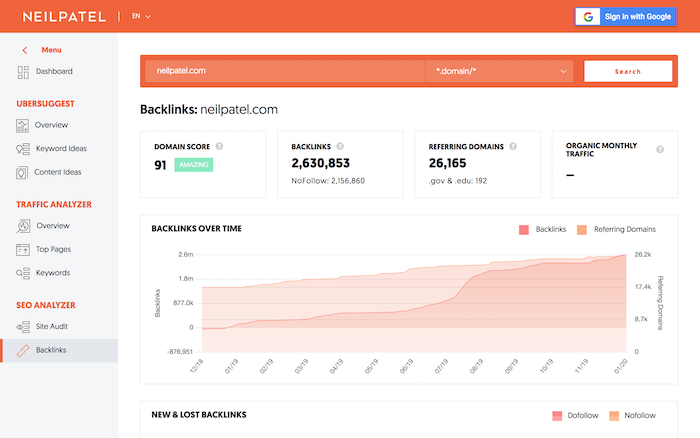
If you want to know your domain score, the backlinks report in Ubersuggest will tell you what it is.
With this experiment, I sent out an email to a part of my list looking for participants and had 794 websites apply.
From there, I set the following criteria:
English-only sites – It’s easier to rank on many of Google’s international search engines even without building links. I removed non-English speaking sites as I didn’t want to skew the results.
Low-authority sites – I removed any website with a domain score greater than 20 and any site with more than 20 backlinks. The reason being is when a site has a lot of authority, they tend to rank easily for new keywords, even if they don’t build any new links.
No subdomains – I didn’t want a WordPress.com site, a Blogspot site, or even a Tumblr site. Again, this would skew the results so I removed them.
After eliminating the sites that didn’t meet the above criteria, I was left with 314 sites.
Of those 314 sites, many dropped off because they didn’t complete the required work on their part (which was to write a blog post), so I was left with 183 sites at the end that participated.
How the experiment worked
Similar to my previous link building experiment and my on-page SEO experiment, I had these websites write a 1,800 to 2,000-word blog post on whatever subject that was relevant to their site.
The websites had 2 weeks to publish their content and then after 30 days, I looked up their URL in Ubersuggest to see how many keywords each URL ranked for in the top 100 spots, top 50, spots, and top 10 spots.
As I have mentioned in the past, Ubersuggest has a big database of keywords. We are currently tracking 1,459,103,429 keywords.
Now, most of these keywords are barely searched but a decent amount of them get hundreds, if not thousands, of searches per month. A much smaller percentage of keywords generate hundreds of thousands or even millions of searches per month.
In other words, the majority of the keywords people are searching for are long-tail phrases.
We then spent a month building links and then waited another 3 months to see what happened to each site’s rankings.
But here’s the thing: We didn’t build the same type of links to all sites. Instead, we broke the 183 sites into 4 groups (roughly 46 sites per group).
Here were the groups:
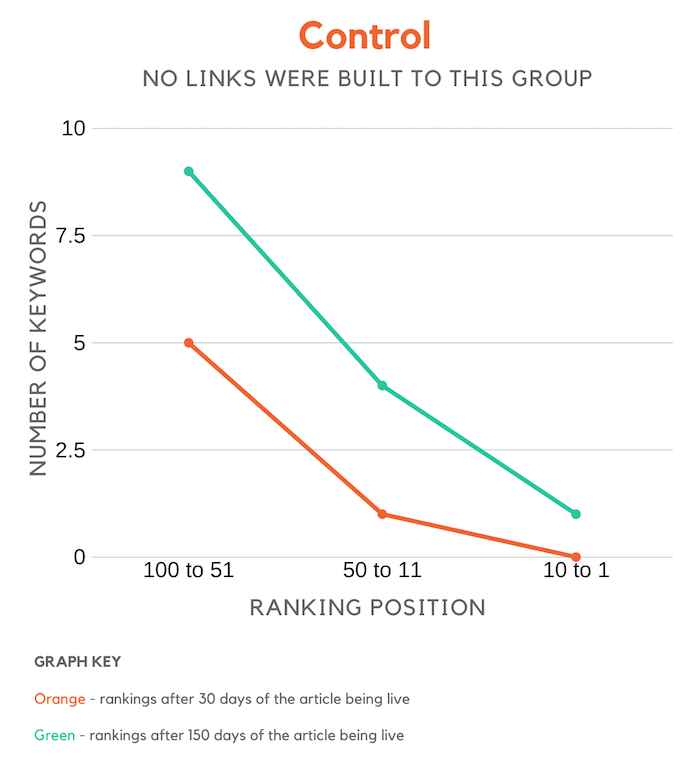
Control – we didn’t build any links to these sites, we just wanted to see what happened to their rankings over time with no focus on link building.
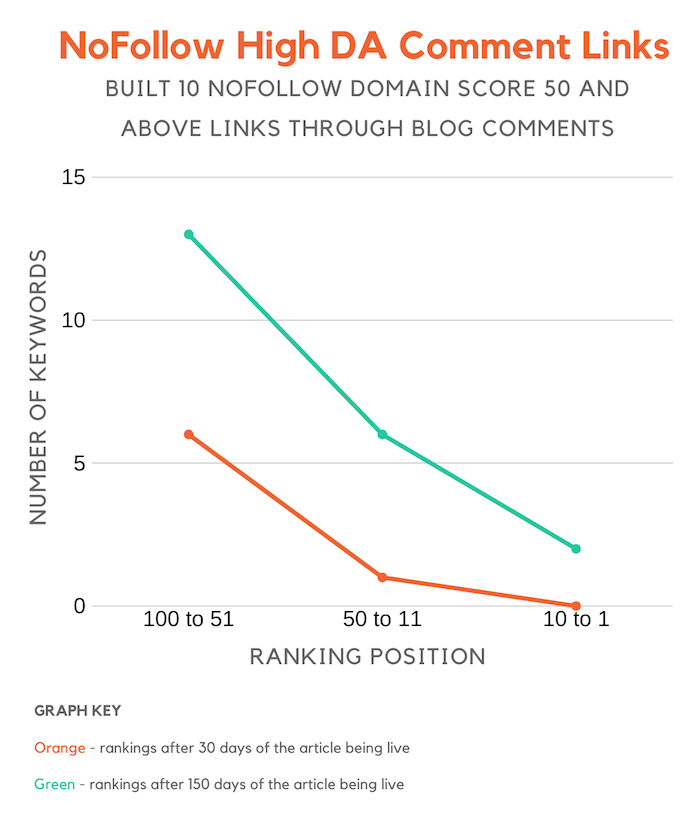
Nofollow high domain score blog comment links – with this group, we built 10 links through blog comments. The links pointed to the newly written post and they were from blogs that had a domain score of 50 or higher and they all contained a nofollow attribute.
Dofollow high domain score blog comment links – with this group, we built 5 links through blog comments. The links pointed to the new post and were dofollow from blogs with a domain score of 40 or higher. (I reduced the domain score criteria for this category and the link quantity as we struggled to find a large number of high authority blogs that pass link juice in the comment section.)
Dofollow low domain score blog comment links – with this group, we built 10 links through blog comments. Each link pointed back to the article and it was from a blog that contains a domain score of at least 20 but no higher than 39. (I was able to build more links here as there are many more low domain score blogs than high domain score ones.)
Keep in mind with the link building for groups 2, 3 and 4,
there was no specific anchor text agenda. Because the links were built through
blog comments, it was too hard to control the anchor text as we didn’t want to
be spammy.
And each comment left on the blog contained at least 75
words as we wanted to ensure that each comment provided value and the core
purpose wasn’t just link building.
Alright, so let’s dive into the results.
Control group
Do you really need links to rank on Google? Well, the chart below says a lot…
As you can see over time, you will naturally grow your search rankings even if you don’t build any links.
Of course, if your content is amazing and you do on-page SEO, you’ll rank higher, but still not growing your link count doesn’t mean you will rank for anything out there… instead, you will still rank for long-tail terms that aren’t too competitive.
Nofollow high domain score blog comment links
Now the results from this group were interesting…
As you can see, the sites in this group had better results than the control group even though the links were nofollowed.
Keep in mind, though, that it could be many variables that caused this, such as the content quality may have been better.
Overall, the sites did perform better than the control group but not by a substantial amount.
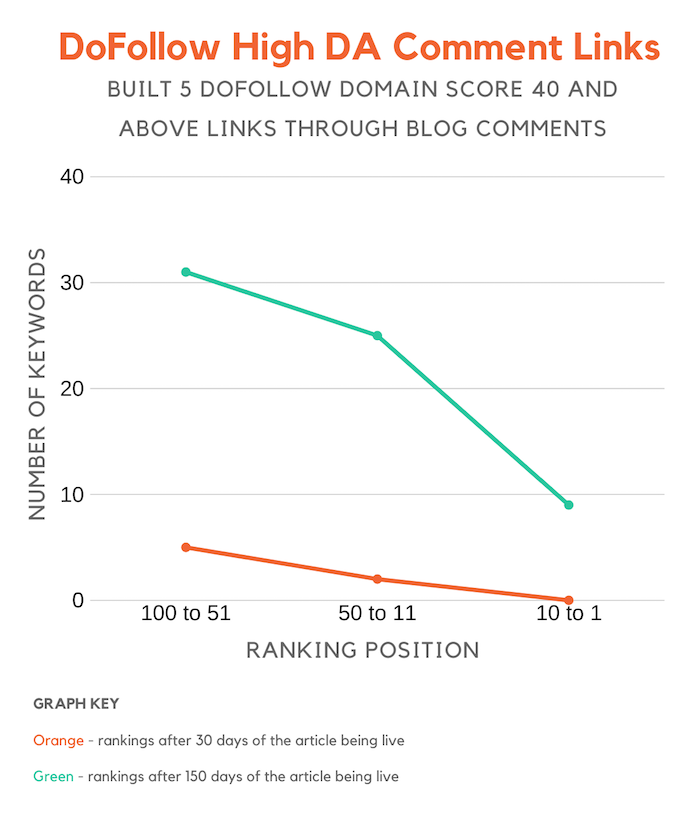
Dofollow high domain score blog comment links
Google is sophisticated, they are able to know if a link is from user-generated content (such as blog comments), so I assumed even though the links where dofollow they still wouldn’t have much (if any) impact.
But, shockingly, sites in this group had the largest gains.
As you can see from the chart above, links from high authority sites, even if it is through user-generated content, help with rankings. They just have to be dofollow.
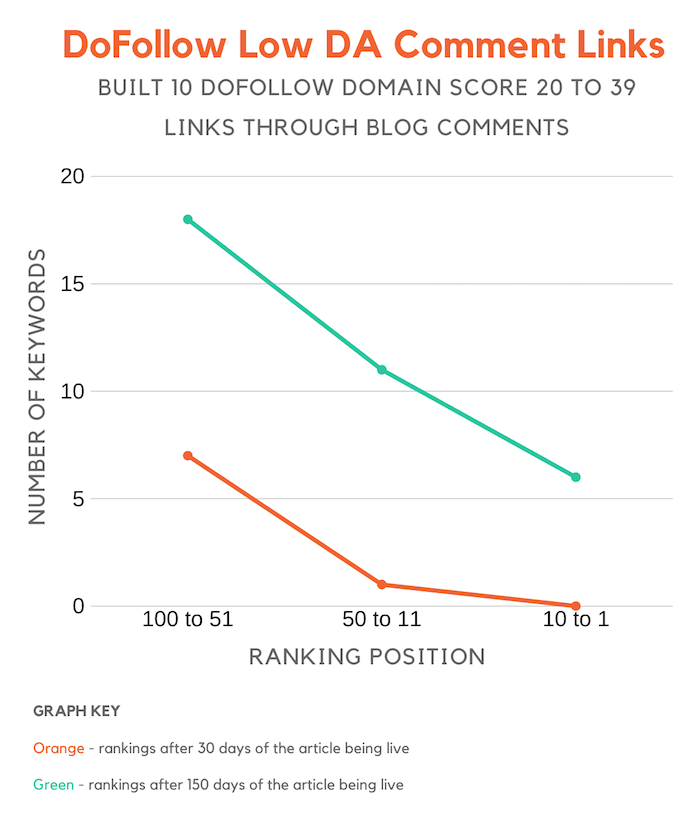
Dofollow low domain score blog comment links
With this last group, we were able to build more dofollow links because we focused on sites with lower authority.
And as you can see from the chart above, it did help with rankings more than building nofollow links but it didn’t help nearly as much as getting links from blogs with higher domain scores.
We built 10 links instead of 5, but the quantity didn’t help
as much as having high domain score links. This group increased their rankings
by 337% versus 828% that group 3 experienced even though they had half the
links.
Again, we still saw gains, just not as large as the previous group.
Conclusion
Who would have thought that building links through blog
comments still helps?
Now, if you are going to use this tactic, you’ll want to focus on blogs that have dofollow comments.
If you aren’t sure how to find them, you can perform a Google search for the following:
“title=”CommentLuv Enabled”” KEYPHRASE – this will showcase blogs that have CommentLuv enabled which means they pass link juice.
“dofollow blogs” – you find a lot of blog articles listing out blogs that have dofollow links. Some of them look like this but you will have to double-check each site as many are nofollow even though bloggers claim they are dofollow.
Followlist – this is a directory of blogs that have dofollow links.
When building links, focus on higher domain scores as it has a bigger impact on rankings.
In addition to that, you’ll only want to leave a comment if you can provide value. Don’t stress the anchor text, focus on the quality of your comment as you don’t want to be a spammer.
Posting spammy links will just cause your comment to be
removed.
Lastly, don’t just leave a valuable comment for the sake of generating a link. Make sure it is on relevant blogs as well. And if that means the blog doesn’t have as high of a domain score that’s fine because the data above shows that even low domain score links still help (just not as much).
So, have you thought about leaving more comments on other blogs? It’s a great way to get your brand out there, generate referral traffic, and boost your rankings.
Every year, 80% of new year’s resolutions fail by the time February rolls around. Launching your email marketing strategy shouldn’t be one of them.
That’s why we created a simple, 7-day challenge to help you dominate email marketing in 2020.
By the end of it, you’ll have launched the most important parts of a successful email marketing strategy. And the best part? You only need 30 minutes or less each day to complete this challenge.
Day 1: Choose your email template and brand it. (30 minutes)
This step is often overlooked. Many people use different email templates every time they send an email. Or, they never fully customize a template to match their brand.
But branding an email template and using it consistently are important. Your brand sets you apart from your competitors. It allows you to be unique and develop a personality for your business. It builds credibility and trust between you and your subscribers. Your subscribers can see your content and immediately tie it back to you.
Step 1: Choose your email template. Find an email template that works with your brand and your message. A plain template is often better than one already filled with colors and background images, because it’s easier to make it your own. Then, add your logo to the top or bottom of the email. (Inside AWeber, there are 8 NEW email templates you can easily customize to fit your branding. Choose the template format you’d like. Then drag and drop to add your images and build the layout you want.)
Step 2: Add your brand colors to your template. Don’t overdo it! Too many colors can be distracting. Try adding your brand colors in just a few places, like your call-to-action buttons, header image, or headlines.
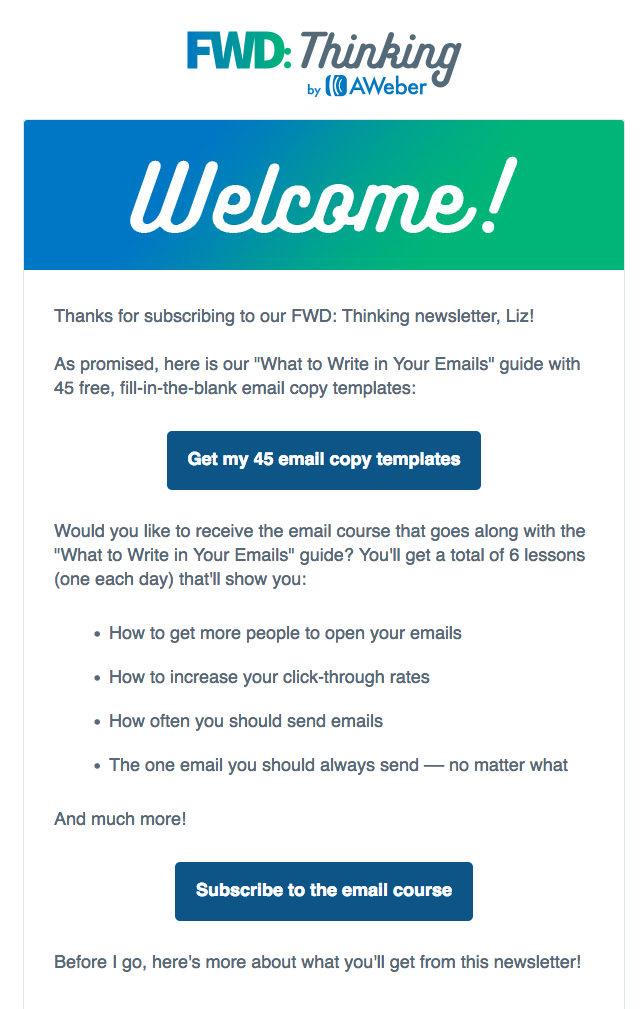
For example, in the welcome email of AWeber’s FWD: Thinking newsletter, we incorporate our brand colors by using a header image with AWeber’s green and blue gradient and a call-to-action button with our brand’s shade of blue.
To do: Choose an email template and add your logo and brand colors to it.
Day 2: Customize your confirmation message. (15 minutes)
A confirmed opt-in message is an email you send people immediately after they fill out your sign up form. It asks them to verify they want to subscribe to your emails by clicking a link or button in the message.
Confirmation messages are optional but strongly recommended. They serve as proof that your subscribers definitely want to be on your list. So internet service providers (like Gmail and Yahoo!) may deliver more of your messages to the inbox when you use confirmation messages. Plus, it prevents subscribers from signing up using fake email addresses.
To make your subscribers more likely to confirm their subscription, you can follow these common best practices for confirmed opt-in emails:
Keep your content short.
Explain the value your subscribers will receive by subscribing to your list.
To do: Set up and customize the subject line and content of your confirmed opt-in email. (If you’re an AWeber customer, you can follow these directions to complete this step.)
Day 3: Create a sign up form. (30 minutes)
Sign up forms allow your subscribers to easily join your email list. You can promote your form by adding it to your website and sharing a hosted sign up form with your audience. Hosted sign up forms allow you to share your form anywhere, even if you don’t have a website.
To do: Write your sign up form copy and build your form using ideas from the homework post you just read.
Day 4: Write your welcome email (30 minutes)
A welcome email is the first message subscribers receive after joining your list and confirming their subscription. And it gets a lot of attention — on average, open rates are 4 times higher and click-through rates are 5 times higher than other emails, according to marketing research company Experian. You can take advantage of this above average engagement by crafting an excellent welcome email.
Your welcome email should:
Welcome subscribers to your email list.
Deliver the lead magnet you promised on your sign up form.
Explain what kind of content you’ll send subscribers, how often you’ll send it, and what they’ll learn.
Introduce yourself or your business.
Ask subscribers to add you to their address book. (This is called whitelisting and it can help more of your emails bypass the spam folder.)
Once you draft your welcome email, take some time to personalize it! Personalization makes your subscribers feel you’re writing a message specifically to them. Something as simple as including your subscriber’s first name in the subject line or body of your welcome email can boost opens and clicks. Homework: Read The One Email You Should Always Send and How Personalization Can Help You Connect with Subscribers.
Day 6: Publish your form on your social media channels. (20 minutes)
Your list is set up and your confirmation and welcome messages are ready to go. Now it’s time to put your hard work to the test and start to grow your list!
An easy first step is turning you social media followers into email subscribers. People who follow your brand on social media have already shown they want to hear from you. And there’s no better way for them to stay up to date on your latest content and sales than joining your email list.
Post a link to your hosted sign up form on Facebook, Twitter, and LinkedIn and ask your social followers to subscribe for exclusive updates.
Day 7: Share your sign up form with your connections. (20 minutes)
Reach out to the people you already know, like colleagues, friends, or family members. Ask them if they want to sign up for your email list.
Let them know what content you are offering and explain the benefits they would receive if they sign up.
If they say no, maybe the content you’re offering just isn’t for them. But maybe they know someone it would be perfect for. You never know until you ask!
To do: Contact 5 people you know. Send them the hosted URL to your sign up form and ask if they’d like to join your email list or share it with someone they know.
Ready, set, go!
Congrats! If you completed this 7-day challenge, you’re well on your way to launching a successful email marketing strategy.
Ready for your next challenge? Then try this: Create a lead magnet — a freebie you give subscribers when they sign up for your list. Lead magnets can increase the conversion rate of your sign up form.
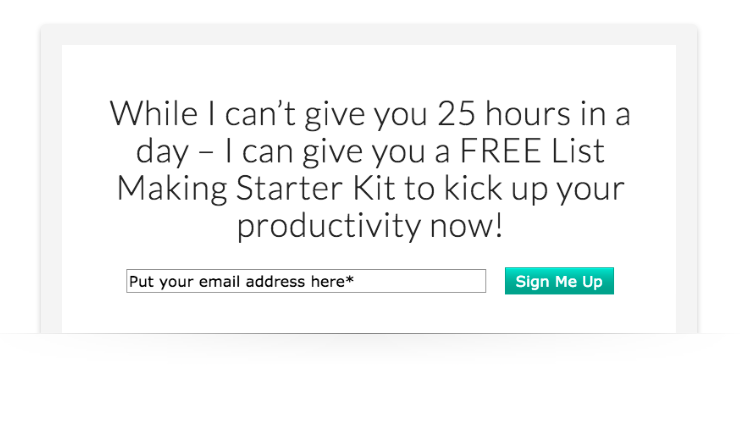
For example, author and productivity expert Paula Rizzo offers a free List Making Starter Kit in return for signing up for her email newsletter, which she sends via AWeber.
Every year, 80% of new year’s resolutions fail by the time February rolls around. Launching your email marketing strategy shouldn’t be one of them.
That’s why we created a simple, 7-day challenge to help you dominate email marketing in 2020.
By the end of it, you’ll have launched the most important parts of a successful email marketing strategy. And the best part? You only need 30 minutes or less each day to complete this challenge.
Day 1: Choose your email template and brand it. (30 minutes)
This step is often overlooked. Many people use different email templates every time they send an email. Or, they never fully customize a template to match their brand.
But branding an email template and using it consistently are important. Your brand sets you apart from your competitors. It allows you to be unique and develop a personality for your business. It builds credibility and trust between you and your subscribers. Your subscribers can see your content and immediately tie it back to you.
Step 1: Choose your email template. Find an email template that works with your brand and your message. A plain template is often better than one already filled with colors and background images, because it’s easier to make it your own. Then, add your logo to the top or bottom of the email. (Inside AWeber, there are 8 NEW email templates you can easily customize to fit your branding. Choose the template format you’d like. Then drag and drop to add your images and build the layout you want.)
Step 2: Add your brand colors to your template. Don’t overdo it! Too many colors can be distracting. Try adding your brand colors in just a few places, like your call-to-action buttons, header image, or headlines.
For example, in the welcome email of AWeber’s FWD: Thinking newsletter, we incorporate our brand colors by using a header image with AWeber’s green and blue gradient and a call-to-action button with our brand’s shade of blue.
To do: Choose an email template and add your logo and brand colors to it.
Day 2: Customize your confirmation message. (15 minutes)
A confirmed opt-in message is an email you send people immediately after they fill out your sign up form. It asks them to verify they want to subscribe to your emails by clicking a link or button in the message.
Confirmation messages are optional but strongly recommended. They serve as proof that your subscribers definitely want to be on your list. So internet service providers (like Gmail and Yahoo!) may deliver more of your messages to the inbox when you use confirmation messages. Plus, it prevents subscribers from signing up using fake email addresses.
To make your subscribers more likely to confirm their subscription, you can follow these common best practices for confirmed opt-in emails:
Keep your content short.
Explain the value your subscribers will receive by subscribing to your list.
To do: Set up and customize the subject line and content of your confirmed opt-in email. (If you’re an AWeber customer, you can follow these directions to complete this step.)
Day 3: Create a sign up form. (30 minutes)
Sign up forms allow your subscribers to easily join your email list. You can promote your form by adding it to your website and sharing a hosted sign up form with your audience. Hosted sign up forms allow you to share your form anywhere, even if you don’t have a website.
To do: Write your sign up form copy and build your form using ideas from the homework post you just read.
Day 4: Write your welcome email (30 minutes)
A welcome email is the first message subscribers receive after joining your list and confirming their subscription. And it gets a lot of attention — on average, open rates are 4 times higher and click-through rates are 5 times higher than other emails, according to marketing research company Experian. You can take advantage of this above average engagement by crafting an excellent welcome email.
Your welcome email should:
Welcome subscribers to your email list.
Deliver the lead magnet you promised on your sign up form.
Explain what kind of content you’ll send subscribers, how often you’ll send it, and what they’ll learn.
Introduce yourself or your business.
Ask subscribers to add you to their address book. (This is called whitelisting and it can help more of your emails bypass the spam folder.)
Once you draft your welcome email, take some time to personalize it! Personalization makes your subscribers feel you’re writing a message specifically to them. Something as simple as including your subscriber’s first name in the subject line or body of your welcome email can boost opens and clicks. Homework: Read The One Email You Should Always Send and How Personalization Can Help You Connect with Subscribers.
Day 6: Publish your form on your social media channels. (20 minutes)
Your list is set up and your confirmation and welcome messages are ready to go. Now it’s time to put your hard work to the test and start to grow your list!
An easy first step is turning you social media followers into email subscribers. People who follow your brand on social media have already shown they want to hear from you. And there’s no better way for them to stay up to date on your latest content and sales than joining your email list.
Post a link to your hosted sign up form on Facebook, Twitter, and LinkedIn and ask your social followers to subscribe for exclusive updates.
Day 7: Share your sign up form with your connections. (20 minutes)
Reach out to the people you already know, like colleagues, friends, or family members. Ask them if they want to sign up for your email list.
Let them know what content you are offering and explain the benefits they would receive if they sign up.
If they say no, maybe the content you’re offering just isn’t for them. But maybe they know someone it would be perfect for. You never know until you ask!
To do: Contact 5 people you know. Send them the hosted URL to your sign up form and ask if they’d like to join your email list or share it with someone they know.
Ready, set, go!
Congrats! If you completed this 7-day challenge, you’re well on your way to launching a successful email marketing strategy.
Ready for your next challenge? Then try this: Create a lead magnet — a freebie you give subscribers when they sign up for your list. Lead magnets can increase the conversion rate of your sign up form.
For example, author and productivity expert Paula Rizzo offers a free List Making Starter Kit in return for signing up for her email newsletter, which she sends via AWeber.
NBC is the latest broadcaster to embrace major events as the best way to set itself apart from its growing number of streaming rivals, unveiling an aggressive slate of programming stretching into 2024. “Where do we fit into these so-called streaming wars? We are the ‘mainstreamer,'” NBC Entertainment chairman Paul Telegdy said today at the…
NBC is the latest broadcaster to embrace major events as the best way to set itself apart from its growing number of streaming rivals, unveiling an aggressive slate of programming stretching into 2024. “Where do we fit into these so-called streaming wars? We are the ‘mainstreamer,'” NBC Entertainment chairman Paul Telegdy said today at the…
NBC is the latest broadcaster to embrace major events as the best way to set itself apart from its growing number of streaming rivals, unveiling an aggressive slate of programming stretching into 2024. “Where do we fit into these so-called streaming wars? We are the ‘mainstreamer,'” NBC Entertainment chairman Paul Telegdy said today at the…