Steps To Financial Freedom

The steps to financial freedom are here. Visit our site if you want to be financially free and live a wealthy lifestyle

Day: January 2, 2020

Ubersuggest 7.0: The Ultimate Keyword Research Tool

Believe it or not, I’ve been working on Ubersuggest for
almost 3 years now.

I bought it on February 13, 2017, for $120,000 dollars as a test to see if I could get more traffic from a tool than traditional content marketing or SEO.

Since then the tool has come a long way, in which I’ve added tons of features that competitors charge $100 a month or even more for.

But I’ve finally got Ubersuggest to a point where I can start releasing features that my competition don’t even have.

So before, you head on over to Ubersuggest to work on your SEO,
make sure you read everything below because I’ve just changed up how you are
going do keyword research (in a good way).

On top of that, I’ve also released a few other features as well related to link data and traffic estimations.

Here’s what’s new:

More keyword data

The biggest problem I had with keyword research was how to find the right keyword.

Sure, there are metrics like CPC data, SEO difficulty, or even search volume, but assuming you find keywords with a high CPC, low SEO difficulty, and high search volume, it still doesn’t mean it is a good keyword to go after.

And there are a few reasons why…

  • Mobile searches aren’t worth as much – first off, if the keyword mainly gets searched from on mobile devices the conversion rate will be lower. It doesn’t mean mobile traffic is useless, it just typically means the keyword won’t be as valuable.
  • High search volume doesn’t guarantee lots of organic clicks – what happens if the keyword gets a ton of searches but no clicks? This sounds crazy, but it actually happens a lot. For example, when people search for “weather” in the United States, roughly 60% of the people don’t click any results.
  • Not all searchers are worth the same – some keywords get searched heavily by teenagers. Some keywords get searched heavily by people who are in their 30s or 40s. If the majority of the searches for a given keyword happen by a really young audience, chances are they won’t have a credit card and they won’t convert into a customer.

Because of all of this, I decided to change how the industry
does keyword research.

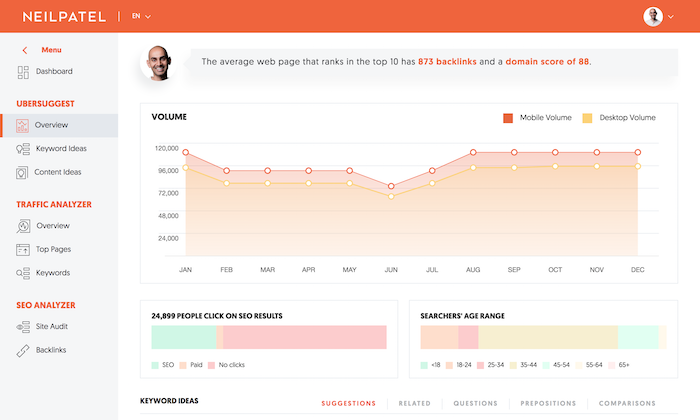
Now when you type in a keyword like “marketing” into
Ubersuggest, you’ll see this:

If you have been using Ubersuggest for the last year or so you may notice some differences… but if you haven’t let me break down what’s new.

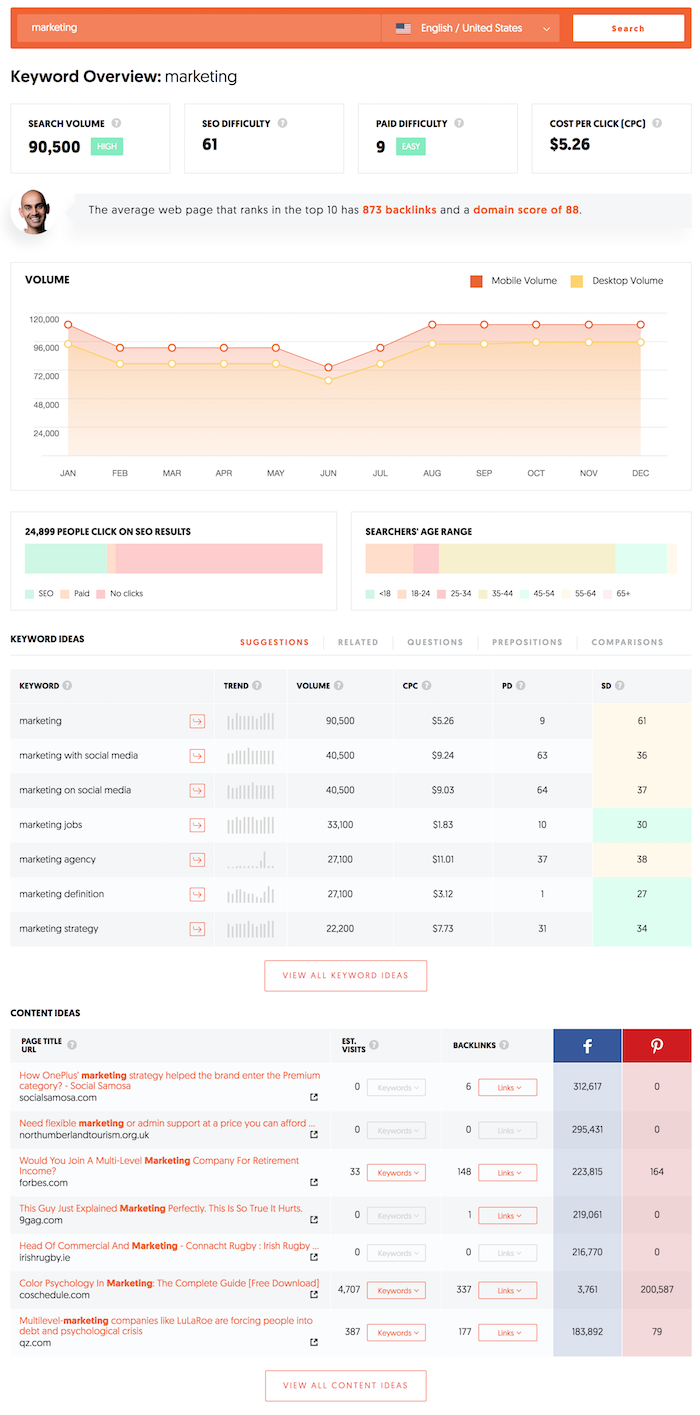
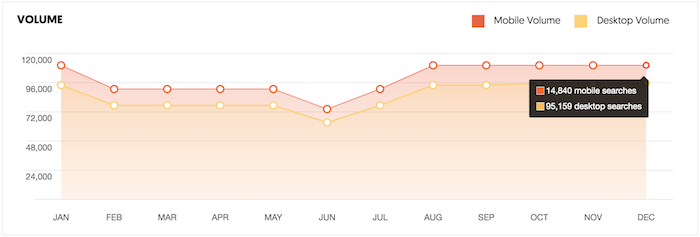
First off, for any given keyword you will see what percentage of the searches are taking place from mobile devices or desktop devices.

For example, with the term “marketing” you can see that the majority of the searches are coming from desktop devices.

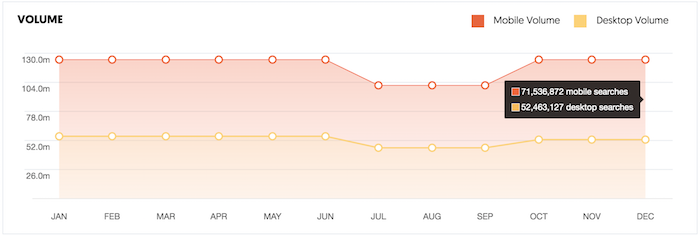
On the flip side, if you use Ubersuggest to look at the term “weather” you’ll notice that the majority of the searches happen on mobile devices.

And with any given keyword you can also see what percentage of the people even click on the SEO or paid results.

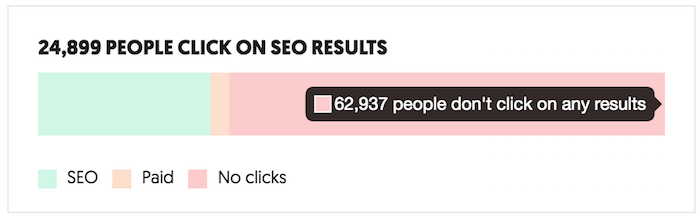
I love this bar chart because it tells me if I should even go after a specific keyword. Just because a term has tons of searches doesn’t mean you are going to get tons of clicks, even if you rank at the number 1 spot.

If you leverage paid ads, this bar chart is also helpful because it will give you a sense of how many people click on the paid ads as well.

Another chart that I’ve added is one that breaks down the age range of each searcher.

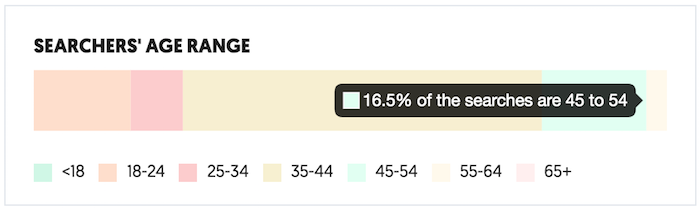
As you can see from the above image, Ubersuggest now shows what percentage of the searches take place between each age range.

This is really important if you know the persona of your ideal customer, as you only want to target keywords that your ideal buyer is searching for.

What’s also cool is this data is available for all countries
within Ubersuggest and for almost all of the keywords within our database.

Now before you head off to Ubersuggest and test it out, there are a few more features that I’ve just released.

More backlink data

Over the last few months, I’ve gotten feedback that our link database isn’t as big as you would like, so we have been working on fixing this.

First off, whenever you do a backlink search in Ubersuggest, you’ll start seeing stats on historical backlink data.

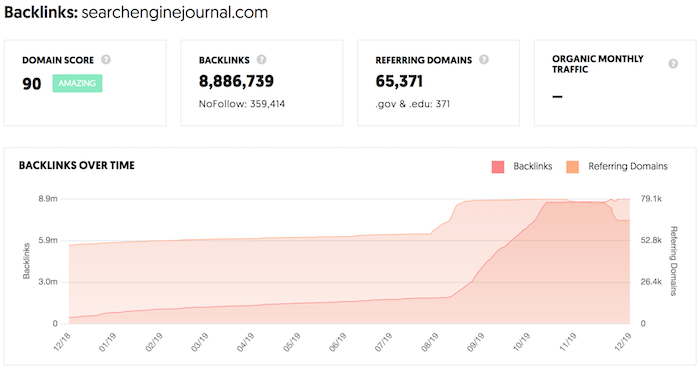
This chart will quickly show you if a site is growing in
backlink and referring domain count over time or if they are declining.

On top of that, we are even showing the daily new and lost link count for a given site.

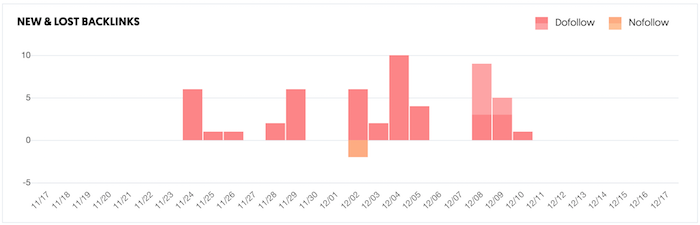
I know the new and lost link count chart looks a bit off,
but keep in mind we started having Ubersuggest crawl more pages around the web
faster and more frequently. Hence you are seeing a big spike in new and lost
links.

But over the next 4 weeks, it should normalize, and you’ll see an accurate representation of new and lost links.

This will help you identify new link opportunities more
easily. Especially because you can now clearly see where your competitors are
focusing their link building efforts.

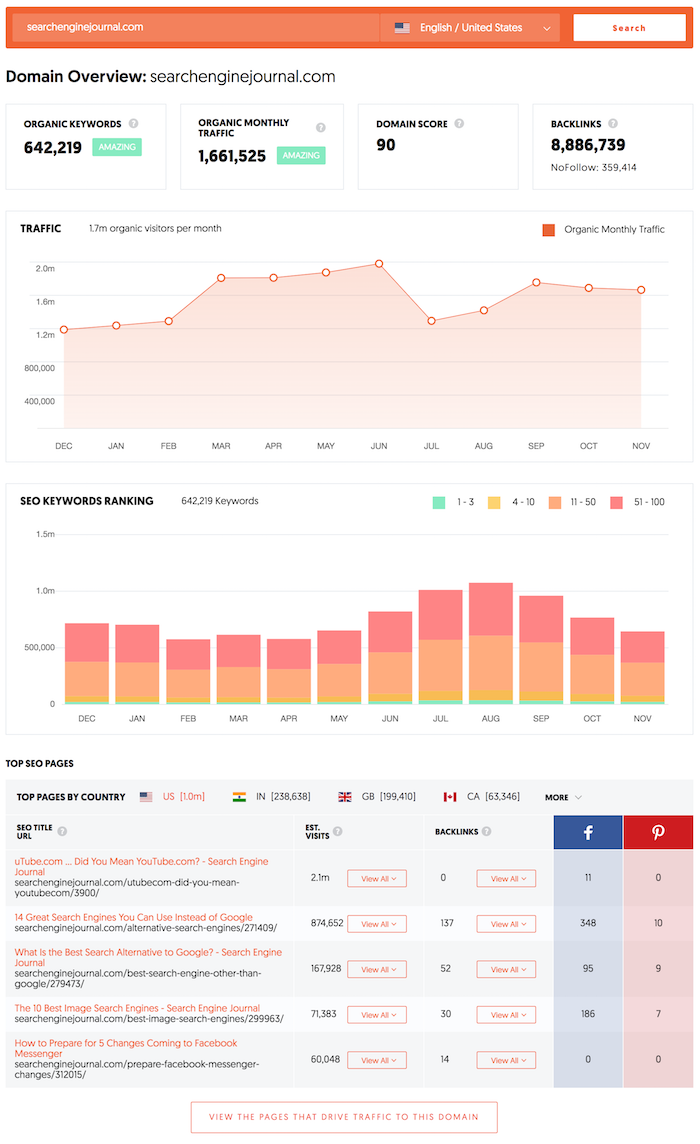
Better traffic estimations

Lastly in Ubersuggest, you can also enter in a URL and get data on any given domain.

From its estimated monthly search traffic to the number of keywords a domain ranks for to even its top pages based on link and traffic count.

We haven’t fully finished creating our new algorithm when it comes to traffic estimations, but the chart you’ll see now is much more accurate than the older one.

Even though this is a big improvement from our older charts, give it another 3 months and it should be extremely accurate.

When you are using the traffic analyzer report in Ubersuggest, keep in mind that this will give you a directional guide on how you are doing versus your competition.

Conclusion

I hope you enjoy the new changes to Ubersuggest.

I’ve made them in order to give you a leg up on your competition as the data in the tool is now something that most of you have never seen before.

And over the next two months, you’ll see some big launches in Ubersuggest. From a chrome extension to even more accurate traffic estimations to even an Alert system that will notify you when things are wrong with your site.

So, go to Ubersuggest and try out the new keyword features as well as traffic estimation and backlink features.

What do you think about the
new features?

The post Ubersuggest 7.0: The Ultimate Keyword Research Tool appeared first on Neil Patel.

The 7-Day Challenge to Jumpstart Your Email Marketing in 2020

Every year, 80% of new year’s resolutions fail by the time February rolls around. Launching your email marketing strategy shouldn’t be one of them.

That’s why we created a simple, 7-day challenge to help you dominate email marketing in 2020.

By the end of it, you’ll have launched the most important parts of a successful email marketing strategy. And the best part? You only need 30 minutes or less each day to complete this challenge.

(Don’t have an email marketing platform? You’ll need one. Set up a FREE email marketing account in AWeber.)

Day 1: Choose your email template and brand it. (30 minutes)

This step is often overlooked. Many people use different email templates every time they send an email. Or, they never fully customize a template to match their brand.

But branding an email template and using it consistently are important. Your brand sets you apart from your competitors. It allows you to be unique and develop a personality for your business. It builds credibility and trust between you and your subscribers. Your subscribers can see your content and immediately tie it back to you.

Step 1: Choose your email template. Find an email template that works with your brand and your message. A plain template is often better than one already filled with colors and background images, because it’s easier to make it your own. Then, add your logo to the top or bottom of the email. (Inside AWeber, there are 8 NEW email templates you can easily customize to fit your branding. Choose the template format you’d like. Then drag and drop to add your images and build the layout you want.)

Step 2: Add your brand colors to your template. Don’t overdo it! Too many colors can be distracting. Try adding your brand colors in just a few places, like your call-to-action buttons, header image, or headlines.

For example, in the welcome email of AWeber’s FWD: Thinking newsletter, we incorporate our brand colors by using a header image with AWeber’s green and blue gradient and a call-to-action button with our brand’s shade of blue.

Homework: Watch this video on How to Design an Awesome Welcome Email.

To do: Choose an email template and add your logo and brand colors to it.

Day 2: Customize your confirmation message. (15 minutes)

A confirmed opt-in message is an email you send people immediately after they fill out your sign up form. It asks them to verify they want to subscribe to your emails by clicking a link or button in the message.

Confirmation messages are optional but strongly recommended. They serve as proof that your subscribers definitely want to be on your list. So internet service providers (like Gmail and Yahoo!) may deliver more of your messages to the inbox when you use confirmation messages. Plus, it prevents subscribers from signing up using fake email addresses.

To make your subscribers more likely to confirm their subscription, you can follow these common best practices for confirmed opt-in emails:

  1. Keep your content short.
  2. Explain the value your subscribers will receive by subscribing to your list.
  3. Tell them what they need to do to confirm.

Homework: Read Writing Confirmation and Welcome Emails People Love.

To do: Set up and customize the subject line and content of your confirmed opt-in email. (If you’re an AWeber customer, you can follow these directions to complete this step.)

Day 3: Create a sign up form. (30 minutes)

Sign up forms allow your subscribers to easily join your email list. You can promote your form by adding it to your website and sharing a hosted sign up form with your audience. Hosted sign up forms allow you to share your form anywhere, even if you don’t have a website.

Homework: Read 9 Inspiring Sign Up Form Ideas to Grow Your Email List.

To do: Write your sign up form copy and build your form using ideas from the homework post you just read.

Day 4: Write your welcome email (30 minutes)

A welcome email is the first message subscribers receive after joining your list and confirming their subscription. And it gets a lot of attention — on average, open rates are 4 times higher and click-through rates are 5 times higher than other emails, according to marketing research company Experian. You can take advantage of this above average engagement by crafting an excellent welcome email.

Your welcome email should:

  • Welcome subscribers to your email list.
  • Deliver the lead magnet you promised on your sign up form.
  • Explain what kind of content you’ll send subscribers, how often you’ll send it, and what they’ll learn.
  • Introduce yourself or your business.
  • Ask subscribers to add you to their address book. (This is called whitelisting and it can help more of your emails bypass the spam folder.)

Once you draft your welcome email, take some time to personalize it! Personalization makes your subscribers feel you’re writing a message specifically to them. Something as simple as including your subscriber’s first name in the subject line or body of your welcome email can boost opens and clicks.

Homework: Read The One Email You Should Always Send and How Personalization Can Help You Connect with Subscribers.

To do: Write and build a welcome message for your subscribers using AWeber’s Drag and Drop Email Builder.

Day 5: Automate your welcome email. (10 minutes)

You wrote your welcome email. Your next step? Automate it. That way, your subscribers will receive it immediately after they sign up for your list.

Simply create an automated series for new subscribers in your email marketing platform. Here’s how:

  1. Build a new automation series in your email marketing platform. Make sure it’s set up to send to every new subscriber.
  2. Paste your welcome email content into the template you chose on day 1.
  3. Add your welcome email to the series.
  4. Activate your series.

Your email marketing system does the rest!

Homework: Read Email Automation 101: How to Use Automation.

To do: Create a welcome series using AWeber’s automation platform Campaigns and add in your welcome email. (Here are step-by-step instructions for setting up your own welcome series in AWeber.)

Day 6: Publish your form on your social media channels. (20 minutes)

Your list is set up and your confirmation and welcome messages are ready to go. Now it’s time to put your hard work to the test and start to grow your list!

An easy first step is turning you social media followers into email subscribers. People who follow your brand on social media have already shown they want to hear from you. And there’s no better way for them to stay up to date on your latest content and sales than joining your email list.

Post a link to your hosted sign up form on Facebook, Twitter, and LinkedIn and ask your social followers to subscribe for exclusive updates.

Homework: Read 7 Expert Tricks to Grow Your Email List with Social Media.

To do: Add your sign up form to your Facebook profile and tweet out the hosted URL to your form.

Day 7: Share your sign up form with your connections. (20 minutes)

Reach out to the people you already know, like colleagues, friends, or family members. Ask them if they want to sign up for your email list.

Let them know what content you are offering and explain the benefits they would receive if they sign up.

If they say no, maybe the content you’re offering just isn’t for them. But maybe they know someone it would be perfect for. You never know until you ask!

Homework: Read How To Get Your First 50 Email Subscribers in Less Than 30 Days. Use the fill-in-the-blank copy template in this post to easily reach out to people.

To do: Contact 5 people you know. Send them the hosted URL to your sign up form and ask if they’d like to join your email list or share it with someone they know.

Ready, set, go!

Congrats! If you completed this 7-day challenge, you’re well on your way to launching a successful email marketing strategy.

Want more content like this? Subscribe to our FREE weekly email newsletter FWD: Thinking for email marketing tips from the pros.

Bonus challenge

Ready for your next challenge? Then try this: Create a lead magnet — a freebie you give subscribers when they sign up for your list. Lead magnets can increase the conversion rate of your sign up form.

For example, author and productivity expert Paula Rizzo offers a free List Making Starter Kit in return for signing up for her email newsletter, which she sends via AWeber.

Homework: Read How to Create a Lead Magnet in Less Than a Day.

To do: Build a lead magnet, add a link to it in your welcome email, and mention it on your sign up form.

The post The 7-Day Challenge to Jumpstart Your Email Marketing in 2020 appeared first on Email Marketing Tips.

How Brands Can Leverage Pinterest To Make Sales

Did you know:

Pinterest is such a key part of the buying journey for its users that over 90 percent of weekly active Pinners use Pinterest to make purchasing decisions.

Talk about buying power!

Not only are Pinterest users making purchase decisions on the platform, 83 percent say they are making purchases specifically based on the content they’ve seen from brands on Pinterest. 

Pinterest is no longer simply a place to save ideas and build dream boards. Instead, Pinterest has turned into the world’s largest visual discovery platform.

And there are a lot of opportunities for brands.

We had a chance to chat with the team over at Pinterest about some of their best practices for brands looking to increase sales. We’re excited to share those lessons with you!

Here’s what we learned…


How people are using Pinterest

According to one survey, “47 percent of social media users saw Pinterest as the platform for discovering and shopping for products—more than three times higher than those who cited Facebook or Instagram.” 

Seventy-seven percent of weekly Pinners have also discovered a new brand or product on Pinterest, and according to Pinterest, “people actually want to see content from brands while they’re on the platform–78 percent say it’s useful.”

Pinterest might not immediately come to mind as a platform to invest in for many brands, but it should.

Pinterest lives in a unique space on the internet where users are discovering content related to themselves and their aspirations rather than focusing on others, and this has turned it into a powerful platform for users to make purchasing decisions and discover new brands and products. 

Clearly, Pinterest is not one to be ignored when it comes to your marketing strategy. Here’s how you can use the platform to drive sales.

How to leverage Pinterest for sales: 5 tips from the Pinterest team

There are some really simple ways that you can start leveraging Pinterest to reach new audiences and optimize your pins and profile for sales. Some of these tips might be easy to implement immediately while others might play into later strategies, let’s dive in! 

1. Brand your pins 

A whopping 97 percent of top searches on Pinterest are unbranded, according to the Pinterest team. For brands, this presents an opportunity to stand out and gain brand recognition through the platform. 

Pinterest recommends adding a small logo in one of the four corners of your pin, this can be done really easily in a tool like Canva. You can play around with the design, of course, and add your logo wherever it feels best. In this example from Quip, they went with top centered to fit with the rest of the text on their image. 

2. Create mobile-first content 

As with most sites, mobile is extremely important on Pinterest. Eighty-five percent of Pinners are using the mobile app, so it’s important that your content appeals to them while they’re on their phones and appears properly in their feeds. If you’re linking back to your own content, it’s also important that the page that you’re sending users to is mobile friendly as well. 

A tip from Pinterest here is to tailor your font size to phone rendering to make sure your fonts are legible on small screens and to design for a vertical aspect ratio. The ideal dimensions are 600 pixels x 900 pixels. 

3. Create a similar look and feel 

Have you ever clicked on a beautiful image on Pinterest only to be taken to a website that looks nothing like the pin? I have, and it left me really confused.

According to Pinterest, the best practice is to make sure your pins and your website have a similar look and feel, and that doing this pays off. In an analysis from Pinterest, they found that “Pins that went to landing pages with similar imagery had a 13 percent higher online sales lift.”

This example from Ettitude is really great. The pin they are sharing fits seamlessly in a lot of home decor and design tags on Pinterest. 

And although their website uses different photos, it still has a similar feel to the pin.

4. Time your campaigns 

A big element to social media marketing and campaigns is timing. When are people online and when are people talking about the things you want to talk about? 

Luckily in the case of Pinterest, they release annual ‘Seasonal Insights,’ which helps take away some of the guesswork. A report that contains more than a dozen specific moments that take place throughout the year. 

For example, their 2019 report shared that users start sharing holiday content in June all the way through December and that content related to the Summer starts getting pinned at the beginning of February. 
They also have monthly trends reports. Here’s their latest for December 2019 trends on Pinterest, it shares specific trends like the search term ‘peach green tea’ is up 320 percent YoY! 

These are great free resources that you can leverage to start timing seasonal campaigns around when people are starting to make specific seasonal purchasing decisions. I would never have thought that people start looking at holiday content in June but that’s super-specific information that can go a long way to help with timely campaigns. 

5. Set up your shop 

One of the main ways for Pinterest to help generate sales is for the products you are selling to be easily available through Pinterest. Luckily, the platform makes this really easy for brands to set up and feature prominently on their profiles. 

Every Business profile on Pinterest has the ability for users to create a “shop” tab. 

The shop tab is just what it sounds like, a place where users can go to see all of the products your brand is selling. On the flip side, brands can leverage that tab to share pins that link directly to their sales pages for the specific product. 

Pinterest makes this whole process quite easy, they even have a method for importing new products through Pinterest Catalogs. All you have to do is have your data source approved and then as you add new products to your website, they get automagically added to Pinterest as well. 


We hope this guide helps you get started with or double down on your efforts with Pinterest. Let us know about your experience with Pinterest in the comments! 

If you want even more Pinterest resources, the Pinterest team has created a free Pinterest Academy with tons of lessons in there. 

How to Create a Voice Marketing Funnel With Alexa Flash Briefings

Looking for a unique way to increase your social media engagement? Have you considered gamifying an Alexa flash briefing? In this article, you’ll discover how to create a voice marketing funnel that increases social media reach and engagement. Using Voice Technology to Improve Social Media Engagement Voice technology is becoming increasingly prevalent with the explosion […]

The post How to Create a Voice Marketing Funnel With Alexa Flash Briefings appeared first on Social Media Marketing | Social Media Examiner.

The 7-Day Challenge to Jumpstart Your Email Marketing in 2020

Every year, 80% of new year’s resolutions fail by the time February rolls around. Launching your email marketing strategy shouldn’t be one of them.

That’s why we created a simple, 7-day challenge to help you dominate email marketing in 2020.

By the end of it, you’ll have launched the most important parts of a successful email marketing strategy. And the best part? You only need 30 minutes or less each day to complete this challenge.

(Don’t have an email marketing platform? You’ll need one. Set up a FREE email marketing account in AWeber.)

Day 1: Choose your email template and brand it. (30 minutes)

This step is often overlooked. Many people use different email templates every time they send an email. Or, they never fully customize a template to match their brand.

But branding an email template and using it consistently are important. Your brand sets you apart from your competitors. It allows you to be unique and develop a personality for your business. It builds credibility and trust between you and your subscribers. Your subscribers can see your content and immediately tie it back to you.

Step 1: Choose your email template. Find an email template that works with your brand and your message. A plain template is often better than one already filled with colors and background images, because it’s easier to make it your own. Then, add your logo to the top or bottom of the email. (Inside AWeber, there are 8 NEW email templates you can easily customize to fit your branding. Choose the template format you’d like. Then drag and drop to add your images and build the layout you want.)

Step 2: Add your brand colors to your template. Don’t overdo it! Too many colors can be distracting. Try adding your brand colors in just a few places, like your call-to-action buttons, header image, or headlines.

For example, in the welcome email of AWeber’s FWD: Thinking newsletter, we incorporate our brand colors by using a header image with AWeber’s green and blue gradient and a call-to-action button with our brand’s shade of blue.

Homework: Watch this video on How to Design an Awesome Welcome Email.

To do: Choose an email template and add your logo and brand colors to it.

Day 2: Customize your confirmation message. (15 minutes)

A confirmed opt-in message is an email you send people immediately after they fill out your sign up form. It asks them to verify they want to subscribe to your emails by clicking a link or button in the message.

Confirmation messages are optional but strongly recommended. They serve as proof that your subscribers definitely want to be on your list. So internet service providers (like Gmail and Yahoo!) may deliver more of your messages to the inbox when you use confirmation messages. Plus, it prevents subscribers from signing up using fake email addresses.

To make your subscribers more likely to confirm their subscription, you can follow these common best practices for confirmed opt-in emails:

  1. Keep your content short.
  2. Explain the value your subscribers will receive by subscribing to your list.
  3. Tell them what they need to do to confirm.

Homework: Read Writing Confirmation and Welcome Emails People Love.

To do: Set up and customize the subject line and content of your confirmed opt-in email. (If you’re an AWeber customer, you can follow these directions to complete this step.)

Day 3: Create a sign up form. (30 minutes)

Sign up forms allow your subscribers to easily join your email list. You can promote your form by adding it to your website and sharing a hosted sign up form with your audience. Hosted sign up forms allow you to share your form anywhere, even if you don’t have a website.

Homework: Read 9 Inspiring Sign Up Form Ideas to Grow Your Email List.

To do: Write your sign up form copy and build your form using ideas from the homework post you just read.

Day 4: Write your welcome email (30 minutes)

A welcome email is the first message subscribers receive after joining your list and confirming their subscription. And it gets a lot of attention — on average, open rates are 4 times higher and click-through rates are 5 times higher than other emails, according to marketing research company Experian. You can take advantage of this above average engagement by crafting an excellent welcome email.

Your welcome email should:

  • Welcome subscribers to your email list.
  • Deliver the lead magnet you promised on your sign up form.
  • Explain what kind of content you’ll send subscribers, how often you’ll send it, and what they’ll learn.
  • Introduce yourself or your business.
  • Ask subscribers to add you to their address book. (This is called whitelisting and it can help more of your emails bypass the spam folder.)

Once you draft your welcome email, take some time to personalize it! Personalization makes your subscribers feel you’re writing a message specifically to them. Something as simple as including your subscriber’s first name in the subject line or body of your welcome email can boost opens and clicks.

Homework: Read The One Email You Should Always Send and How Personalization Can Help You Connect with Subscribers.

To do: Write and build a welcome message for your subscribers using AWeber’s Drag and Drop Email Builder.

Day 5: Automate your welcome email. (10 minutes)

You wrote your welcome email. Your next step? Automate it. That way, your subscribers will receive it immediately after they sign up for your list.

Simply create an automated series for new subscribers in your email marketing platform. Here’s how:

  1. Build a new automation series in your email marketing platform. Make sure it’s set up to send to every new subscriber.
  2. Paste your welcome email content into the template you chose on day 1.
  3. Add your welcome email to the series.
  4. Activate your series.

Your email marketing system does the rest!

Homework: Read Email Automation 101: How to Use Automation.

To do: Create a welcome series using AWeber’s automation platform Campaigns and add in your welcome email. (Here are step-by-step instructions for setting up your own welcome series in AWeber.)

Day 6: Publish your form on your social media channels. (20 minutes)

Your list is set up and your confirmation and welcome messages are ready to go. Now it’s time to put your hard work to the test and start to grow your list!

An easy first step is turning you social media followers into email subscribers. People who follow your brand on social media have already shown they want to hear from you. And there’s no better way for them to stay up to date on your latest content and sales than joining your email list.

Post a link to your hosted sign up form on Facebook, Twitter, and LinkedIn and ask your social followers to subscribe for exclusive updates.

Homework: Read 7 Expert Tricks to Grow Your Email List with Social Media.

To do: Add your sign up form to your Facebook profile and tweet out the hosted URL to your form.

Day 7: Share your sign up form with your connections. (20 minutes)

Reach out to the people you already know, like colleagues, friends, or family members. Ask them if they want to sign up for your email list.

Let them know what content you are offering and explain the benefits they would receive if they sign up.

If they say no, maybe the content you’re offering just isn’t for them. But maybe they know someone it would be perfect for. You never know until you ask!

Homework: Read How To Get Your First 50 Email Subscribers in Less Than 30 Days. Use the fill-in-the-blank copy template in this post to easily reach out to people.

To do: Contact 5 people you know. Send them the hosted URL to your sign up form and ask if they’d like to join your email list or share it with someone they know.

Ready, set, go!

Congrats! If you completed this 7-day challenge, you’re well on your way to launching a successful email marketing strategy.

Want more content like this? Subscribe to our FREE weekly email newsletter FWD: Thinking for email marketing tips from the pros.

Bonus challenge

Ready for your next challenge? Then try this: Create a lead magnet — a freebie you give subscribers when they sign up for your list. Lead magnets can increase the conversion rate of your sign up form.

For example, author and productivity expert Paula Rizzo offers a free List Making Starter Kit in return for signing up for her email newsletter, which she sends via AWeber.

Homework: Read How to Create a Lead Magnet in Less Than a Day.

To do: Build a lead magnet, add a link to it in your welcome email, and mention it on your sign up form.

The post The 7-Day Challenge to Jumpstart Your Email Marketing in 2020 appeared first on Email Marketing Tips.