The Ultimate Guide to Google Docs
Everything Google touches seems to turn to gold.
Not only has the brand helped online businesses generate billions of dollars through its search engine, but it’s also — and continues to — branch out and create other products.
One of these products is Google Docs, a free word-processor and alternative to Microsoft Word that allows anyone to easily create and edit their own shareable document.
Google Docs is a behemoth. The tool is so multi-faceted and multi-functional; it’s easy to get overwhelmed when learning your way around. That’s why we wrote this guide — to teach you about how to use Google Docs to create awesome content and collaborate with your team. We’ll also tap into some tips and tricks that will make this process even easier.
What is Google Docs?
No software downloads. No payments. No specific browser or computer necessary. Is there really any product out there these days that is this simple to obtain and use?
The answer is yes.
Google Docs is a completely free, cross-platform (syncs documents across phones, tablets, and desktops) word processor that works both online and offline. All you need is a Google account, the same free account that you use for your G Suite or Gmail.
The cloud-based tool includes a clean layout and unique features for users, such as the ability to work, share, and collaborate from anywhere. The platform even automatically syncs and saves all of your work, so you don’t even have to worry about pressing Save.
With these features, it’s clear why millions of users prefer Google Docs over other word processors.
Google Docs vs. Microsoft Word
Let’s not forget about Microsoft Word, however. Microsoft Word been around longer than Google Docs and remains exceptionally popular today. Millions of individual users and companies still pay big money to use Word. So, how do Google Docs and Word compare?
For one, Google Docs is free with a Google account. Microsoft Word must be purchased as part of a Microsoft Office package, which includes other Microsoft products such as PowerPoint, Excel, and Outlook.
The Home and Business packages run from $69.99 (for an individual user at home) up to $150 (for an individual user at work) for an annual membership. Google Docs, on the other hand, allows you to collaborate with any number of people, anywhere in the world, for free.
Another differentiating factor is that, with Google Docs, all of your work is saved to the Cloud. That means you won’t lose your 20-page report … even if your laptop croaks. (Whew!) With Microsoft Word, your documents live on your computer; your coworkers can’t check them out unless you save and share them via email or the like.
Whether you choose Google Docs or Microsoft Word, it’s not difficult to sync the two. You can create a new Google Doc by simply uploading an existing Word file. Here’s how.
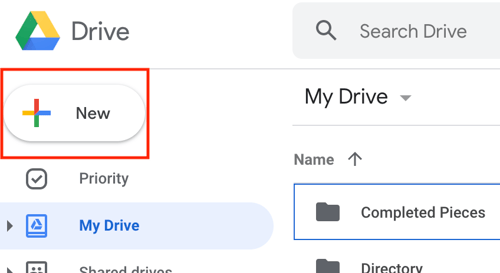
Open your Google Drive and click New.
Tap File upload to access the files saved on your computer.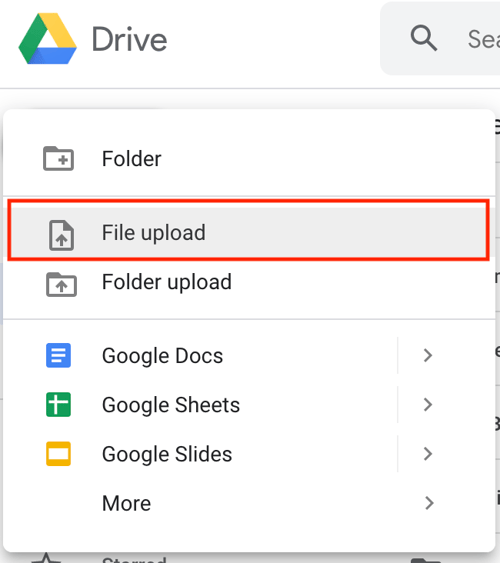
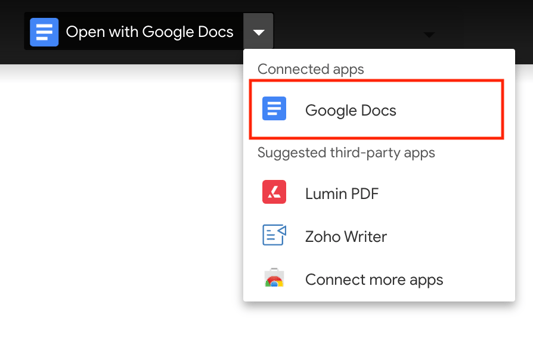
Choose your Word file from your computer and click Open. This will upload your file to your Google Drive. Once uploaded, double-click it to open. Once open, click Google Docs from the drop-down menu at the top.
Voila! That’s how you convert a Word doc to a Google Docs file. Now, let’s dig a bit deeper on how to use Google Docs.
There are a plethora of tips and tricks that users can take advantage of while using Google Docs — whether working as an individual or with a team.
Google Docs allows multiple people to work, collaborate, and edit within a single document in real-time through any web browser. Here’s how.
Sharing Your Google Doc
Individuals can share their document with as many people as they want, as well as edit their permissions to limit what they can do.
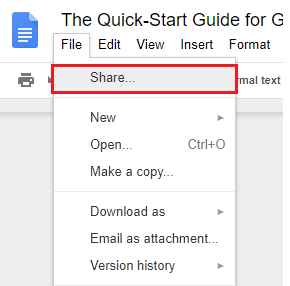
To get started sharing, click File > Share.
There are four sharing options — the one you pick is totally your choice.
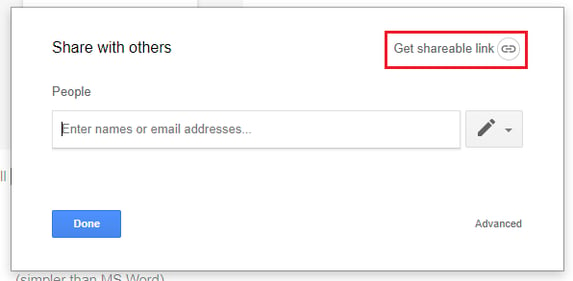
1. Create a shareable link.
The simplest way to share a Google Docs page is to generate a shareable link. This allows anyone to click a unique URL and view your document.
After clicking Share, tap the Get Shareable Link button in the top right corner.
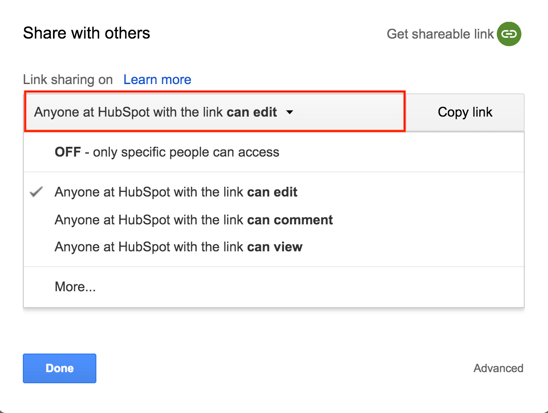
Select a sharing permission for your document.
 After defining permissions, press Copy link.
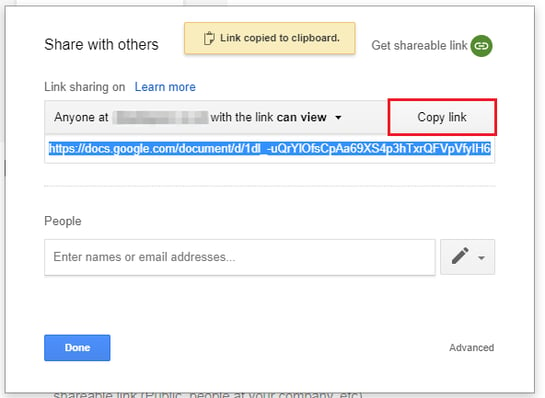
The URL will then be copied to your clipboard for you to send to anyone who wishes to view the document.
2. Share via email address.
You also have the option to share your document with an email address. This will send an invite to that person’s inbox, and add the document to their Google account.
To do this, head back to the sharing box.
Enter the email address of the person you’d like to share your document with and select an option from the drop-down to edit their permissions.
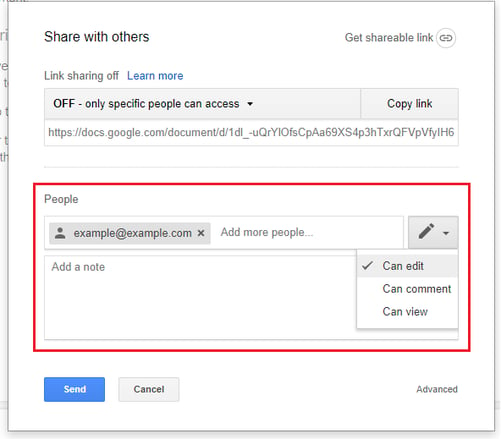
If you add a note to this invite, it will be displayed in the email invitation.
3. Choose the advanced sharing options.
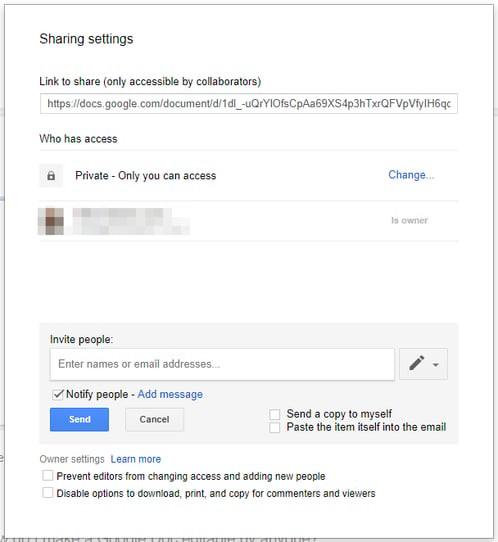
Head back to your sharing box and hit Advanced.
Here, you can see all sharing settings — including who has access to your document, their permission settings, and the option to invite more people or remove others.
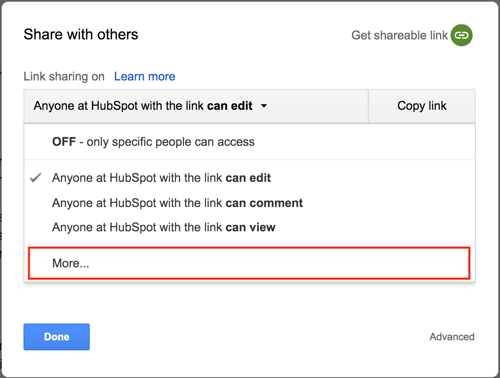
4. Make your document editable by anyone.
Want to grant anyone permission to edit the contents of your document? Hit File > Share to get your shareable link.

In the drop-down menu displayed, click More…
After that, choose On — Anyone with the link and set the permissions in the bottom drop-down menu.
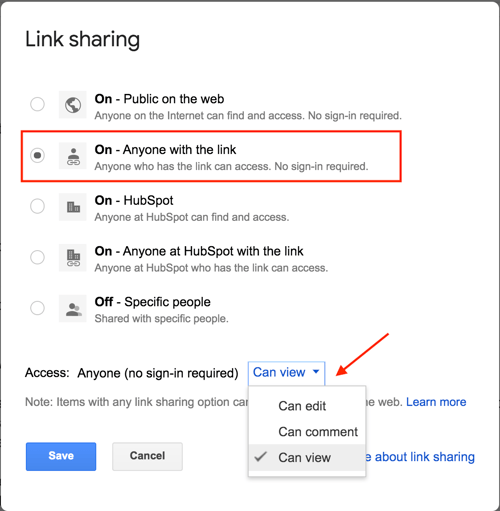
As this option clearly states, anyone with your unique URL will be able to make changes, edit, and even delete your document … so be careful about who you’re sharing it with.
Using Google Docs Shortcut Keys
There are a number of shortcut keys to help increase your productivity while working in Google Docs. Review the following chart to learn some of the most popular shortcuts.
| actions | mac shortcuts | pc shortcuts |
| Copy | ⌘ + c | Ctrl + c |
| Paste | ⌘ + v | Ctrl + v |
| Cut | ⌘ + x | Ctrl + x |
| Paste without formatting | ⌘ + Shift + v | Ctrl + Shift + v |
| Undo | ⌘ + z | Ctrl + z |
| Redo | ⌘ + Shift + z | Ctrl + Shift + z |
| Insert/edit link | ⌘ + k | Ctrl + k |
| Open link | Option + Enter | Alt + Enter |
| Show common keyboard shortcuts | ⌘ + / | Ctrl + / |
| Save (Google Drive automatically saves to Drive) | ⌘ + s | Ctrl + s |
| ⌘ + p | Ctrl + p | |
| Open | ⌘ + o | Ctrl + o |
| Find | ⌘ + f | Ctrl + f |
| Insert page break | ⌘ + Enter | Ctrl + Enter |
| Hide menus (compact mode) | Ctrl + Shift + f | Ctrl + Shift + f |
For a complete list of Mac, PC, Android, iPhone, and iPad shortcut keys, check out this page.
Creating and Writing in Google Docs
Which Google Docs features will help you and your team create powerful documents, no matter your location? Here are some options for you to try.
Work Offline
A bonus to using Google Docs is that you’re able to edit, save, and create documents through your web browser even when you’re not connected to the internet. This might come in handy if you need to get some work done while traveling. The changes you make are still saved and will sync when you go back online.
But, this isn’t an automatic feature. You’ll need to set-up offline connections in your account.
To do this, visit the Google Docs homepage and locate the menu button on the left-hand side.
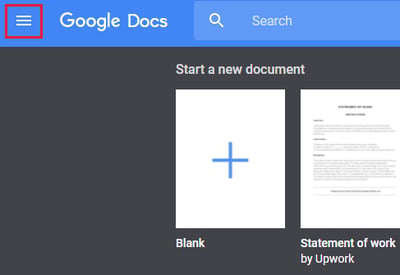
Then press Settings.
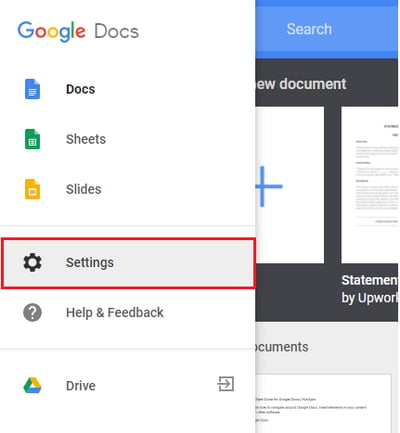
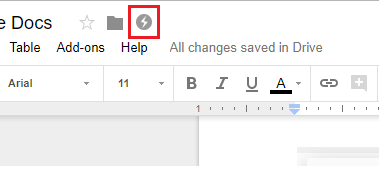
A pop-up box will then be visible on your screen. To set up offline editing, toggle the Offline button to On. (This should turn the button blue, rather than gray.)

Your browser will then adjust to offline editing and you’ll see the following icon when editing your document without internet.
Voice Typing
Voice technology is a growing industry, and Google has been at the forefront of this trend. You can speed up your writing process by using voice typing in Google Docs.
To use the feature, begin by checking your device settings to confirm that your microphone works.
Then head to Tools > Voice Typing. You’ll see a microphone icon.
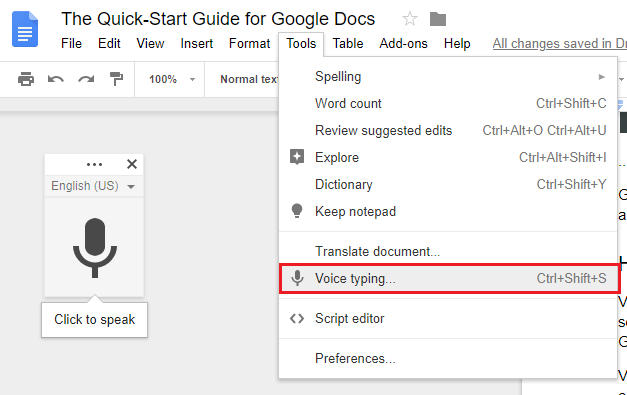
Click it and start speaking. Google will convert your spoken words into text, which you’ll see appear on the page.
Google Docs App
With the Google Docs app, users can continue to edit, share, collaborate in real-time, add images, and create content all while on-the-go.
The free app even works offline once you’ve turned on that setting — the same way you did on your laptop or desktop — and it automatically saves your work to the Cloud.
Explore
Have you ever been writing about a topic and stopped to think, “Wow, I could use a suggestion or two on how to improve my piece.”
Google Docs has you covered.
The Explore feature — found by clicking Tools > Explore — Google Docs will scan the content you provide and suggest information that you could add to your piece.

These suggestions might include details you may have forgotten, images to enhance your piece, or possible research that you could include to back your points and claims.
Formatting Your Document in Google Docs
Google Docs empowers you to create a document that works for you and the content you’re creating. Whether it’s the page orientation, images, or page numbers, these tips will help you format your document any way you want.
- Changing page margins
- Changing page orientation
- Adding a text box
- Adding page numbers
- Creating a hanging indent
- Inserting an image
- Creating a table of contents
Changing Page Margins
If you’re looking to make the most of the blank space in your document or format your document for printing, you might need to change the margins.
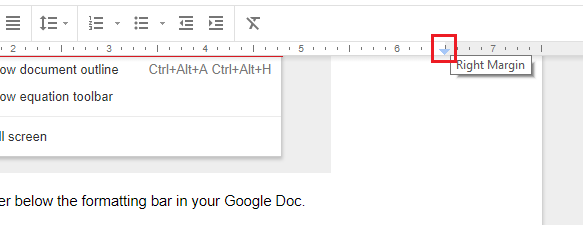
Before doing this, you’ll need to make sure the ruler is visible above your document.
Simply head to View > Show Ruler.

You should see a ruler below the formatting bar in your document.
Then, to change the margins of your page, locate the small blue button on the left-hand side of the ruler and slide the button to alter your left margin.
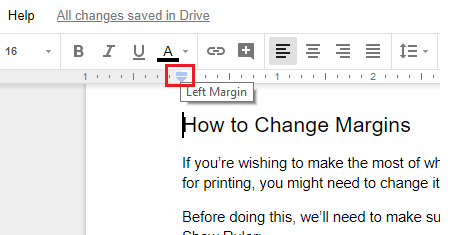
To change your right margin in Google Docs, repeat this process using the blue button on the right side of your ruler.
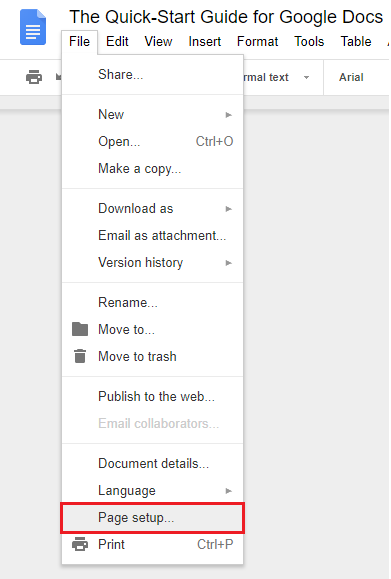
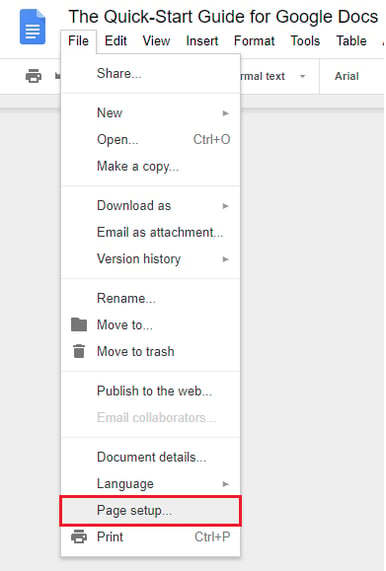
If you need strict margins in your document, click File > Page Setup.
You’ll then see the following pop-up box where you can change the margins.
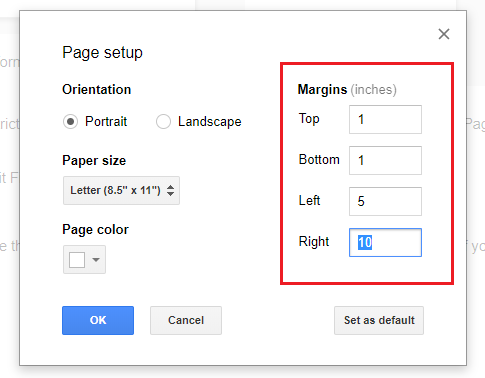
If you need the same margins in every document you create, save time and hit Set as Default. This will automatically copy your margin set-up to all new documents.
Changing Page Orientation to Landscape
Looking to change the orientation of your document? Head to File > Page Setup.
Then, select Landscape under Orientation.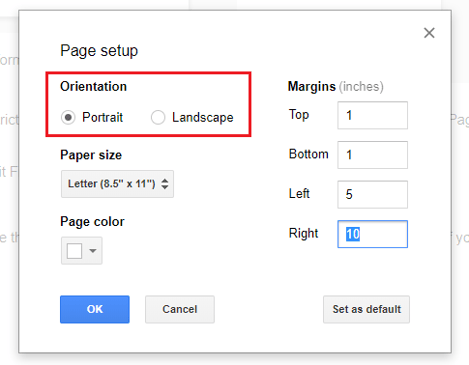
If you want all of your documents to have the same orientation, press Set as Default.
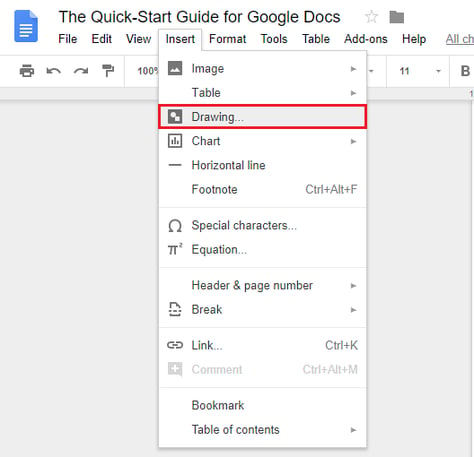
Adding a Text Box
Text boxes are a great option if you’re looking to add an extra visual element to your document. They allow you to position additional text anywhere on your page without altering the format of your existing document.
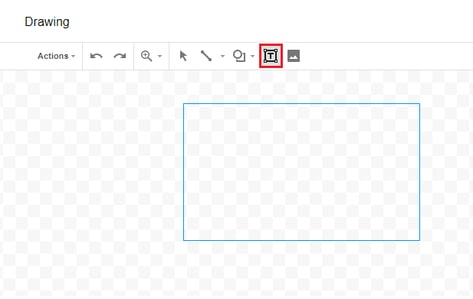
In Google Docs, text boxes are classified as drawings. You can insert one by clicking Insert > Drawing.
This will open the Drawing feature. Next, press Text Box.
Drag your cursor into the drawing space to create a box that fits your requirements
Once your box has been created, it’s time to enter your text.
You can change the font, color, and alignment of the text in your box by using the navigation bar in the pop-up window.
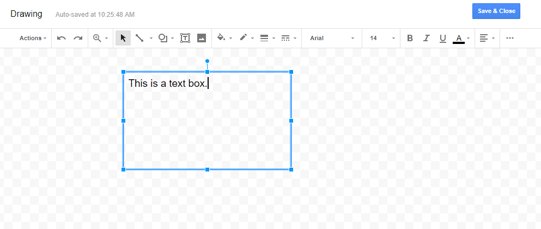
Happy with your text box? Hit Save & Close to insert it into your document.
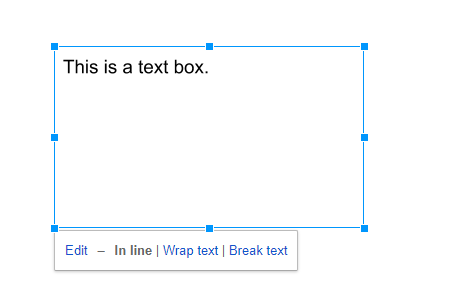
From here, treat your text box as an image. Select the image to change the alignment or move the box around your document for ideal placement.
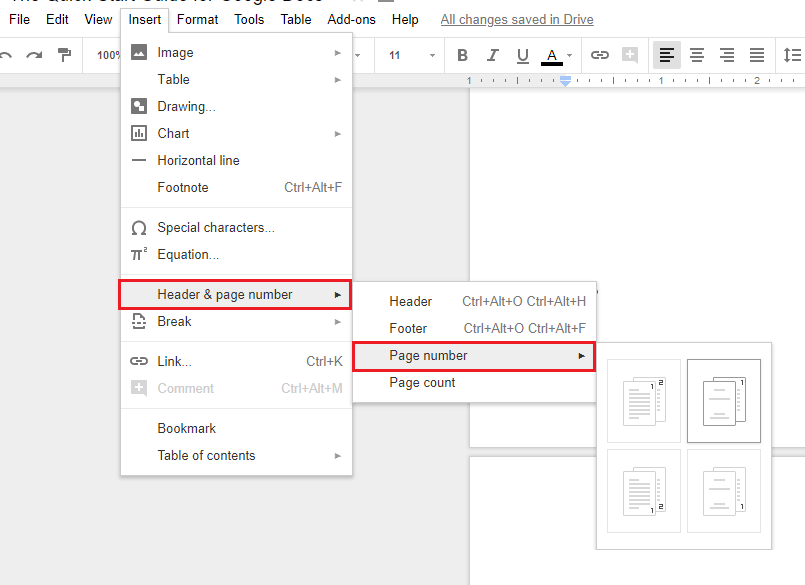
Adding Page Numbers
Page numbers make your document easy to navigate and allow for better organization when printed — you’ll avoid asking yourself, “Does this page go here … or there?”
Add page numbers to your document by clicking Insert > Header > Page Number. Then choose the option of your choice.
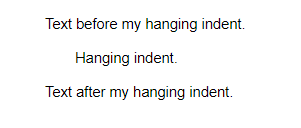
Creating a Hanging Indent
Hanging indents are indents that automatically change the margin of a paragraph without interrupting the format used elsewhere on your page.
Here’s an example:
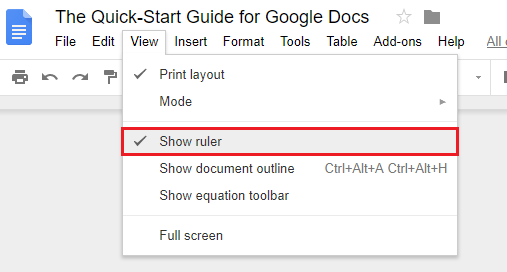
To add a hanging indent in Google Docs, make sure your ruler is visible by pressing View > Show Ruler.
Then, head back to your main document and highlight the text you want to format.
Add a hanging indent by locating the ruler above your document and sliding the blue arrows to your specification.
Slide the arrow on the left side to alter the left indent, and the arrow on the right side to change the right indent.

Inserting an Image
To add an image to your document, simply put your cursor wherever you want to insert the image.
Scroll up to the top of the page and click Insert > Image.
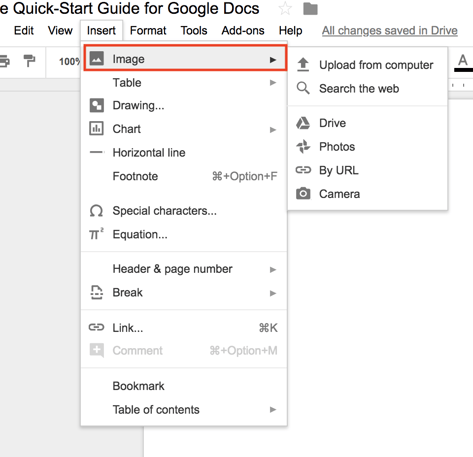
Choose the image location — there are multiple options that include your computer, the web, Google Drive, or by URL.
Select your image, click Open, and voila! Your image should appear.
For more on this process, check out this page.
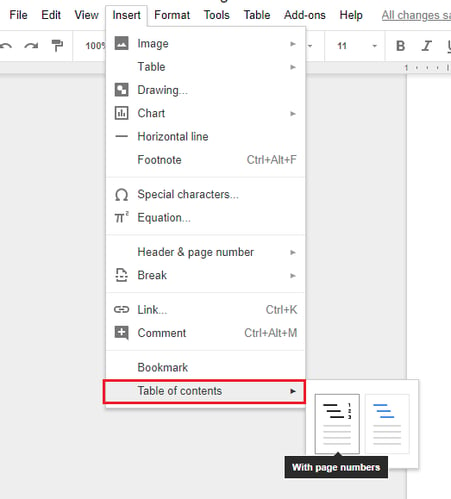
Creating a Table of Contents
If you’re writing a presentation or whitepaper, a table of contents is a great way to display each section you’re creating and the page number that it can be found on.
You can insert a table of contents in your Google Doc by ensuring all subheadings are formatted with a heading tag. To do this, highlight your subheading and press the appropriate tag in your formatting bar.
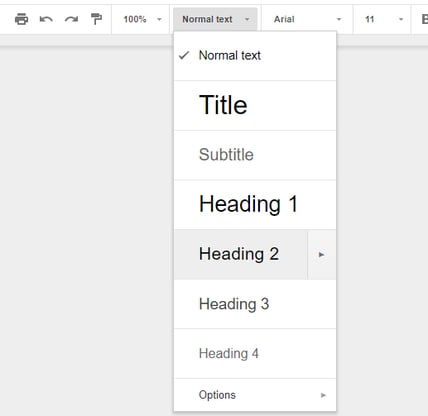
As a general rule of thumb, the Heading 1 tag should be your main title. Heading 2 tags should be subheadings, and Heading 3 tags should be sections below a subheading.
Now you’re ready to create a table of contents. Hold your cursor where you’d like to insert it and click Insert > Table of contents to choose an option based on your preference.
Editing Your Document in Google Docs
Google Docs offers a variety of editing features to ensure your work reaches full potential.
Tracking Changes
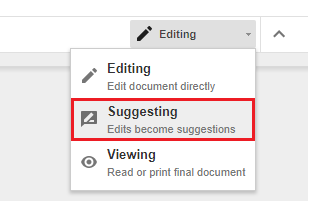
If you’re working with another person on your document, you can ask them to track their changes and edits. This will show you who made the edits, when they made those edits, and what the text was prior to their edits.
You can track changes in Google Docs by changing Editing to Suggesting in the top right-hand corner of the page.
Then, when someone edits your document, any changes will show up in a different color, with a box on the right-hand side to show their name, photo, and editing details.

You can then browse the tracked changes and accept or reject them as necessary.
Adding Comments
With Google Docs, you and your team can leave comments in any document for each other to view. These are often used as reminders to come back to a specific section, leave more detailed revision ideas, or add URLs to other sites and images for reference.
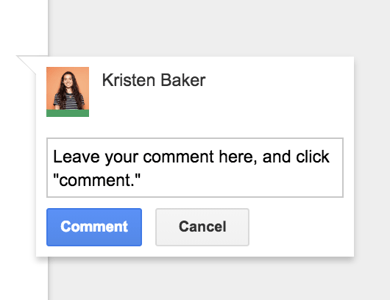
To do this highlight the word, sentence, or paragraph you want to comment on and click the Add Comment button (the text box with the plus sign inside).
You can then write a comment — or paste a URL — in the comment box. Click Comment when you are ready to post your box.
To edit the information in the box, click the three dots on the right and select Edit. You can also thread comments beneath the original comment by typing in the Reply box.
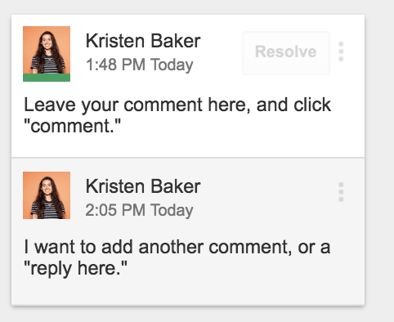
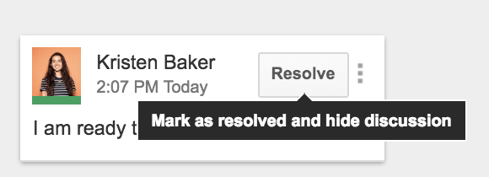
To get rid of a comment box you can either delete it or resolve the comment. Click the three dots on the right and select Delete to delete the box. Click Resolve in the top right of the box when the issue has been resolved and you no longer need the comment.
If you are looking for more in-depth information on adding and resolving comments in Google Docs, look at this page.
Finding Word Count
Have you ever struggled while writing a paper, report, or blog post because of a required word count that you were trying to reach?
Although reaching a required word count may not always be easy, Google Docs makes the count itself simple.
Once you’re in your document, click Tools > Word Count. (You can also use the shortcut ⌘ + Shift + c.)
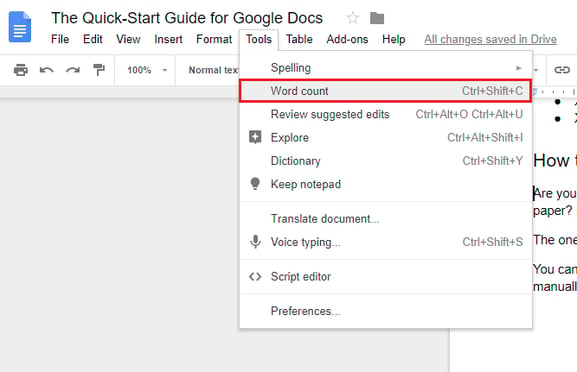
Google will then display the total number of words (along with the total number of pages, characters, and characters excluding spaces).
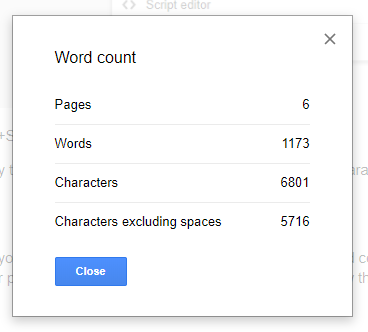
To count the words within a specific sentence, paragraph, or page, highlight the text you want to include and follow the same steps above.
Running Spell Check
It’s not uncommon even for professional writers to make an occasional spelling mistake. Google Docs can help all writers with this dilemma.
Run a spell check to locate and correct any errors you may have missed. Think of it as your personal proofreader or editor.
To run a spell check in Google Docs, click Tools > Spelling > Spell check.
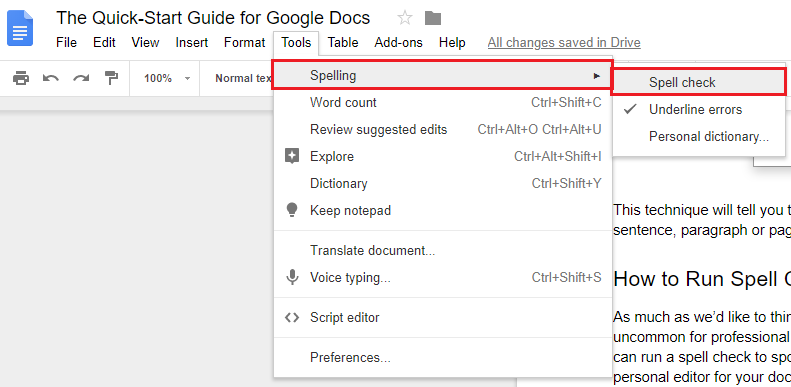
Google Docs will then scan your entire document for misspelled words and grammatical errors. You’ll be given the choice to accept or ignore Google’s suggestion.
If you find that you’re frequently using a word that Google doesn’t recognize, you can add it to your dictionary. This will prevent Google Docs from highlighting the word in future spell checks.
Adding a Strikethrough
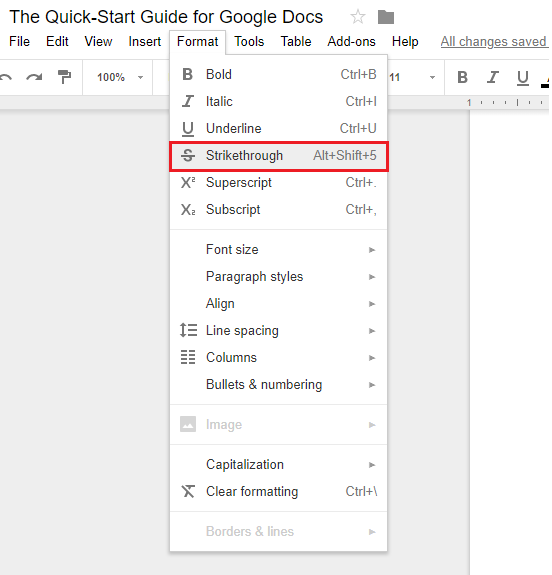
In Google Docs you can add a strikethrough by highlighting the text you want to strike and clicking Format > Strikethrough.
Using Google Docs Add-Ons
You can add third-party tools, or add-ons, to your documents. These add-ons contain unique features to help you improve your work in various ways.
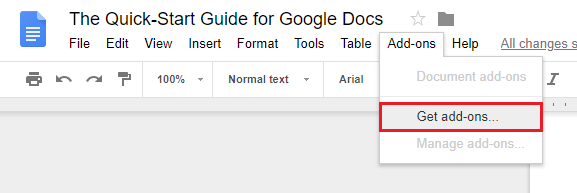
You can find these add-ons by clicking Add-ons > Get add-ons…
Here are a few popular add-ons you may find helpful.
Google Keep
Writing a document that needs supporting data? Install Google Keep to your browser to collect notes, case studies, and references you’re planning to cite. Then, use the add-on to pull them in as needed. You can also edit the notes you’ve saved with Google Keep.
Extensis Fonts
Consistent branding is important, but that can be tricky when you’re using unique fonts. The Extensis Fonts add-on imports thousands of fonts from the Google Fonts library into your document to enhance your piece’s overall aesthetic.
HelloSign
Writing a contract, agreement, or any other paperwork that requires a signature? The HelloSign add-on will help you collect electronic signatures in an easy and secure way.
Translate
Need a translator? Install the Translate add-on to easily translate your content into another language.
Lucidchart
The Lucidchart add-on allows you to add unique diagrams to your document that are easy to design and edit. It’s perfect for anyone working with data or looking for a fun way to display information.
Language Tool
Language Tool makes proofreading easy in over 20 languages. You won’t have to wonder about your spelling or grammar anymore. This add-on catches errors and mistakes no matter the language.
EasyBib
EasyBib is an automatic bibliography generator with over 7,000+ style options, including MLA, APA, and, Harvard-style.
Using Google Sheets and Google Forms with Google Docs
With Google Docs, it’s easy to integrate with other useful tools such as Google Sheets and Google Forms. If you create a spreadsheet or chart in Google Sheets, you can insert that information directly into Google Docs.
With Google Forms, you can create surveys that are automatically saved to your Google Drive for easy access and review from Google Docs.
Google Sheets
Google Sheets is a great option for anyone who needs to build any type of chart, list, plan, or spreadsheet. It is a spreadsheet generator — similar to Excel — and it’s free.
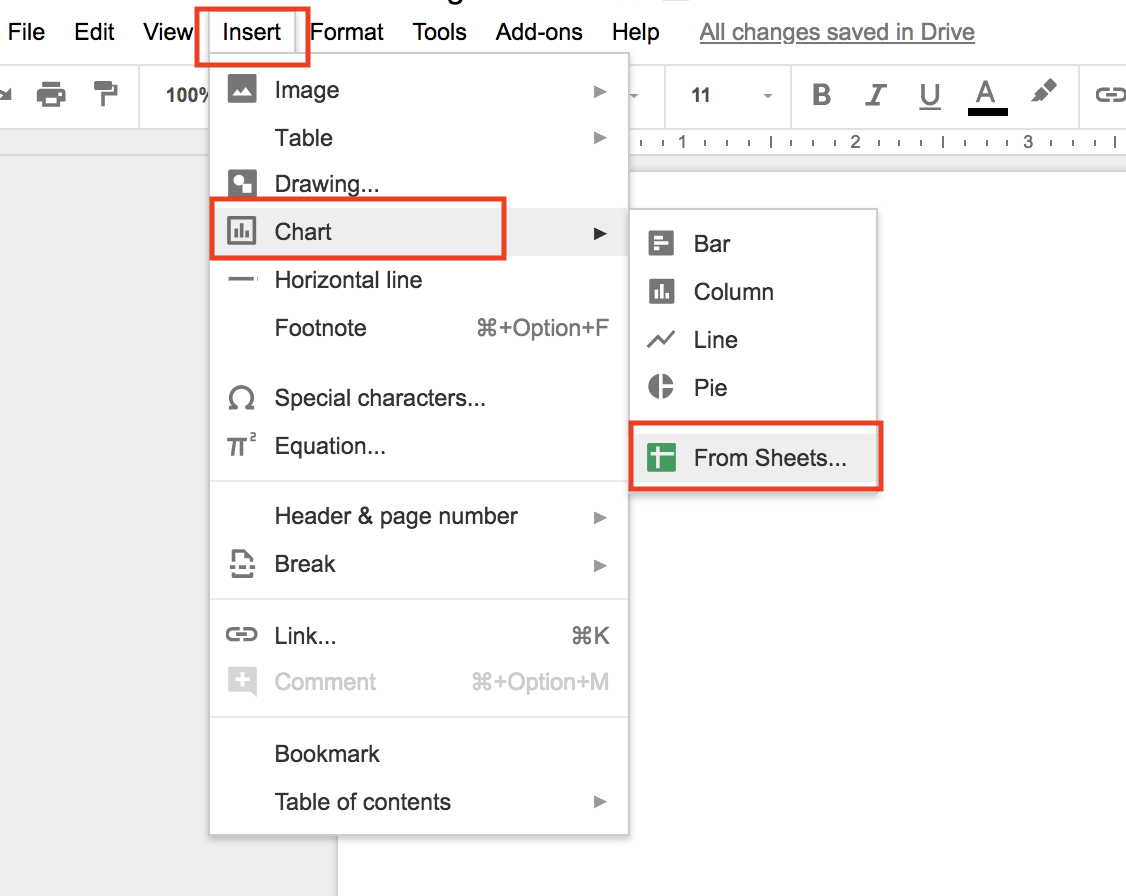
Once you’ve opened Google Sheets and created your chart, you can easily insert it into your document.
Do this by heading up to the toolbar and clicking Insert > Chart > From Sheets. You should be able to view and select the chart you want to add to your document.
Google Forms
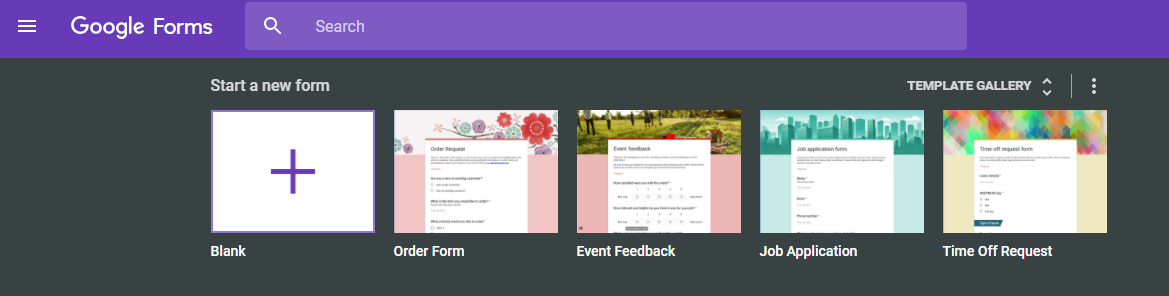
Google Forms is a great way to collect information and survey responses. Just go to the Google Forms site and begin creating your form or survey in a matter of seconds.
You and your team can collaborate and select a template from Google’s gallery — or create a unique template from scratch to style it to your taste.
Google Forms is also free to use and can integrate with software like Asana and HubSpot.
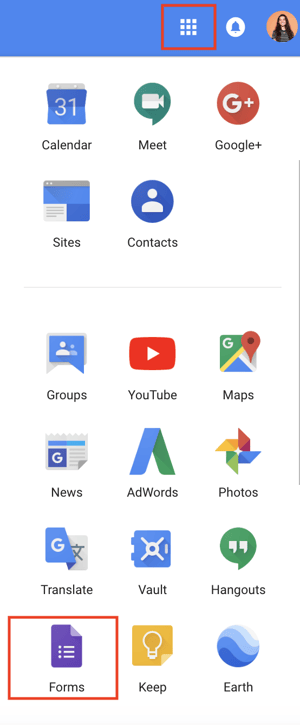
Additionally, all of your Google Forms documents and responses are automatically saved to your Google Drive so you can easily access them while in your Google Docs page.
To do this, click on the Apps icon when you open Google Docs. Scroll down to Forms to find the form or survey you want to open.
One last feature to note is that the people responding to your form or survey can do so on any type of device, making Google Forms a convenient option for everyone.
Get Started with Google Docs
Congratulations! You’re now a Google Docs pro. Whether you’re a marketer or CEO, these tips will allow you to take advantage of Google’s software and create incredible documents of any kind, no matter your professional background.
Google Docs gives you the ability to share your work with as many people as you want, whenever you want, making it a great tool for collaborative teams. It also keeps your life simple by automatically saving any changes to your document to the Cloud … meaning no more stress about losing your work. Lastly, you can work on your documents from anywhere — whether or not you have internet.
With all of these features, you can see why so many people have jumped on the Google Docs bandwagon. Plus, it’s free! Why not give it a try?
![]()


Editor’s note: This post was originally published in August 2018 and has been updated for comprehensiveness.